
Instructions / Assembly


9
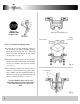
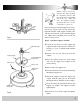
Fig. 13
Motor Housing
Pre-Installed
Screws to
Blade Arm
Close-Up of Blade Arm
Mounting
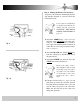
Fig. 14
(A) 4 Blade Pattern
(B) 5 Blade Pattern
(C) 4 or 5 Blade
Pattern
Remove the large screws in the face of the
motor. Discard any rubber blocks attached to
these screws. The rubber blocks are installed
at the factory to stabilize the motor during
shipment.
With some CONCORD fans, you have the
choice of using 4 or
5 blades (see figure 13-
C) or you may have purchased a fan with
ONLY 4 blades (see figure 13-A) or 5 blades
(see figure 13-B).
Select the correct mounting pattern and attach
each blade to the motor face using pre-
installed screws (see figure 14). Take care not
to bend the blade arms during installation.
This will cause your fan to wobble while run-
ning.
Step 7 Fan Blade Assembly Installation
On the 4 or 5 blade motors, the inside hole pat-
tern is for 4 blades and the outside hole pattern
is for 5 blades.
Try mounting the blades on opposing sides of the
motor face, This will help keep the fan more
level during blade installation.