
Instructions / Assembly


10
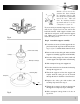
Fig. 12
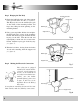
Fig. 13
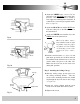
Fig. 14
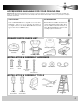
Attach each fan blade to a blade arm with three (3)
3/16” x 1/2” washer head screws and three (3) 3/16”
screw pads (see figure 12). DO NOT OVER
TIGHTEN THESE SCREWS.
Screws should be tightened until the screw pads
are compressed by the screw head. Hold the Blade
Arm decorative side down
and place the blade on
top with the flat side of the blade facing down.
Each screw is passed through the screw pad and
blade and screwed into the blade arm.
Make sure to review the mounting pattern (it should
be 5- hole-blade mounting pattern) and mounting
position for each blade (see figure 13).
Select the correct mounting pattern and attach
each blade to the motor face using pre-
installed screws (see figure 14). Take care not
to bend the blade arms during installation.
This will cause your fan to wobble while run-
ning.
Step 7 Blade to Motor Installation
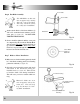
The ABS blades on this unit
have a support ridge running
down the center of the blade.
This ridge should be facing
the ceiling after installation.
Step 6 Fan Blade Assembly
Mount the blades one at a
time on opposite sides of the
motor face. This will help
keep the fan more level dur-
ing blade installation.
Screw Pads
Screw Pads
Blade Arm
5 Hole Blade
Pattern for
Blade Arm
Motor Housing
Pre-Installed Screws
to Blade Arm
Close-Up of Blade Arm
Mounting