
Instructions / Assembly


7
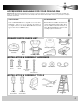
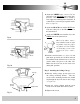
Fig. 4
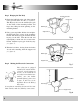
Fig. 5
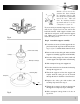
Loosen the set screws (2) in the support rod cou-
pler located on the top center of the motor hous-
ing (see figure 5) until the inside channel is clear.
Remove and save the safety pin on the end of the
support rod assembly (opposite end of half ball).
Place the ceiling canopy face down (small end)
over the support rod coupler on the motor housing.
Slide waterproof canopy onto support rod.
Feed the electrical wires from the fan housing
through the support rod.
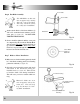
Thread the support rod into the support rod
coupler until the safety pin can be inserted
through the hole in both the rod and bracket.
Replace the safety pin with washer and
retaining clip removed in step 2.
Tighten the set screws (2) that you loosened on
the support rod coupler (in step 1) until tight.
Slide waterproof canopy down so it sits on
top of fan.
Step 2 Attach the support assembly
Pull the electric wires in the
junction box down through
the mounting bracket and
then bend them up and back
out of the way. This will
leave the mounting bracket
open and ready to receive the
ceiling fan (see figure 4).
If you are using an extended support rod, (longer
than the one supplied with your fan) remove the
half ball from the small support rod that came
with the fan and put it on the extended support
rod. Make sure to retighten the set screw and
insert the safety screw.
Downrod Assembly
Safety Pin
Waterproof Canopy
Retaining Clip
Set
Screws
Canopy