
Installation Instructions

2
frequent wetting is likely. In this case we recommend
the use of MAPEI Ultrabond G15 a fast-setting, two-part
reactive epoxy adhesive.
AD42 Clear Thin-Spread Tile Adhesive
Congoleum AD42 is a clear, thin-spread adhesive
designed for installing vinyl composition tile over
suspended wood, concrete on all grade levels, metal,
terrazzo, ceramic, marble, and approved resilient floor
covering installed over on and above-grade levels.
Congoleum AD42 adhesive must be applied with the
recommended trowel U-notch size, 1/16” wide, 1/32”
deep, 1/32” apart and allowed to dry completely to a
tack before installing the tiles.
Precautions
The use of the correct adhesive and proper application
is critical for a quality, trouble-free installation.
Excessive amounts of adhesive will result in telegraphing
or exudation (oozing) between the tile in service
depending upon the type of adhesive used; whereas,
insufficient coverage, caused by spreading too thin or
using worn trowels, will prevent proper adhesion of the
tile.
Some concrete floors are excessively porous and
absorptive. Premature set-up of the adhesives is first-
hand evidence of excessive absorption (i.e., when
adhesive sets up in less open time than specified on the
label). This condition can be corrected by priming the
subfloor with the required adhesive (using a
straightedge steel trowel for application of the
adhesive). The prime coat should be as thin as possible.
ROOM LAYOUT
IMPORTANT: Avoid positioning tile joints directly over
underlayment joints or seams in the old floor covering.
There are two basic tile layouts: square and diagonal.
Two or more colors from the same or coordinating
product lines can also be mixed or matched to create
decorative borders and special effects.
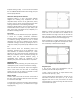
Square Layout
• Place a mark in the center of the floor at each end of
the room. Snap a chalk line down the center of the floor
to connect the marks (AB).
• Find the center of the line and snap a second chalk line
at a right angle using the 3', 4', 5' method to form a right
angle (Figure 1).
Figure 1: Square Layout
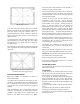
Measure or make a dry layout of loose tiles along the
chalk lines to one end wall and one sidewall. If the
distance between the edge of the last full tile and the
wall is less than a half tile, establish a new center line(s)
one-half the dimension of a full tile away (Figure 2).
When installing tile in irregular shaped rooms, check the
size of the last tile along all walls and adjust the center
lines if necessary to achieve the best layout.
Figure 2: Adjust the center line(s).
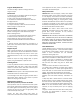
Diagonal Layout
• Lay out the center and perpendicular lines as
previously covered under Square Layout.
• Place a mark on each line, an equal distance away
from the center point (E, F, G, H).
• Using a slightly larger measurement, swing an arc on
both sides of each line from points E, F, G, H. Snap
diagonal chalk lines at the point where the marks
intersect (Figure 3). If done correctly, the chalk lines will
intersect the center point.