
Installation Instructions

3
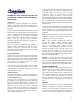
Figure 3: Diagonal layout
If the layout includes a border, adjust the size of the
border to allow whole tiles to be used at the edge of the
field tiles. When using two different colors, i.e.
checkerboard design, it will be necessary to adjust the
layout to allow the same colored tile to be used at the
edge of the field.
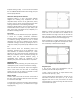
To adjust the layout, snap new diagonal chalk lines one-
half the distance of a full tile away from the original
lines (Figure 4). It may also be necessary to adjust the
size of the border.
The chalk lines on both square and diagonal layouts will
serve as guidelines for positioning the tile and adhesive
application.
Figure 4: Adjust the layout to allow the same
colored tile to be used at edge of the field.
INSTALLATION PROCEDURES
Prepare the subfloor and determine the layout as
previously described.
The adhesive can be spread over one-half of the floor
provided it can be covered with tile in approximately 6
hours. Periodically check trowel for wear, particularly on
concrete floors. Worn trowels should be re-notched or
replaced.
Allow the adhesive to dry to a tack before starting to
install tile. The adhesive is dry when beige color has
changed to light beige and the adhesive does not
transfer to the finger when pressed into it lightly.
Drying time varies with temperature and humidity. A
typical set-up time is 45-60 minutes.
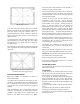
Tiles should be laid starting at the center of the room,
working towards the wall. The border tiles should be
scribed to the wall, cut and fitted in place after the field
tiles have been installed.
Carefully set the first tile into the adhesive at the
intersection of the chalk lines. The tile will bond
instantly on contact so it must be positioned accurately
without sliding it into position. Continue setting the
tiles in a stair-step pattern along the center and
perpendicular lines. Hold the tile in a low angle to
ensure tight fitting joints. Position each tile tightly
against the edges of the previously installed tiles before
pressing down firmly. Continue working toward the
walls to complete the area. Check to make sure corners
are lined up and adjust if necessary to prevent run-out.
Spread the adhesive on the second half of the floor so it
can dry while you are cutting and fitting the last row of
tiles along the wall. Complete the second half of the
room following the same procedures.
Immediately upon completion, roll the entire floor in
both directions with a minimum 100-pound, three-
section roller.
Remove any adhesive that gets on the face of the tile
with a clean, white cloth dampened with mineral spirits.
CAUTION: Mineral spirits is extremely flammable. Read
and follow cautions on container label.
Reroll the entire floor after one to two hours.
Do not wash or apply polish to the floor for a minimum
of 72 hours after installation.
CUTTING AND FITTING
The last row of tiles will need to be cut to fit to walls and
other vertical surfaces.
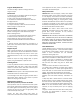
Straight Walls
1. Place tile to be cut, hereafter called Tile A, precisely
over the tile in the row closest to the wall. Make sure
the tile pattern is running in the right direction.
2. Lay another tile, hereafter called Tile B, tight against
the wall and directly over Tile A. Allow a 1/8” space for
expansion, between the edge of the tile and the walls
and other vertical surfaces when a base molding is going
to be installed.
3. Using the edge of Tile B, as a guide, mark Tile A with a
pencil.
4. Cut the tile along the pencil line with a utility knife
and flex the tile downward to break off the excess.
5. Place the tile into position with the cut edge along the
wall and press firmly.