
Installation Instructions
4
Irregular Walls/Obstacles
Use direct scribing or pattern scribing to fit tile to
irregular shapes.
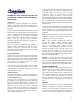
Direct Scribe
1. Place tile to be cut, hereafter called Tile A, along the
wall, overlapping the last whole tile.
2. Place a mark along the back edge of Tile A.
3. Set dividers to the distance between the mark and
the edge of the tile.
4. Reposition the tile and scribe.
5. It may be necessary to heat the tile from the back
before cutting it on intricate cuts.
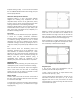
Pattern Scribing
TIP: Cover adhesive with wax paper to avoid adhesive
transfer if scribing felt is used. Remove wax paper
before installing the tile.
1. Cut a piece of scribing felt the exact size of the tile.
2. Position the felt in the area to be fit and trim
approximately 1/4" (6.4 mm) short of the walls.
3. Scribe the felt with dividers and extend reference
lines.
4. Remove the felt and reposition it accurately on a
piece of tile. Transcribe the marks. Heat the back of the
tile before cutting.
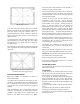
Diagonal Layout
Make a square template out of rigid sheet flooring or
other rigid material. Use the exact dimensions of the tile
when measured diagonally from corner to corner. (The
diagonal dimension of a 12" x 12" tile is approximately
17".)
Follow the steps for fitting straight walls on square
layouts, using the templates in place of Tile B.
Finishing the Job
• Clean any adhesive smears on the face of the flooring
immediately while wet with a clean cloth and dilute
solution of neutral cleaner and water. Mineral spirits
can be used to remove dried adhesive.
CAUTION: Mineral spirits is extremely flammable. Read
and follow cautions on container label.
• Seal the edge of the floor along the perimeter with a
high quality acrylic caulking in wet areas to prevent
water from seeping under the floor.
Maintenance Procedures
Alternatives, Choices, CX Series and Profile
These products must be maintained with floor polish
and a regular maintenance schedule to seal and protect
the surface against soil and staining. Prior to use, apply a
minimum of three to five coats of high quality metal
cross-linked acrylic floor polish.
Protect the floor with heavy Kraft paper on
construction sites where other trades are active and the
initial application of floor polish is prohibited. Do not
use asphalt-saturated felt paper.
Safety Information
CAUTION: Wet floors are slippery. Water, other liquids
and foreign matter on the surface of the floor can cause
it to be slippery and should be removed immediately.
Improper waxes and finishes can also cause slipperiness.
Whenever washing, waxing or stripping floors, traffic
should be excluded from the area due to the possibility
of slipping and signage to warn against a slip hazard
should be prominently placed. The use of walk-off mats
at entrances will reduce tracked-in water.
WARNING: An electric shock hazard exists when
performing maintenance with a floor machine. Use a
ground fault circuit interrupter for any electrical
connection in a wet environment.
CAUTION: DO NOT DRY BUFF, SPRAY BUFF, OR BURNISH
VINYL COMPOSITION (WITH OR WITHOUT ASBESTOS)
OR ASPHALT FLOOR TILE WITHOUT PRIOR APPLICATION
OF A METAL CROSS-LINKED ACRYLIC POLISH WHICH IS
RESISTANT TO NEUTRAL CLEANERS. DO NOT DRY STRIP
UNDER ANY CONDITIONS.
Initial Maintenance
• Allow adhesive to dry a minimum of 72 hours before
washing or waxing the floor. Initial maintenance MUST
be performed on Alternatives, Choices, CX Series and
Profile. If these instructions are not followed,
permanent staining may occur.
• Protect the floor from rolling or static loads for at least
48 hours after installation to allow adhesive to set firm.
• Always use strips of hardwood or plywood when
moving heavy objects such as furniture or equipment
over the floor even when using carts or dollies with
wheels.
• Sweep or vacuum the floor to remove loose dirt.
• If needed, after installation use lighter fluid, rubbing
alcohol, paint thinner or mineral spirit applied with a
clean white cloth to remove scuffs marks and adhesive
residue. Keep traffic off treated area for 30 minutes.
Caution: Lighter fluid and other solvents are flammable.
Carefully read and follow cautionary information on
label.
• Damp-mop with a dilute solution of neutral cleaner
No-Rinse Cleaner or other suitable resilient floor cleaner
and rinse the floor with clean water. Avoid flooding the
floor. Be sure it is thoroughly dry before applying polish.
NOTE: If the floor becomes heavily soiled it may be
necessary to strip the factory finish prior to applying
polish.
• Apply a minimum of three to five coats of floor polish.
Five coats are recommended in medium to heavy
commercial applications.