
Installation Instructions


Setting Floor Tiles
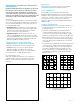
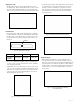
• Carefully position the rst tile into the adhesive at the intersection of
the chalk lines (Fig. 10). The tile will bond instantly on contact so it must
be positioned accurately without sliding it. Press the tile firmly into the
adhesive. Follow the procedures below for grouted and ungrouted floors.
Grouted Floors
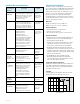
• The desired grout line width should be determined prior to starting the
ooring installation. It is important to understand that the nished grout
line will be 1/16" to 3/32" wider than the space between the tiles, since
the grout will extend onto part of the radius along the top edge of the
tile (Fig. 11).
• Use spacers to maintain the joint width. Small pieces of DuraCeramic
or 1/8" tile, cut into 1" squares, work very well as spacers, depending
on the desired grout line width.
• If standard tile spacers are used, it will be necessary to remove one leg
of the spacer (Fig. 12) otherwise it will interfere with positioning the tile.
Stand spacers on end. Do not place tile spacers flat at the intersection
of tiles; they can become bonded, making it difficult to remove them
without damaging the edge of the tile.
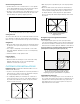
• Position two spacers along the edge of adjacent tiles, then lay the next
tile gently against the spacers without forcing it into place (Fig. 13).
Continue to set the tiles in straight rows to complete each section
(Fig. 14). Follow the chalk lines to keep the joints straight and make
minor adjustments if necessary. Remove the spacers immediately
after setting each tile.
Ungrouted Floors
• When installing an ungrouted oor, continue setting the tiles in a
stair-step pattern along the center and perpendicular lines (Fig. 15).
Hold the tile in a low angle to the oor and position it tightly against the
previously laid tile. Press it rmly into the adhesive. Continue working
toward the walls to complete the first quadrant before starting the next.
Check to make sure corners are lined up and adjust if necessary to
prevent run-out.
Fig. 12 - Use spacers with one leg removed.
Fig. 15 - Install ungrouted floors following
a stair-step pattern.
9
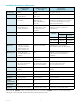
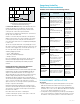
Spacer Size 1/8" 3/16" 1/4"
Actual Grout
3/16" to 7/32" 1/4" to 9/32" 5/16 to 11/32"
Line Width
Fig. 11 - The nished grout line width is wider
than the space between the tiles.
GROUT
Fig. 10 - Positioning tiles.
Fig. 13 - Position spacers before setting the tile.
Fig. 14 - Set tile in straight rows.
May 2015