
Owner's manual

REXA INST
Con-Tech Lighting REXA Series Adjustable Recessed or Surface Mount LED Edge-Lit Exit Sign with Battery Back-Up
www.con-techlighting.com
All specifications subject to change without notice.
1-847-559-5500 This document can be recycled.
INSTALLATION INSTRUCTIONS:
The unit can be installed on any surface, you may rotate the Exit panel in any angle from 0 - 180°. Secure Exit panel angle using the locking screws.
Recessed Mounting: Ceiling/Wall
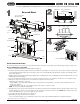
1. Refer to assembly drawing before starting installation. (Figure 1)
2. Position metal housing and bar hangers between joists. Make sure bar hangers are oriented in the correct position. Position metal housing
temporarily by hammering “nail-in” tabs on bar hangers, then secure permanently with nails. Bar hangers should be level with the bottom
of the joists. (Figure 2)
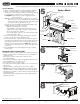
3. Adjust height of metal housing vertically using adjusting slots and tightening all screws on adjusting slots and bar hanger bracket to secure
adjusting bracket and bar hanger.
4.
Connect test switch and LED indicator cables via connectors. (Figure 1) You must connect battery connectors before connecting AC power.
5. Make proper electrical connections at recessed metal box or at junction box in the ceiling:
- Make the proper supply wire connections.
- If using 120VAC, connect the black and white wires to the supply wires. If using 277VAC, connect the orange and white wires to the
supply wires. (Figure 3)
- Cap off unused wires. In all cases, use standard approved wire nuts for connection of wires.
NOTE: You may use holding wire during wiring.
6. Determine direction for chevron (arrow) placement. Peel adhesive chevron(s) from backing liner and place into the marked position on the
template. Firmly press chevron corners and edges, then peel template off and leave chevron in place. NOTE: When Chevron(s) are being
taped on the EXIT panel, you can not use it again once it is removed.
7. Secure trim plate by using provided screws. (Figure 4)
8. Allow battery to charge for 24 hours before first use.
For recessed wall mounting, you may follow all procedures above, then rotate the EXIT panel 90º after securing the trim plate.
Recessed Back Box
(Metal Housing)
Bar Hangers
Spring Bracket
Main Backup Circuit
For AC
Power
Junction
Box
End Cap
Main Housing
Rotation Housing
Chevron
EXIT Panel
Chevron Template
Trim
Plate
Screw
Recessed Back Box
(Metal Housing)
Adjusting Slots
Bar Hangers
Tighten Screws After Positioning
Green
Orange
White
Black
Ground
Wire
277VAC
Input
120VAC
Input
Recessed Ceiling Mount
Recessed Wall Mount
Recessed Mount