
Owner's manual

Surface Mounting
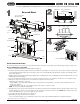
1. Refer to assembly drawing before starting installation. (Figure 5)
2. Attach crossbar to junction box, using screws if needed (not
provided). Open end cap (with test switch and indicator assembled)
to connect battery connector before connecting AC power.
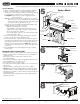
Ceiling/Wall: Figures 6 and 7. Feed AC supply wires through
canopy center hole.
End: Figure 8. Remove the opposite mounting end cap and knock
out the holes on the cap for pulling through wires and assembly
screws. Pull out all AC supply wires and feed wires through the
center holes of end cap first, then the canopy.
Assemble canopy onto aluminum housing with (2) #10-24 screws
(supplied) and make proper wire connections.
- Make the proper supply wire connections.
- If using 120VAC, connect the black and white wires to the
supply wires. If using 277VAC, connect the orange and white
wires to the supply wires. (Figure 3)
- Cap off unused wires. In all cases, use standard approved wire
nuts for connection of wires.
2. Remove bushing and then insert plug and rivets into housing top
holes to close the holes on the aluminum housing.
3. Determine direction for chevron (arrow) placement. Peel adhesive
chevron(s) from backing liner and place into the marked position on
the template. Firmly press chevron corners and edges, then peel
template off and leave chevron in place. NOTE: When Chevron(s)
are being placed on the Exit panel, you can not use it again once it
is removed.
4. Using (2) M4-40 screws (supplied), tighten canopy to mounting
plate/crossbar.
IMPORTANT SAFETY INSTRUCTIONS:
•
Read all the instructions before installation. Save instructions for later use.
• Turn off the power at fuse or circuit breaker box before installation or
maintenance work.
• Wear rubber soled shoes and work on a sturdy wooden or
non-conductive ladder.
• Product must be installed in compliance with National Electrical Code
and local building codes. For indoor use only.
• Do not mount near gas or electric heaters.
• Use caution when servicing batteries. Battery acid can cause burns to
skin and eyes.
• Installing contrary to instructions may cause unsafe conditions.
• Warning: Risk of fire. Most dwellings built before 1985 have supply
wire rated at 60°C. Consult a qualified electrician before installation.
• Avoid hazards to children: account for all parts and properly dispose of
all packing materials.
• Call the Technical Support department at Con-Tech Lighting with any
installation questions.
REXA INST
Con-Tech Lighting REXA Series Adjustable Recessed or Surface Mount LED Edge-Lit Exit Sign with Battery Back-Up
www.con-techlighting.com
All specifications subject to change without notice.
1-847-559-5500 This document can be recycled.
Surface Ceiling Mount
Surface Wall Mount
Surface End Mount
Junction Box
(Not Provided)
Crossbar
Canopy
Mounting End Cap
Bracket
Ni-Cad Battery
Power Wires
Hole Plug
Bushing
LED PCB
End Cap
Test Switch
LED Indicator
Locking Screw
Main
Housing
Rotation
Housing
Chevron
Canopy
EXIT Panel
Chevron Template
Surface Mount
Junction Box
(Not Provided)
Junction Box
(Not Provided)
Canopy
Canopy
Crossbar
Crossbar