INSTALLATION AND OPERATIONS MANUAL INCLUDES R290 MODELS Worktops/Undercounters & Sandwich Units Refrigerators & Freezers Please fill in the following information for your NEW unit, carefully read the instructions in this manual and file it for future reference. MODEL NO. SCAN this code to download manual SERIAL NO. PURCHASED FROM INSTALL DATE 1-800-523-7138 Continental Refrigerator A Division of National Refrigeration & Air Conditioning Products, Inc.
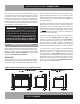
WORKTOPS/UNDERCOUNTERS & SANDWICH UNITS Some models utilize R-290 refrigerant, which is flammable. Refer to data tag to see what refrigerant is used on your product of choice. REFER HERE FOR REFRIGERANT TYPE. IF R-290, SEE BELOW. - WARNING: Do not damage the refrigerant circuit. Do not store explosive substances, such as aerosol cans with flammable propellant, in this appliance.
TABLE OF CONTENTS Page Receiving Your New Model...................................................................................................................................................5 General Information and Important Operating Facts............................................................................................................5 Uncrating Your New Model.....................................................................................................................
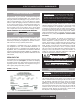
WORKTOPS/UNDERCOUNTERS & SANDWICH UNITS RECEIVING YOUR NEW MODEL Congratulations on your purchase of Continental Refrigerator superior foodservice equipment! When your shipment arrives, thoroughly examine the packaging for any punctures, dents or signs of rough handling. It is in your best interest to partially remove or open the shipping container to examine the contents for any missing accessories or concealed damage which may have occurred during shipment.
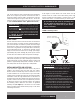
WORKTOPS/UNDERCOUNTERS & SANDWICH UNITS Four (4) bolts secure the cabinet to the wooden skid. The bolts are located at each end on the underside of the skid. In order to remove these bolts, tilt the cabinet backwards and place wooden blocks at each end in order to hold it in its tilted position. Using a ¾” socket or open end wrench, remove the bolts and carefully slide the cabinet off of the skid.
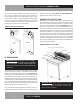
WORKTOPS/UNDERCOUNTERS & SANDWICH UNITS “UC” series models and units provided with the Front-Breather Option do not require any clearance around the the sides or back of the cabinet, since they take in and exhaust air under the cabinet and through the front grill, under the door. The air flow under the cabinet and through the front grill cannot be restricted. (see “Front Breather Kit” under “Optional Accessories”).
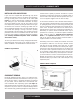
WORKTOPS/UNDERCOUNTERS & SANDWICH UNITS INSTALLING LEGS AND LEVELING If your new unit is supplied with adjustable legs, they will be packed in the accessory carton in the cabinet. Each model has four leg mounting holes on the bottom of the cabinet (see Figure 4). In order to install the legs, carefully tip the cabinet back, adding four (4) 2” wood blocks underneath, and simply screw the threaded leg studs into the case bottom front leg holes.
WORKTOPS/UNDERCOUNTERS & SANDWICH UNITS DOOR ADJUSTMENT All doors are aligned at the factory, however vibration during transit may cause them to shift and adjustment may be necessary. If a door requires realignment, carefully open the door (90°) and loosen, but do not remove the mounting screws securing both the top (see Figure 6) and bottom (see Figure 8) hinge brackets to the cabinet. Move the door to the desired position by hand or by gently tapping on the edge with a rubber mallet.
WORKTOPS/UNDERCOUNTERS & SANDWICH UNITS For doors with spring cartridge on the bottom: Open the door fully (115°) and remove the mounting screws securing the hinge cartridge bracket to the cabinet below the door. Lower the door down carefully, to avoid bumping the cartridge bracket, and slide it off the pivot pin bracket over the door. To reinstall, reverse this procedure and follow the instructions above to set the hinge tension and adjust the door properly.
WORKTOPS/UNDERCOUNTERS & SANDWICH UNITS INTERIOR ACCESSORIES Your new unit is shipped with (1) shelf per section and (4) pilaster clips for each shelf. SHELVING INSTALLATION Pilaster strips which support the shelving are secured to the cabinet walls with special pilaster screws which allow the strips to be readily removed for cleaning without the use of tools.
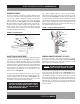
WORKTOPS/UNDERCOUNTERS & SANDWICH UNITS 115 VOLT, 60 HZ, 1 PHASE CONNECTION All 115 volt models are provided with a factory installed, UL approved 15-amp power cord and NEMA 5-15P plug, or a 20-amp power cord and NEMA 5-20P plug. To insure proper operation, this equipment must be plugged into a NEMA compatible, grounded receptacle that can supply the full voltage and amperage stated on the serial plate (see Figure 1). IMPORTANT NOTE: A SEPARATE, ISOLATED, PROPERLY SIZED POWER SUPPLY MUST BE PROVIDED.
WORKTOPS/UNDERCOUNTERS & SANDWICH UNITS EVAPORATOR ASSEMBLY All undercounter refrigerators and freezers have an easily accessible, easily serviceable, performance-rated, forced-air evaporator assembly which utilizes a plasticized fin coil for extended life. All models utilize a full length, extra large evaporator coil with a uniquely directed air flow distribution which keeps compartment product at uniformly constant temperatures (see Figure 11).
WORKTOPS/UNDERCOUNTERS & SANDWICH UNITS OPERATION WITH ELECTRONIC CONTROL ELECTRONIC CONTROL DISPLAY AND BUTTONS COMPRESSOR AUX HTRS (UP) EVAP FAN SET (MUTE) DEFROST AUX HTRS DEFROST (DOWN) ALARM The control has a 3 button interface. • The “AUX HTRS/UP” button is used for adjustment of the auxiliary anti-condensate heaters or for increasing values. • The “SET/MUTE” button is used to lock in a new value or to silence the alarm beeper.
WORKTOPS/UNDERCOUNTERS & SANDWICH UNITS ANTI-CONDENSATE CONTROL (Freezers only) 1. 2. To see the current state of the aux heaters (anti-condensate), press and HOLD the “AUX HTR” button for 1 second. RELEASE the “AUX HTR” button. The display will show the current state of the heater (“ON” or “OFF”) when the button is pressed. To change the current state of the AUX Heaters, press and HOLD the “AUX HTR” button. The display will show the current state of heater operation.
WORKTOPS/UNDERCOUNTERS & SANDWICH UNITS MAINTENANCE SAFETY PRECAUTIONS DISCONNECT POWER BEFORE ATTEMPTING TO WORK ON OR CLEAN EQUIPMENT. DO NOT ATTEMPT TO REMOVE ANY COVERS OR PARTS YOURSELF, AS THIS CAN EXPOSE DANGEROUS, HIGH VOLTAGE WIRING. SERVICE SHOULD ONLY BE PERFORMED BY A QUALIFIED TECHNICIAN. Carefully wash all of the vinyl door gaskets with clean water, dry them and check for any damage, which may affect the seal.
WORKTOPS/UNDERCOUNTERS & SANDWICH UNITS CARE AND CLEANING OF STAINLESS STEEL* DO NOT USE: abrasive cleaners, chemicals with chlorides or muriatic acid to clean your equipment. *Some information and graphics for this section were obtained from “Stainless Steel Equipment Care and Cleaning” brochure, published by the North American Association of Food Equipment Manufacturers (NAFEM).
WORKTOPS/UNDERCOUNTERS & SANDWICH UNITS PARTS AND SERVICE Continental is committed to providing the best customer service in the industry. All new units come with a Limited Extended Protection Warranty (see “Warranty” section of this manual for details). If a problem arises with your equipment, please contact our Service Department at 1-800-523-7138. One of our Service Specialists will do everything possible to solve the problem as quickly as possible.
WORKTOPS/UNDERCOUNTERS & SANDWICH UNITS 2. All refrigerant should be removed from the system by a qualified technician and disposed of properly, or reclaimed. (Intentional venting of many refrigerants into the air is harmful and prohibited; violators are subject to fines). All refrigerant oil should be drained from the compressor and discarded appropriately. 3. Properly dispose of the cabinet and refrigeration system components.
WORKTOPS/UNDERCOUNTERS & SANDWICH UNITS With the cage properly in place, use the holes along the front sides of the cage assembly as a template to drill (6) 1/8” pilot holes through side breakers and the metal underneath. Drive a sheet metal screw into each of the front mounting holes, securing the front of the cage to the inside of the opening, and tighten them snugly, without stripping the screws or the pilot holes.
WORKTOPS/UNDERCOUNTERS & SANDWICH UNITS Secure the shelf, using two 10-32 screws on each end, driving them snugly but not tightly. Check the alignment of the shelves and tighten all the screws. Double check that the shelves and uprights are secured rigidly. FIGURE 15: Overshelf Installation TOP SHELF (NO NOTCHES IN BACK CORNERS) 10-32 SCREWS BOTTOM SHELF UPRIGHT 4.
WORKTOPS/UNDERCOUNTERS & SANDWICH UNITS INSTALLING FRONT BREATHER KIT (Skirt and Grill) IMPORTANT NOTE: You may CAREFULLY lay the cabinet on it’s back, but only FOR A BRIEF PERIOD OF TIME. Caution must be taken to ensure you DO NOT DAMAGE the louvered back panel, refrigeration system components, or copper tubing located behind the panel. The cabinet must be properly blocked, to allow room to get your hands in to lift without damaging the cabinet or crushing the vents on the back panel.
WORKTOPS/UNDERCOUNTERS & SANDWICH UNITS IMPORTANT NOTE: Always wear proper work gloves and use appropriate safety equipment. You may CAREFULLY lay the cabinet on it’s back, but only FOR A BRIEF PERIOD OF TIME. Caution must be taken to ensure you DO NOT DAMAGE the louvered back panel, refrigeration system components, or copper tubing located behind the panel.
WORKTOPS/UNDERCOUNTERS & SANDWICH UNITS FIGURE 19: Electric Condensate Heater 1. 2. 3. 4. 5. REMOTE SET-UP AND INSTALLATION GUIDELINES All remote refrigerators and freezers are shipped with an expansion valve, thermostat and defrost timer (freezer only), installed from the factory.
WORKTOPS/UNDERCOUNTERS & SANDWICH UNITS WARRANTY United States of America & Canada THREE (3) YEAR PARTS AND LABOR WARRANTY Continental Refrigerator warrants to the original purchaser of every new Continental Refrigerator self contained unit, including all parts thereof, that such equipment is free from defects in material and workmanship, under normal use, proper maintenance and service as indicated by Continental Refrigerator installation and operation manual, for a period of three (3) years from the
WORKTOPS/UNDERCOUNTERS & SANDWICH UNITS TROUBLESHOOTING GUIDE PROBLEM PROBABLE CAUSE Condensing unit will not start - no hum. 1. 2. 3. 4. 5. 6. Condensing unit will not start - hums but trips on overload protector. 1. 2. 3. 4. 5. Condensing unit starts and runs, but short cycles on overload protector. CORRECTION 1. 2. 3. 4. 5. 6. Close start or disconnect switch. Replace Fuse. Determine reason and correct/replace. Relocate control. Repair or replace control. Check wiring against diagram.
WORKTOPS/UNDERCOUNTERS & SANDWICH UNITS TROUBLESHOOTING GUIDE PROBLEM Start capacitor open, shorted or blown. PROBABLE CAUSE CORRECTION 1. Relay contact not opening properly. 2. Prolonged operation on start cycle: (a) Low voltage to unit. (b) Improper relay. (c) Starting load too high. 3. Excessive short cycling. 4. Improper capacitor. 1. Clean contacts or replace relay. 2. (a) Determine reason and correct. (b) Replace with correct relay. (c) Correct by using pump down. 3.
WORKTOPS/UNDERCOUNTERS & SANDWICH UNITS WORKTOP/UNDERCOUNTER REFRIGERATOR 115/60/1 WD-R5 WIRING DIAGRAM 28 OPERATIONS MANUAL
WORKTOPS/UNDERCOUNTERS & SANDWICH UNITS WORKTOP/UNDERCOUNTER REFRIGERATOR 115/60/1 W/ SPLIT ELECTRONIC CONTROL WD-R5-EC-SP WIRING DIAGRAM OPERATIONS MANUAL 29
WORKTOPS/UNDERCOUNTERS & SANDWICH UNITS WORKTOP/UNDERCOUNTER FREEZER 115/60/1 WD-F5 WIRING DIAGRAM 30 OPERATIONS MANUAL
WORKTOPS/UNDERCOUNTERS & SANDWICH UNITS WORKTOP/UNDERCOUNTER FREEZER 115/60/1 W/ SPLIT ELECTRONIC CONTROL WD-F5-EC-SP WIRING DIAGRAM OPERATIONS MANUAL 31
A Division of National Refrigeration & Air Conditioning Products, Inc. 539 Dunksferry Road • Bensalem, PA 19020-5908 P 215-244-1400 • 1-800-523-7138 • F 215-244-9579 www.continentalrefrigerator.