Model 1100 Illustrated Installation Instructions Contractors Wardrobe ® DESIGNERS • MANUFACTURERS • TOLL FREE: (800) CW-DOORS • (800) 293-6677 • www.cwdoor.
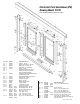
Illustrated Parts Breakdown (IPB) Drawing Model #1100 (For shower head nozzle on right) 12 20 21 10 8 17 22 1 11 17 8 19 22 7 11 21 24 23 10 22 18 5 15 22 17 24 22 20 12 18 12 20 14 21 21 23 15 22 7 6 3 26 9 22 NO.
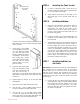
In this instruction booklet we will walk you through the installation of your new shower door. (#3) 2 Wall Jambs - #1100 (Marked “L” and “R”) (#4) 1 Guide - #1100 DO NOT REMOVE your old shower door until you check that your new shower door kit is the right size for your shower and that all the proper parts are in the box or hardware bag. NOTE: The Header (#1) and Bottom Track/Curb (#2) are shipped 1” oversize, so you will need to cut each to fit.
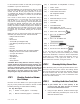
B. Center the Bottom Track/Curb (#2) on the sill/dam. In some installations, you may prefer to position the Bottom Track/Curb (#2) forward or back of center. For example, by moving the Bottom Track/Curb (#2) forward, you will slightly increase the depth within the shower area (See Figure 2). Duct Tape STEP 4 Installing the Wall Jambs NOTE: The Model #1100 comes with two Wall Jambs (#3).
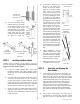
12 20 STEP 5: Shower head and controls left side A. In order to install the Panel Locator (#13) you must first determine which wall the shower head is on. See Figures 4A and 4B. B. Attach Panel Locator (#13) to the edge of the Wall Jamb (#3) on the shower head side, as shown.
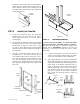
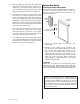
D. If someone is assisting you, First Panel Installation (Inside Door) have he or she stand in the shower and pull the bottom edge of the Inside Framed Door Panel (#6) towards them, to give you about 2” of clearance for the next step. Inside A If you are installing the doors Shower by yourself, you will need to push the Inside Framed Door Panel (#6) out of your way as A we describe here. Hold the Outside A Outside Framed Door Panel Shower (#5) so that the Rollers (#11) Figure 6A face towards you.
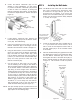
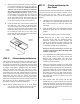
the #8-32 x 3/8” HWH Screw (#17) securing the Roller (#11) and gently slide the Roller (#11) in either direction until the Door Panels (#5, #6) hang flush with the Wall Jambs (#3). Tighten the screw (See Figure 7). Adjust Hex Screw Outside Shower Figure 7 STEP 10 A. Installing the Towel Bar Locate the Towel Bar (#14), two Towel Bar Brackets (#15), two #8 x 3/8” FH T/S Type F Screws (#23) and two #6 x 5/16" FH Type F Screws (#24). STEP 11 B.
C. D. Slide both Door Panels (#5 and #6) to one side. Peel the paper backing off the two-way tape on the bottom of the Guide (#4). Without letting the adhesive tape touch the Bottom Track/Curb (#2) OR accidentally pressing down or locking the Guide (#4) into place, carefully insert the front edge of the Guide (#4) into the groove in the Bottom Track/Curb (#2) and slide the Guide (#4) under the two Door Panels (#5 and #6) as shown in Figure 9B.
G. H. Optional Door Handle With the Header (#1) free from both Wall Jambs (#3) and the Panels (#5 and #6) hanging in the Header (#1), you should now be able to lift out one or both Panels (#5 and #6) from the Guide (#4) and disengage them from the Header (#1). Installing the Optional Door Handle Please note that the Door Handle (#25) is not necessary. This can be used as another handle to enter the enclosure. Once installed the Door Panels will not bi-pass one another.