
Installation Guide

In this instruction booklet we will walk you through the
installation of your new shower door.
DO NOT REMOVE your old shower door until you check
that your new shower door kit is the right size for your
shower and that all the proper parts are in the box
or hardware bag. NOTE: The Header (#1) and Bottom
Track/Curb (#2) are shipped 1” oversize, so you will need
to cut each to fit.
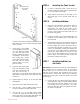
Use a level to check that the tub (sill/shower dam) is
reasonably level — not more than 1/4” out of level from
side to side. If it is out of level more than that, you
may want to consider ordering a custom-mitered fill that
fits under the Bottom Track/Curb (#2). This will level
the Bottom Track/ Curb (#2) correctly. In the absence of
leveling the Bottom Track/Curb (#2) with a mitered fill,
and depending upon how badly your tub is out of level,
the panels may not stay in a closed position. Instead,
the panels may roll downhill, causing one of the doors
to open.
Make sure that you have all the proper tools required to
assemble your new shower door. Use this check list.
• Phillips Head Screwdriver
• Level
• Electric Drill
• 1/8” Drill Bit (for fiberglass stall)
• 3/16” Masonry Drill Bit (for tile stall)
• Pencil
• Hammer
• Fine File
• Miter Box and Hacksaw with 32 Teeth/Inch Blade
•
Caulking Gun and one Tube of Clear Tub/Tile Silicone
• 1/4” Open End Wrench
• Wire Cutters
• Tape Measure
• Duct Tape
• Safety Glasses
CAUTION: Wear Safety Glasses whenever drilling or
cutting. Handle the framed glass Panels carefully. The
sharp corners of the Panels can damage tile and floor
covering. Tempered glass cannot be cut. Do NOT let
the corners of the Door Panels strike the other glass
Door Panel or any hard surface, wall or floor. Even
tempered glass may be shattered in this manner.
STEP 1 Checking Contents of Shower
Door Package
DO NOT use a razor blade to cut open the paper wrap-
ping as you may scratch the contents. In the box or small
hardware parts bag you should find the following:
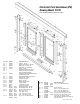
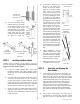
No. Qty. Description
(#1) 1 Header - #1100 (approx. 1” oversized)
(#2) 1 Bottom Track/Curb (approx. 1” oversized)
(#3) 2 Wall Jambs - #1100 (Marked “L” and “R”)
(#4) 1 Guide - #1100
(#5) 1 Outside Framed Door Panel
(#6) 1 Inside Framed Door Panel
with Integrated Handles
(#11) 4 Roller - #1100
(#12) 4 Wall Jamb Bumper - #1100
(#13) 1 Panel Locator - #1100
(#14) 1 Towel Bar
(#15) 2 Towel Bar Bracket
(#16)
1 Panel
Glide Strip - #1100
(Pre-installed in Bottom Track/Curb)
(#17) 4 #8-32 x 3/8” HWH Screw
(#19) 2 #8 x 1-1/2” FH SMS Screw
(#20) 4 #8 x 1-1/2” PH SMS Screw
(#21) 6 Screw Anchor
(#23) 2 #8 x 3/8” FH T/S Type F Screw
(#24) 2 #6 x 5/16" PH FT SMS Screw
If you find that any parts are damaged or missing,
refer to the parts list and IPB Drawing and contact
Contractors Wardrobe
®
’s Customer Service Department
at 661-257-1177. NOTE: Views and directions given in
these instructions — left, right, front, back, etc. — are
from outside the enclosure, facing the shower.
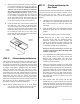
STEP 2 Removing Existing Shower Doors
After determining that your newly purchased shower enclo-
sure kit is the correct size, remove the existing shower
door and all existing parts of that door assembly. Remove
all screw anchors from the wall. Clean silicone sealant
or shower caulking and any other contaminants from
shower and wall surfaces.
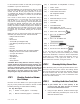
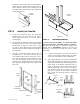
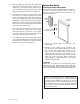
STEP 3 Installing the Bottom Track/Curb
NOTE: If your shower has a curve (radius) in the
corners at the side walls, be sure to measure
from wall to wall below the curves.
A. Using the Tape Measure, measure between right
and left walls along the flattest part of the tub sill.
Write this dimension down.
3
#1100 - I01100 - 0508