
Installation Guide
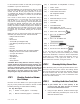
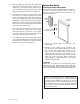

B. Center the Bottom Track/Curb (#2) on the
sill/dam. In some installations, you may prefer
to position the Bottom Track/Curb (#2) forward
or back of center. For example, by moving the
Bottom Track/Curb (#2) forward, you will slightly
increase the depth within the shower area (See
Figure 2).
C. Locate Bottom Track/Curb (#2). Remove the
Panel Glide Strip (#16) from the Bottom Track/
Curb (#2). See IPB Drawing.
D. Using the measurement from Step 3A, cut the
Bottom Track/Curb (#2) to this length. Use the
Miter Box and Hacksaw to make a straight cut.
E. Using the Wire Cutters, cut the Panel Glide Strip
(#16) 3/8” shorter than the Bottom Track/Curb
(#2). Re-install the Panel Glide Strip (#16)
into the Bottom Track/Curb (#2) and position it
(center it) so that the ends of Panel Glide Strip
(#16) are evenly spaced at each end of the
Bottom Track/Curb (#2).
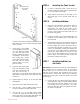
F. Cut two pieces of Duct Tape 12” long. Next,
use the Caulking Gun to apply a thick bead of
Silicone sealant (approximately 3/8” in diameter)
to the bottom surface of the Bottom Track/Curb
(#2) along its entire length. Place the Bottom
Track/Curb (#2) on the shower sill, in the position
you determined in Step 3B. Use the two strips
of Duct Tape to temporarily hold the Bottom
Track/Curb (#2) in place, but DO NOT place the
tape within 2” of the wall. In other words, the
distance (gap) between the wall and the tape
should be 2” or more away from the walls so
that the tape will not be in your way when you
install the Wall Jambs (#3) (See Figure 2).
NOTE: The tape will help provide a positive seal to the
shower sill while holding the Bottom Track/Curb
(#2) in place for the following steps.
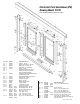
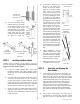
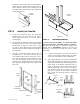
STEP 4 Installing the Wall Jambs
NOTE: The Model #1100 comes with two Wall Jambs
(#3). One is notched for the left wall, the other
is notched for the right wall (as you face the
enclosure from the outside). If you look at the
bottom end of each Wall Jamb (#3), on the back
surface you will see that each is clearly stamped
“L” for left, “R” for right.
A. Locate the left Wall Jamb (#3L) marked with an
“L”. If your shower has curved corners, use a
File to round off and shape the bottom ends of
the Wall Jambs (#3) to fit the rounded corners
of the shower.
B. Place the left Wall Jamb (#3L) against the left wall
and slip/snap the bottom of the Wall Jamb (#3L)
over the Bottom Track/Curb (#2). Use a Level
held against the side of the Wall Jamb (#3L) to
align it vertically straight up and down as shown
in Figure 3. Use a Pencil to mark the position
Figure 3
Top of
Wall Jamb
If your enclosure has
rounded corners,
use a file to shape the
Bottom Track/Curb
to fit
Bottom Track/
Curb
Shower head
and controls
right side
3L
12
20
3R
13
20
12
4
Figure 2
INSIDE
TUB
Duct Tape
Silicone
Panel Glide Strip
Bottom Track/
Curb
OUTSIDE
TUB
19
20
12
20
12
19
Level
#1100 - I01100 - 0508
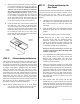
Figure 4A