
Installation Guide
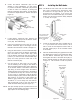
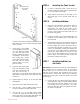

STEP 5: Installing the Panel Locator
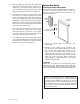
A. In order to install the Panel Locator (#13) you
must first determine which wall the shower head
is on. See Figures 4A and 4B.
B. Attach Panel Locator (#13) to the edge of the
Wall Jamb (#3) on the shower head side, as
shown.
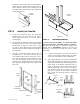
STEP 6 Installing the Header
A. Using the Tape Measure, measure the distance
between the left and right wall at the top
(Remember, the width at the bottom of the
enclosure may not be the same as the width of
the top of the enclosure because walls may not
be plumb and square).
B. Locate the Header (#1). Using the Miter Box and
Hacksaw, cut the Header (#1) to the length you
just measured.
C. The Model #1100 comes with a positive snap-lock
feature which eliminates the need for screws to
hold the Header (#1) in place, and help to secure
the Panels (#5 and #6) in Header (#1) in case
there is an earthquake. Position the Header (#1)
over the top of the Wall Jambs (#3). Spread the
Header (#1) sides slightly as you pull it down
firmly onto the Wall Jambs (#3) as it snaps and
locks in place. You should be able to hear and
feel when it solidly locks in place.
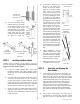
STEP 7 Installing the Rollers on
the Panels
IMPORTANT: Enclosures with Obscure or Specialty glass
are installed with the textured surface of the framed
Panels facing out, or to the front. The smooth surface
will face into the shower. This orientation gives you the
front and back of each Panel. Now, locate the Outside
Framed Door Panel (#5). Locate four #8-32 x 3/8” HWH
Screws (#17).
A. Use two #8-32 x 3/8” HWH Screws (#17) to attach
two Rollers (#11) to the top of the Outside Framed
Door Panel (#5) with the Rollers (#11) on the
front surface of the Top Rail (#10). The metal
parts (the Nut side) should be against the frame,
as shown in Figure 5B.
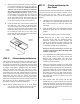
of each of the three pre-drilled holes in the left
Wall Jamb (#3L). Set the Wall Jamb (#3L) aside
for the moment.
C. Using either a 1/8” Drill Bit
(for a fiberglass enclosure)
or a 3/16” Masonry Drill Bit
(for tile) drill three holes
where you made the marks.
If installing in a tiled enclo-
sure, gently tap a Screw
Anchor (#21) into each hole.
DO NOT use the Screw
Anchors (#21) for a fiber-
glass enclosure.
D. Place the Wall Jamb (#3L)
back over the Bottom Track/
Curb (#2) and against the
wall and secure with a
single #8 x 1-1/2” PH SMS Screw (#20) and one
Wall Jamb Bumper (#12) in the TOP hole only,
at this time.
E. Repeat Steps 4A through 4C for the right Wall
Jamb (#3R).
F. Remove the Duct Tape after Silicone dries.
G. Use two #8 x 1-1/2” FH SMS Screws (#19) to
secure the middle of the Wall Jamb (#3).
H. Use two #8 x 1-1/2” PH SMS Screws (#20)
to secure the Wall Jamb Bumpers (#12) in the
bottom hole of the left and right Wall Jambs (#3)
to completely secure the Wall Jambs (#3).
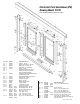
Figure 4B
Shower head
and controls
left side
3L
12
20
3R
13
20
12
5
Figure 4C
19
19
20
12
20
12
#1100 - I01100 - 0508