
Installation Guide
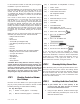
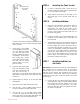
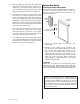

B. Use two more #8-32 x 3/8”
HWH Screws (#17) to attach
the remaining Rollers (#11)
to the back surface of the
Top Rail (#10) of the Inside
Framed Door Panel (#6). The
metal parts (the Nut side)
should be against the frame,
as shown in Figure 5C.
STEP 8 Installing the Door Panels
Installing the Door Panels may be easier if you have
someone assisting you. Always wear gloves and safety
goggles whenever handling glass.
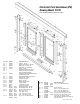
A. Locate the Inside Framed Door Panel with
Integrated Handles (#6). When standing inside
the shower, the curved Integrated Handles will be
facing you.
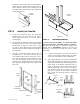
B. Hold the Inside Framed Door Panel (#6) so that
the rollers are facing away from you. Standing
outside and facing the shower enclosure, lift the
Inside Framed Door Panel (#6) up and over the
Bottom Track/Curb (#2) and then lift the Top Rail
(#10) up into the Header (#1) (See Figure 6A).
C. Gently set (lower) the Inside Framed Door Panel
(#6) into position with the wheels seated in the
rear track of the Header (#1). Make sure that the
Panel rolls freely.
D. If someone is assisting you,
have he or she stand in the
shower and pull the bottom
edge of the Inside Framed
Door Panel (#6) towards
them, to give you about 2” of
clearance for the next step.
If you are installing the doors
by yourself, you will need to
push the Inside Framed Door
Panel (#6) out of your way as
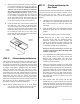
we describe here. Hold the
Outside Framed Door Panel
(#5) so that the Rollers (#11)
face towards you. Lift the
Outside Framed Door Panel
(#5) and use the index finger
of both hands to carefully push
the Inside Framed Door Panel
(#6) back and out of the way
as you lift the Outside Framed
Door Panel (#5) up and over
the Bottom Track/Curb (#2).
Insert the Top Rail (#10) up
and into the Header (#1). Set
the wheels into the front track
of the Header (#1) (See Figure
6B).
E. VERY CAREFULLY set the
Outside Framed Door Panel
(#5) into the track and make
sure that it rolls freely. Carefully
ease the Inside Framed Door
Panel (#6) back into place.
F. Slide both Panels to one side
to prepare for the next step.
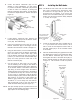
STEP 9 Adjusting and Aligning the
Door Panels
A. To ensure that the enclosure is water-tight, the
Door Panels (#5, #6) must be correctly aligned.
Slide the Inside Framed Door Panel (#6) toward
the wall with the shower head. Slide the Outside
Framed Door Panel (#5) to the opposite wall. If
the Door Panels (#5, #6) are not flush with the
Wall Jambs (#3) or are too high off the Bottom
Track/Curb (#2), the unit could leak while the
shower is in use. If the edges of the Door Panels
(#5, #6) do not align flush with the Wall Jambs
(#3), the Door Panels (#5, #6) need to be adjust-
ed.
B. One or more of the Rollers (#11) may need to
be adjusted to properly align the Door Panels
(#5, #6). Using a 1/4” Open End Wrench, loosen
6
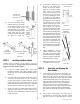
Figure 5C
Inside
Tub:
Smooth
side of
glass
Outside
Panel-Rollers
on front side
Inside Panel - Rollers
on back side
Figure 5A
Outside Tub:
Front of each
panel faces out
Frame
Top
Front of
Outside
Panel
(Textured
side)
Nut
Outside
Shower
Inside
Shower
A
A
A
First Panel Installation
(Inside Door)
Figure 6A
Second Panel
Installation
(Outside Door)
Figure 6B
Push
with
index
finger
Tub Sill /
Shower Dam
Figure 5B
#1100 - I01100 - 0508