
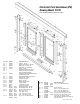
Installation Guide
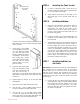

C. Slide both Door Panels (#5 and #6) to one side.
Peel the paper backing off the two-way tape on
the bottom of the Guide (#4). Without letting the
adhesive tape touch the Bottom Track/Curb
(#2) OR accidentally pressing down or lock-
ing the Guide (#4) into place, carefully insert
the front edge of the Guide (#4) into the groove
in the Bottom Track/Curb (#2) and slide the
Guide (#4) under the two Door Panels (#5 and
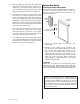
#6) as shown in Figure 9B. Center the Guide (#4)
on the pencil mark you made (See Figure 10).
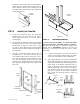
D. Press the Guide (#4) onto the Bottom Track/Curb
(#2) and lock it into position by pressing firmly
on the back edge of the Guide (#4) as shown in
Figure 9C. You should feel it lock into place. If the
Guide (#4) doesn’t lock into position easily, it may
be necessary to press firmly on one end to start
the process and work along the back of the Guide
(#4) in order to lock it into place.
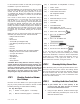
STEP 12 Silicone Sealing the Enclosure
Using rubbing alcohol and a lint-free rag, thoroughly clean
the edges of the aluminum enclosure and tiles and at
both ends of the Header (#1) at the walls, where the Wall
Jambs (#3) meet the tile or fiberglass surfaces and along
all edges of the Bottom Track/Curb (#2) and sill/dam.
When the alcohol has dried, you will have a clean,
excellent surface for silicone sealing the enclosure. Use
the Caulking Gun with clear Tub/Tile Silicone to seal both
ends of the Bottom Track/Curb (#2) where it meets the
Wall Jambs (#3), along both the interior and exterior
edges (horizontal and vertical) and along the interior
edges where the Wall Jambs (#3) and Bottom Track/Curb
(#2) meet with the tile or fiberglass surfaces. It is not
necessary to silicone around the Header (#1).
NOTE: Silicone sealant must cure for 24 hours before
you use your new enclosure. Silicones may vary.
Please follow curing instructions on the tube.
STEP 13 Cleaning and Removing the
Door Panels
The enclosure Door Panels (#5 and #6) are not designed
to be removed once they are installed. However, incon-
venient areas that you may want to clean, such as
the overlap between the doors, can still be reached for
cleaning.
A. Carefully remove all the hardware from door. This
will enable you to slide the glass Panels (#5 and
#6) in either direction to clean the entire Panel
thoroughly.
B. Clean the glass with a mild, non-abrasive cleaner
designed for glass such as CW
®
Mirror & Glass
Cleaner.
C. Re-install the hardware when you are finished.
CAUTION: Removing one or both of the Panels (#5
and #6) should NOT be attempted without
assistance. Always wear Safety Goggles and
Gloves when handling the glass Panels (#5 and
#6). Read through the following instructions first
to familiarize yourself before proceeding.
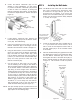
Should it become necessary to remove one
or both of the Panels IT WILL REQUIRE TWO
PEOPLE TO DO THIS.
D. If you applied Silicone Caulking around the Header
(#1), carefully remove it by cutting through the
Silicone with a Razor Blade. Use care when
cutting through the Silicone so that you do not
scratch or mar the extrusion.
E. Slide both Panels (#5 and #6) to one side. Now
you need to release the Header (#1) from the Wall
Jamb (#3). At the opposite side (from the Panels),
loosen the Header (#1) from the Wall Jamb (#3).
Spread the Header (#1) open to release it from
the locking grooves on the Wall Jamb (#3) and,
at the same time, lifting it slightly in the air. When
the Header (#1) is free, set it back on top of the
Wall Jamb (#3).
F. Now carefully slide both Panels (#5 and #6)
toward the end you have released from the Wall
Jamb (#3) and have the second person hold the
Panels (#5 and #6) in place while you repeat Step
13-E to release the other side of the Header (#1)
from the Wall Jamb (#3).
8
#1100 - I01100 - 0508
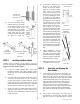
Figure 10
Outside
Shower
Inside
Shower