
Installation Guide
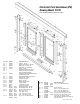
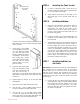

G. With the Header (#1) free from both Wall Jambs
(#3) and the Panels (#5 and #6) hanging in the
Header (#1), you should now be able to lift out
one or both Panels (#5 and #6) from the Guide
(#4) and disengage them from the Header (#1).
H. As an alternative to taking out one Panel at a time
and having to remove the hardware from each
Panel, you might try this: With the Header (#1)
free from both Wall Jambs (#3), slide the Panels
(#5 and #6) to the center. Each person holds the
Header with one hand next to the Panels (#5 and
#6) to keep them from sliding and the other hand
at the end of the Header (#1).
I. With the Panels (#5 and #6) secured so they
won’t slide, lift the Header (#1) with hanging
Panels (#5 and #6) up and out of the shower
enclosure. Carefully lay the Panels (#5 and #6)
on the floor while still in the Header (#1).
J. To re-install the Door Panels (#5 and #6), reverse
the process described above, hanging the Panels
(#5 and #6) in the Header (#1) and re-attach the
Header (#1) onto the Wall Jambs (#3).
9
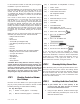
Thank you for purchasing a CW
®
Shower Enclosure.
This is only one of a large line of shower enclosures
and high quality wardrobe door products. If you like
this product, please contact Contractors Wardrobe
®
for
more information about our many beautiful wardrobe
doors in bi-pass and bi-fold styles with steel, aluminum
and hardwood frames.
#1100 - I01100 - 0508
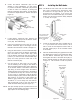
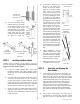
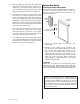
Optional Door Handle
Position Handle
midway on Door Panel
Inside of
Shower
Installing the Optional Door Handle
Please note that the Door Handle (#25) is not necessary.
This can be used as another handle to enter the
enclosure. Once installed the Door Panels will not
bi-pass one another.
A. Locate the Handle (#25) and the #6 x 3/8″
Screw
(#26).
B. Standing on the outside of the enclosure, with
the curved part of the Handle (#25) facing towards
you, position the Handle (#25) midway on the
frame of the Inside Framed Door Panel (#6) (as
measured from the bottom of the Panel), on the
edge nearest the Wall Jamb (#3) near the shower
head. Use a #6 x 3/8″ Screw (#26) to attach the
Handle (#25) to the Side Rail (#7) of the Inside
Framed Door Panel (#6).
WARNING
Make sure not to drill into the Side Rail (#7) before
attaching the screw. Drilling directly into the Side Rail
(#7) could potentially cause the glass panel to explode.
The screw will safely drill through the Handle (#25) and
Handle
(#25)
Screw
(#26)