
Instructions / Assembly

Thank you for purchasing a CW
®
Wardrobe Door.
This is only one of a large line of wardrobe doors and
high quality bath enclosure products. If you like this
product, please contact Contractors Wardrobe
®
for
more information about our many beautiful bath
enclosures available in a vast array of colors and
finishes to suit your designing needs.
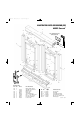
Step 4 Installing the Mirrored
Glass Panels
A. Make sure you have a pad or
blanket to protect the Mirrored
Glass Panels ( # 1 ) f r o m
scratches. Lay Panels ( # 1 ) with
backside up on the floor. Locate
one of the Steel Wheel
Assemblies (#13) on the bottom
of a Panel ( # 1 ). With a Phillips
S c r e w d r i v e r, turn the a d j u s t i n g
screw to the right to lower the
r o l l e r. Do this until you have 1″ o f
roller showing. Adjust both Wheel
A s s e m b l i e s (#13) on each Panel
( # 1 ) (This will avoid scratching
the Bottom Track (#3) when
installing the panels).
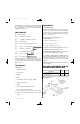
B. Pick up one Panel ( # 1 ) and, with the mirror facing
you, tilt the top of the Panel ( # 1 ) back and slip the
Panel ( # 1 ) into the back runner of the To p
Channel (#2). Next, set the bottom of the Panel
(#1) into the back runner of the Bottom Track (#3).
C . For the front Panel (#1), repeat B, but place the
Panel (#1) into the front runner of the Top Channel
(#2) and front runner of the Bottom Track (#3).
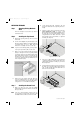
Step 5 Adjusting the Panels
Slide the front Panel (#1) to the side closest to the
r o o m ’ s entrance door (This is how the Wa r d r o b e
Doors will be in position to look their best). Look at
the space between the door edge and the wall.
You want the door edge and the wall to be flush. If
you see space at the top or bottom edge of the
Panel (#1), turn the adjusting screw on top of the
Steel Wheel Assembly (#13) on the lower back of
the Panel (#1) nearest the wall. Turn the screw left
or right until the Panel (#1) aligns flush with the
wall (See Figure 4). Repeat for each Panel (#1).
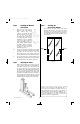
Step 6 Installing the
Clear Plastic Bumpers
Peel paper off the back of the Clear Plastic
Bumpers (#8) and place on the edge of the Panel
(#1) frame 30
1
/2″ up from the bottom. The Clear
Plastic Bumpers (#8) will cushion and protect the
door and wall when you close the Wardrobe Doors
(See Figure 5).
Figure 5
Concord
™
- I3045 - 0302
Bumper
Bumper
30
1
/2″
30
1
/2″
5
Concord - Web 3/20/03 11:16 AM Page 5