Installation Instructions Model Aurora Aurora Plus Serenity (Wooden Frame) and Tranquility ™ ™ ™ ™ ™ ™ (Wooden Frame) Contractors Wardrobe ® DESIGNERS • MANUFACTURERS 26121 Avenue Hall • Valencia, CA 91355 • (661) 257-1177 • FAX: (661) 257-4907 Toll Free: (800) CW-DOORS • (800) 293-6677 • www.CwDoor.
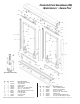
Illustrated Parts Breakdown (IPB) Model Aurora / Aurora Plus ™ 17 ™ 5 5 12 15 15 14 14 5 5 17 2 17 11 11 15 5 16 14 16 8 5 15 17 1 12 7 16 11 16 16 18 16 11 1 16 13 12 18 7 18 17 8 13 6 16 6 18 13 9,10 13 17 9,10 6 17 Steel Wheel Assembly 17 12 6 9,10 No.
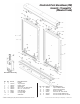
Illustrated Parts Breakdown (IPB) Serenity / Tranquility (Wooden Frame) ™ 5 ™ 5 17 12 15 15 14 14 5 5 17 11 2 17 11 5 5 15 14 8 15 17 1 12 11 18 11 1 13 18 17 8 18 6 6 13 13 12 17 17 9,10 9,10 18 6 13 Steel Wheel Assembly 12 17 6 9,10 No.
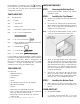
INSTALLING THE DOORS Congratulations on purchasing your new Wardrobe Doors. Now that you have opened the package, we want you to verify that you have all the necessary hardware supplied with your doors. STEP 1 Remove existing doors, brackets, top channel and bottom track. PARTS CHECK LIST: No.
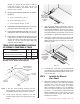
already, you should cut the carpet in order to install the Bottom Track (#3). We do not recommend installing the Bottom Track (#3) directly on top of carpet. 2. Do you have a concrete, wood floor or ceramic tile floor? PENCIL MARK TO LOCATE FRONT EDGE OF WOOD STRIP A. If it is a concrete floor, go to 3… B. If it is a wood floor, go to 4… C. If it is a ceramic tile floor, go to 5… Figure 2 3.
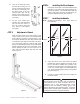
B. C. Pick up one Panel (#1) and, with the mirror facing you, tilt the top of the Panel (#1) back and slip the Panel (#1) into the back runner of the Top Channel (#2). Next, set the bottom of the Panel (#1) into the back runner of the Bottom Track (#3). STEP 6 For the front Panel (#1), repeat B, but place the Panel (#1) into the front runner of the Top Channel (#2) and front runner of the Bottom Track (#3).