
Instructions / Assembly

Congratulations on purchasing your new
Wardrobe
Doors. Now that you have opened the package, we want
you to verify that you have all the necessary hardware
supplied with your doors.
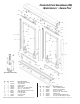
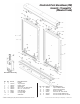
PARTS CHECK LIST:
No. Qty DescriPtioN
(#1) 2 Panels
(#2) 1 Top Channel
(#3) 1 Bottom Track
(#4) 1 Wood Strip (located inside of track)
(#5) 6 #8 x 1-1/2ʺ PH SMS Screws:
(#6) 4 #8 x 1/2ʺ Truss Screws:
(#7) 2 Mirror Handles (In bag, attached to back of the
Panels) (Aurora™ only)
(#8) 2 Clear Bumpers:
(#9) 4 Concrete Nails:
(#10) 4 5 Penny Nails:
If you find that any parts are damaged or missing, refer to
the parts list and the IPB Drawing and contact Contractors
Wardrobe
®
’s Customer Service Department at
661-257-1177. NOTE: Views and directions given in these
instructions — left, right, front and back, etc. — are from
outside the closet, facing the wardrobe doors.
TOOL CHECK LIST:
You will need:
• PhillipsScrewdriver
• TapeMeasure
• Hammer
• Pencil
• 3/8ʺ Drill Motor and 3/16ʺ and 1/8ʺ Drill Bits
• MiterBoxandHacksaw
• Square
• GlassCutter(foroptionalMirrorFascia)
• Four1ʺScrewsandScrewAnchors(Forceramictile
floorsonly.SeeFloorCheckList#5)
• Adhesive(Forceramictilefloorsonly.SeeFloor
CheckList#5)
4
INSTALLING THE DOORS
STEP 1 Removing the Existing Doors
Remove existing doors, brackets, top channel
and bottom track.
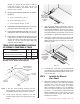
STEP 2 Installing the Top Channel
A. Measure the opening at the top of the closet from
wall to wall.
B. Cut the new Top Channel (#2) to this dimension.
When cutting the Top Channel (#2) we recommend
that you use a Miter Box and Hacksaw for a
straight cut. Cut one side only.
NOTE: If your closet has bumper jambs you may need to
notch your Top Channel (#2) on each end.
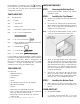
C. When cut to proper length, install Top Channel
(#2) up to the top front of closet opening making
sure that the front of the Top Channel (#2) is flush
withoutsidewalls(SeeFigure1).HolduptheTop
Channel (#2) in the desired position and with
your Pencil, mark where the pre-drilled holes are
in the Top Channel (#2).
D. Remove the Top Channel (#2) and drill holes
using 1/8ʺ Drill Bit where you made the pencil
marks. Now install the Top Channel (#2) in place
using the #8 x 1-1/2ʺ PH SMS Screws (#5).
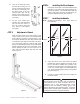
STEP 3 Installing the Bottom Track
A. Make sure that you have used the Floor Check
Listtodeterminewhichfloorandinstallationyou
will use.
ALIGNTOP
CHANNEL FLUSH
WITHTHEWALL
Figure1
FLOOR CHECK LIST
1. Do you have carpet?
It is highly recommended that if you have
carpet and do not have a cut-out in the carpet
Aurora™/ Aurora Plus™/ Serenity™/ Tranquility™ - I3010 - 0115