
Product Manual

Step 7
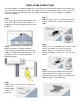
When the unit is properly located, apply a generous
amount of roofing compound between the flange
and the shingles approximately 1-in inside the
perimeter of the flange and begin to secure with
nails.
Suggested nailing pattern:
Step 8
Check the installation for leakage with water from a
garden hose. Do not spay water directly into the
vent opening.
THERMOSTAT INSTALLATION
WARNING
Before wiring the thermostat, turn the power off at the breaker to avoid electrocution.
Be certain to confirm to all Local Electric Codes and Regulations.
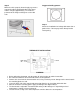
Remove the cover from the thermostat box and, using screws to prevent damage to the control, attach
the mounting plate to a stud.
Leave the back side of the control unobstructed to allow free air circulation behind the box.
Wire the unit to the incoming power supply according to the diagram above.
The thermostat is adjustable. Recommended setting is 90-110 degrees F depending on local
temperatures. Setting is fan-on and fan-off.
The fan will run as long as the attic temperature remains above the set temperature.