Microscope Digital Video Record Camera User Manual V 2.
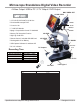
Microscope Standalone Digital Video Recorder 4 Video Output: USB to PC / 2 TV Output / DVR Output BNC VIDEO OUT 4G SD CARD MS1000 * 1/3” COLOR CCD 560TVL 0.001Lux * Functional Microscope DVR VIDEO * 2 Lens 4x 10x TO TV * 7” LCD DVR Monitor Monitor * Mpeg 4 Compression format D1 640x480 ON/OFF 4X LENS * Memory Full Overwrite Funtcion * High Ligh Cold LED.
Contents 1. SAFETY PRECAUTIONS .......................................................................................................... 1 2. FEATURES .................................................................................................................................. 2 3. PACKAGE CONTENT................................................................................................................ 3 4. Smoke DVR Description.....................................................................
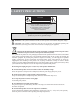
1. SAFETY PRECAUTIONSġ ġġġġġġġġġġġġġġġġ CAUTION RISK OF ELECTRIC SHOCK. DO NOT OPEN! CAUTION : TO REDUCE THE RISK OF ELECTRICAL SHOCK, DO NOT OPEN COVERS (OR BACK). NO USER SERVICEABLE PARTS INSIDE. REFER SERVICING TO QUALIFIED SERVICE PERSONNEL. It is advised to read the Safety Precaution Guide through carefully before operating the product, to prevent any possible danger. WARNING: This symbol is intended to alert the user to the presence of un-insulated “dangerous voltage”.
2. FEATURES z The Mini DVR Module supports NTSC or PAL video system, and auto detects video loss. z The Mini DVR Module is built-in with MPEG4-SP video and G.726 audio codec. It supports 1 channel video and 1 channel audio recording and playback operation. z Audio/ Video data are recorded directly on the SD card with FAT16/ 32 file system and ASF file format. Simple data backup method to a PC. z Audio/ Video data are recorded directly as ASF file format.
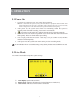
4. Microscope DVR Description 4.
5. OPERATIONġ 5.1 Power On 1. To power-up, connect to a DC 12V power input connector. (NOTE 1: Each time after power-on, the system auto-detects its peripherals. When the REC LED flashes indicate that the SD card is proceeding testing (complete boot time is several seconds) When an image file error has been detected, the system will initiate auto repairing. 2. After power on, the system auto enters live monitoring. When the system is currently under schedule recording, it auto enters record mode. 3.
P Record Status: Manual Record Parameter. 烉Record Size, please refer to˰7.4 Record Setup˱for VIDEO SIZE setup. 烉Record Quality, please refer to˰7.4 Record Setup˱for VIDEO QUALITY setup. 烉Audio Off Record, please refer to˰7.4 Record Setup˱for AUDIO RECORD setup. Q SD Card Status: 烉SD Card has not been inserted or malfunction. 烉SD Card is proceeding file testing. 烉SD Card is functioning normally. 烉Overwrite record.
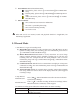
3. Record Display: M Record Status: : Indicates recording is in progress. N Record Mode: 烉Manual Record ! ! 烉Motion Detection Record 烉Schedule Record 烉Alarm Record O Record Storage Mode Status: ! 烉Continuous Record ! % 烉Remaining Storage Capacity 4 System recording is determined according to the recording priority order (Record Priority: Manual/ Alarm/ Motion Detection/ Continuous). 5. Different recording modes may have different kinds of setups.
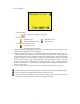
5.4 Playback Mode Selectable Playback format: Continuous Playback and Searching Playback. (1) Normal Playback: Press˪ / ˫button to first playback the final recorded data, and then according to the SD card file recording order. M Playback Status: ` 烉Press˪ / ˫button once to playback, press it again to pause. 烉Press˪ ˫or˪ ˫button to Fast Rewind or Fast Forward (Speed: x2/ x4/ x8/ x16/ x32). Press˪ / ˫button to return to normal speed playback.
烉Manual !! 烉Motion Detection!! 烉Continuous ! 烉Alarm (NOTE 1 & NOTE 2). P Each color distinguishing different recording events, the user may press˪ ˫or ˪ ˫button to move the cursor left or right and immediately shows the first image of the highlighted event on the screen display background.! Q Displays the time highlighted by the event bar.! (NOTE 1烉Select the starting point and press˪Enter˫button to playback.
6. MENU SETUPġ 6.1 Main Menu M MAIN MENU: Item subject. N Menu Layer Indication: The device consists of three menu layers. ˍ ˍˍ ˍˍˍ : First Menu Layer (Main Menu) : Second Menu Layer : Third Menu Layer O MENU Content: Basic Menu Operations. Press˪ ˫or˪ ˫button, to select the item. Press˪ENTER˫button, to enter the sub menu (烍).! Press˪ İɶ ɶ˫button: Under second or third menu layer, the system will return to the previous menu layer (second layer to first layer or third layer to second layer).
6.2 Date/ Time MDate Format 烉Y / M / D M / D / Y D / M / Y NDate/ Time Adjustment 烉Year Setup: 2000 - 2099 Month Setup: 01 - 12 Time Setup: 00 : 00 - 23 : 59 Return to factory default, no changes will be made. 6.3 Motion Detection 1. Window Setup: M Detection Block: Formed by two or more cells. N Cursor: Press˪ İII˫button to switch to Select/ Edit mode. O Detection Cell: The whole screen is divided into 16x12 cells. P Detection Block. 2.
3. Motion Detection Area Setup: (1) Press˪ İII ˫button to edit detection block. Q Mode CELL EDIT Single detection cell setup (detection/ non-detection) DEL BLOCK Disable a block Delete all cells DEL ALL ADD BLOCK Enable a block Enable all cells ADD ALL (2) Press˪ İII ˫button to switch cursor to edit mode (cursor color is pink). Press ˪ / / İ ˫button, follow step (1) to change the size of the detection block. (3) Detection area is shown by color red, press˪Enter˫to enable/ disable the detection block. 4.
6.4 Record Setup Selectable manual or schedule recording, basic setups are shown below: 1. MANUAL RECORD: Press ( ) button to start recording (NOTE 1). MVideo Size/ Frame Rate Setup: VIDEO SIZE 320x240 640x480 12 fps FRAME RATE (MAX) 30 fps NImage Quality: HIGH Using high recording quality (More CF card storage capacity will be required). MEDIUM Using medium recording quality. LOW Using low recording quality (Less CF card storage capacity will be required).
(1) SCHEDULE SETUP烉 M SCHEDULE 烉Record ON / OFF setup (default setup is OFF). N SCHEDULE MODE 烉Press˪ ˫or˪ ˫to setup schedule time. Press˪ ˫ or˪ ˫ to setup different types of recording schedule. ( 烉Motion Detection Record!! 烉Continuous Record!! 烉Alarm Triggered Record). (2) Increase setup during Alarm Detection: M DURATION 烉Duration time when motion detection has been triggered (05 ~ 90 SEC (increase by every 5 SEC) / 10 SEC). N ALARM INPUT 烉Alarm trigger method (N.C./N.O.).
(4) CONTINUE RECORD: Setup method is similar to manual record setup, for more information please refer to [7.4 1. MANUAL RECORD]. 6.5 SD Card Options M TOTAL SPACE 烉SD card total capacity. N REMAIN SPACE 烉SD card remaining capacity. (NOTE 1: Proceeding continuous recording, old videos can be deleted and overwritten. Please confirm before setup. (NOTE 2: Recording time depend on the SD card capacity, different recording modes, and degree of video variation.
6.6 System Status Press any button to return to the Main Menu. 6.7 Power On Setup M LANGUAGE 烉Setup menu language. N COMPOSITE 烉Setup video output format, NTSC/ PAL (NOTE 1). (NOTE 1: Connect the camera, the device auto detects NTSC/ PAL video system (the output video system will be setup the same as its input video system). Without connecting the camera, the video system setup will be the same as its previous setup.
6.8 Factory Default Press˪Enter˫button, returns all settings to the factory default value (NOTE 1).! Press˪ İɶ ɶ˫button, exit this screen display and returns to the Main Menu.! ! (NOTE 1: Return to factory default will erase all configuration values and return to the Factory Default values炷except Date and Time setup炸. Therefore, confirm before you proceed.
7. TROUBLE SHOOTING Q1. What is the recording capacity for 1GB SD card? A1. Different recording setup has different recording capacity. Table below shows possible recording time during continues recording applying different record mode. Quality Frame Rate SD Card High Medium Low VGA (640 x 480) 12 FPS 1 GB 155 min 280 min 340 min QVGA (320 x 240) 30 FPS 1 GB 150 min 380 min 600 min Q2. Why does the system auto reboot during normal operation? A2.
9. SPECIFICATIONġ ġ STANDARD FUNCTION System NTSC / PAL Video System and Video Loss Auto Detection Codec MPEG4-SP ASF File Format 1, 2, … , Maximum fps selectable Record Frame Rate Video 30 fps@320x240 / 12 fps@640x480 Record Quality Audio Maximum: Low / Medium / High Recording Date/Time Overlay with Video Images in ASF File Input 1 CH Composite Video Line In Output 1 CH Composite Video Line Out Sampling Rate 44.1 KHz Codec G.