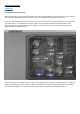
Corsair Link v2.4 Manual Initial Set-up Placing devices within the chassis When you first start up Corsair Link, there will be a list of auto-detected devices on the left column. You can drag and drop the devices listed from the left-hand side of the screen and place them anywhere on the chassis. To do this, simply left-click and hold on the device you wish to move, and then drag and drop the icon to the location you wish to place it.
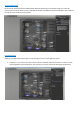
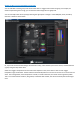
Changing device properties Temperature Sensor Configuration To change the properties of any device or monitoring function, simply right click or double click on any device icon. This will bring up the properties window on the right hand side. Here you can change the properties of the device using the drop down menus. You can see here we are adjusting the configuration for Cooling Temp 1. These devices can also be renamed.
Device Configuration Because some motherboards report RPM speeds differently depending on the chipset being used, it may be necessary to set a speed divider for the pump RPM as needed. If the RPM seems abnormally high or low compared to what you have, enable the speed divider. Fan Configuration Selecting a fan will enable several options in the drop down menus on the right hand panel 1.
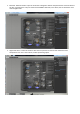
2. Balanced - Balanced mode is a pre-set mode that is designed to balance the performance and noise levels of the fans. Typically this is a very low noise level and RPM at low loads, and a faster, but not obnoxious noise level at higher loads. 3. High Performance - Select this mode to allow the fan speeds to increase to their maximum as the temperature rises. This is the noisiest, but best performing option.
4. Custom - This setting will allow you to fully customize the fan speed based of temperature thresholds and ranges. For a CPU cooler, make sure each fan is tied to your CPU temperature or Coolant Temperature, and then you can personalize the fan performance profile to your liking. 5. Fixed RPM - Select this option to set the fan speed at your desired RPM regardless of the temperature readings. The fan will run at a constant speed, and will not adjust based on temperature.
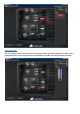
. Maximum RPM - This option overrides any custom settings and runs the fan at it maximum speed, regardless of temperature. LED Setup Selecting the LEDs (if equipped) allows you to customize the LED lighting within your case. You can choose the color and whether or not to have normal or cycling lighting.
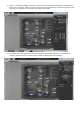
Adding an LED to a group and linking to properties You can add LEDs to device groups and then link the colors to trigger events within the group, for example, if a certain temperature goes too high, you can have the LEDs change color to signify that. You can manually select colors by simply selecting the appropriate “strength” of the RGB (Red, Green, and Blue) channels. Full blue is shown below.
LED Custom Name. You can customize the LED name by putting your own preferred label. Click the box right next to “Name” under Configuration panel. In this example we have re-labelled LED1 to Case LED. This feature applies to any device.
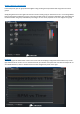
Adding a device to a control group In the Groups tab, you can group devices together using the drag and drop method and assign them to control groups. Simply drag devices from the right hand column into the control group you want them to be in. In the image below LED1 is assigned the temperature group, so the fans and LED will act as one device dependent upon the settings for the devices within the group. LED2 will vary according to its own set of properties as it is not assigned to a group.
Closing the configuration panel shows the device color key. Saving a Profile You can save your profile, load existing profiles or create new profiles from the File menu. You can have multiple profiles for different uses, such as quiet, low power computing or full performance for gaming.
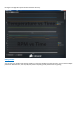
To create a new profile, go to Options tab and under Profile section click new. A window will pop up where you can name of the profile you would like to create then save it. Power Tab The Software will automatically detect a Corsair PSU that is compatible with Corsair Link. If a Corsair Link enabled PSU is detected, the power tab menu will be populated with information that is outputted by the PSU.
example below, Efficiency in percentage and Power in/Power out values are available for monitoring. Voltage on each of the PSU rails is displayed as well. The OCP section. This will allow you to select a check box and enable Over Current Protection (OCP) or Multi-Rail Mode on some PSUs. The slider rail is activated upon selection of the check box and you can then adjust the OCP setting from 20A to 40A. This selection is automatically written back to the PSU upon data point adjustment.
Options Tab General Options This section is where you can manage Corsair Link settings. You can select whether you want to have your temperature scale measured in °C or °F values. You will have the option to run Corsair Link during Windows start up or you simply run it manually once Windows has fully loaded. Selecting skins, font color, and restarting the service will be under this section as well. Clicking “Reset to Default” box will set all values and settings back to default profile.
Once the device is selected, click the box next to the file tab, then select the Firmware file update you have downloaded and click open. Select start to initiate the firmware update. The progress of the upgrade will be shown as a percentage in the dialogue box. Once the update is complete, simply close the dialogue box using the X in the top right corner or the “Close” button in the dialog box.
To view details of the software version as well as contact Corsair, click the About Tab