
Installation Guide

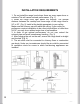


INSTALLATION REQUIREMENTS
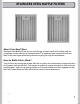
1. Do not install the range hood where there are many open doors or
windows.This will cause reduced performance. (Fig. 1)
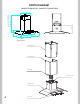
2. Install the range hood right above the cooktop. The optimal
distance between the cooktop and lower edge of the range hood is
24” to 36”. (Fig. 2) Install at the height appropriate to your ceiling.
Make sure the chimney can still reach the ceiling. If your ceiling or
preference requires installation to be a few inches higher or lower than
24-36" you may do so without major loss of performance.
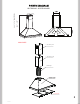
3. In order to get optimal performance, do not over extend the
exhaust pipe and avoid unnecessary bending. (Fig. 3)
4. After hanging the unit on the wall, ensure the range hood is straight
and leveled. (Fig. 4)
5. The air outlet must be connected to chimney flues or combustion
gas ducts. Under no circumstances should the air outlet be connected
to ventilation ducts for rooms in which fuel-burning appliances are
installed.
7
25" to 35"
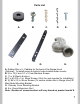
A. Rubber Disc x 2 - Padding for the back of the Range Hood
(Optional). To install screw on back in holes located under mounts.
B. (8 or 12) 4 mm-0.7 x 12 mm Machine Screws
C. (7 or 8) Plastic Anchors
D.
(7 or 8) #10 x 2 in. Wood Screws (Only four are required for installation)
E. (2) #8 x 1/2 in. Wood Screws (To secure rubber disc to Range Hood) F.
Main Body Mounting Bracket
G. Chimney Cover Mounting Bracket
H. 6 in. Round Aluminum Duct
Note : Number of screws/anchors will vary based on product model #.
H.
B.
E.
A.
Parts List
8
C.
D.
G.
F.
7