TABLE OF CONTENTS OVEN SAFETY............................................................................................................. 2 Warnings for Electric Installation........................................................................................... 3 PARTS AND FEATURES............................................................................................... 6 CONTROL PANEL.......................................................................................................
OVEN SAFETY Your safety and the safety of others are very important. We have provided many important safety messages in this manual and on your appliance. Always read and obey all safety messages. This is the safety alert symbol. This symbol alerts you to potential hazards that can kill or hurt you and others. All safety messages will follow the safety alert symbol and either the word “DANGER,” “WARNING” or “CAUTION.” These words mean: DANGER An imminently hazardous situation.
WARNINGS FOR ELECTRIC INSTALLATION WARNING Electrical Shock Hazard Installation and service must be performed by a qualified installer or service agency. The models may be powered at 240V or 208V. Always disconnect the power before servicing this unit. This appliance must be properly grounded. Failure to do so could result in death or serious injury.
IMPORTANT SAFETY INSTRUCTIONS • Do not cover or block any openings on this appliance. • Use this appliance only for its intended use as described in this manual. Do not use corrosive chemicals, vapors, or nonfood products in this appliance. This type of oven is specifically designed to heat or cook. It is not designed for industrial or laboratory use. The use of corrosive chemicals in heating or cleaning will damage the appliance.
IMPORTANT SAFETY INSTRUCTIONS • During and after use, do not • • • • • touch or let clothing or other flammable materials contact the heating elements or the interior surfaces of the oven until they have had sufficient time to cool. The trim on the top and sides of the oven door may become hot enough to cause burns. Use care when opening the door. Open the door slightly to let hot air or steam escape before removing or replacing food. Do not heat unopened food containers.
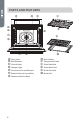
PARTS AND FEATURES a b h g c j d i k l d f e a Oven Vent b Broil Element c Control Panel d Halogen Light e Convection Fan and Element f Bottom Element (not visible) g Model and Serial # Plate 6 m h Door Gasket i Temperature Probe j Oven Rack Back k Oven Rack Front l Broiler Pan Rack m Broiler Pan
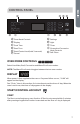
CONTROL PANEL a Bake Broil Convection b c d e Warm/ Proof Meats 2 3 4 5 6 7 8 9 Timer 0 Light Cook Time Start Start Time Self Clean Baked Goods 1 Other Foods Settings Cancel g f Convection Conversion k j i a Oven Mode Controls b Display c Cook Time d Start Time e Start/Control Lock (hold 3 seconds) f Cancel OVEN MODE CONTROLS Bake h g Settings h Light i Timer j Convection Conversion Mode Controls k Self-Clean Broil Convection Warm/ Proof Select from Bake, Broil, Conve
CONTROL PANEL LOCKOUT The control panel can be locked to avoid unintended use of the oven. NOTES: • The control cannot be locked if the oven is in use or if Cook Time is operating. • The current time-of-day will remain in the display when the control is locked. To Lock Control Panel: • Press and hold START for 3 seconds or until “LOCKED” appears in the display. “LOCKED” will remain lit in the display. To Unlock Control Panel: Press and hold START for 3 seconds or until “LOCKED” scrolls in the display.
NOTES: • Cook Time can be set in hours or minutes up to 11 hours and 59 minutes. • To change the cook time during cooking, press CANCEL. Enter the new cook time and press START. • At the end of the set cook time, the oven will turn off automatically, the alert tone will sound, and “Cooking Complete” will appear in the text area. To Set Cook Time: 1. Select cooking mode. 2. Select temperature. 3. Press COOK TIME. Enter the desired cook time by pressing the number keypad. 4. Press START.
SETTINGS Settings The Settings control allows you to access the menu for additional functions and features. Press SETTINGS to show Menu Options 1 - 6. Then, press START to show Options 7 - 9. CLOCK The clock can be set to display time in a 12-hour or 24-hour format. The clock is factory preset for the 12-hour format. To Set the Clock: NOTE: Before setting the clock, make sure both the Oven and Timer are turned Off. 1. Press SETTINGS. The various Options will appear in the display. 2.
To Adjust Sound Volume: The oven sound is factory preset for High but can be changed to Low. 1. Press SETTINGS. The various Options will appear in the display. 2. Press “4” on the number keypad. “SOUND VOLUME” and “HIGH” will appear in the display. 3. Press “1” on the number keypad. HIGH/LOW” will appear in the display. 4. Press “1” on the number keypad to turn the sound Low. 5. Press SETTINGS to confirm. The sound volume has now been changed. 6.
To Bake While the Oven is in Sabbath Mode: 1. Press and hold BAKE for 3 seconds. 2. Enter the desired oven temperature by pressing the numbered keypad. 3. After selecting Bake and a Temperature, you have the option to set a Cook Time and Start Time before pressing START. See “Cook Time” and “Start Time.” 4. Press START. Pressing Start activates Sabbath mode. Only the Cancel control is functional. • Press CANCEL twice to exit Sabbath mode, and resume normal oven operation.
OVEN USE BEFORE USING THE OVEN 1. Turn the Temperature Control to the highest setting. 2. Turn the Cooking Mode Selection control to a cooking mode. 3. Allow the oven to operate for 30 minutes with the door closed and no food in the cavity. NOTE: Any odor that may be detected during this initial use is due to the evaporation of substances used to protect the oven during storage. 4. Turn off the oven, and allow the oven to cool.
TEMPERATURE PROBE WARNING Burn Hazard Use an oven mitt to remove temperature probe. Do not touch broil element. Failure to do so can result in burns. The temperature probe monitors the internal food temperature, which is frequently used as an indicator of doneness especially for meats and poultry, and turns off the oven when the internal food temperature reaches the programmed temperature. The temperature probe will work with all oven modes except for the Warm/Proof, Sabbath and Self-Clean modes.
UTENSILS • Glass baking dishes absorb heat. Reduce oven temperature 25°F (15°C) when baking in glass. • Use pans that produce the desired browning. The type of finish on the pan will help determine the amount of browning that will occur. - Shiny, smooth metal or light non-stick / anodized pans reflect heat, resulting in lighter, more delicate browning. Cakes and cookies require this type of utensil. - Dark, rough or dull pans will absorb heat resulting in a browner, crisper crust.
OVEN VENTS Blocking or covering the oven vents will cause poor air circulation, affecting cooking, cleaning and cooling results. • Both the upper and lower oven vent(s) allow fresh air to enter the cooling system. • The lower oven vent also allows hot air to be expelled from the cooling system. OVEN CONDENSATION AND TEMPERATURE • It is normal for a certain amount of moisture to evaporate from the food during any cooking process. The amount depends on the moisture content of the food.
OVEN MODES The illustrations show the heating elements and fans used for each oven mode. NOTE: The lower element is concealed under the oven floor. BAKE Baking is cooking with heated air. Both upper and lower elements in the oven are used to heat the air but no fan is used to circulate the heat. Follow the recipe or convenience food directions for baking temperature, time and rack position. Baking time will vary with the temperature of ingredients and the size, shape and finish of the bakeware. 1.
To Broil: 1. Place the food on the rack in the broiler pan and place pan in the oven. Close the oven door. NOTE: Preheating is not necessary. 2. Press BROIL for the desired mode. “BROIL” and “Set temp or Press START” will appear in the display, and “550ºF” (288ºC) will be displayed. 3. Press START, if you wish to broil at 550°F (288°C). OR Enter the desired temperature by pressing the number keypad, and then press START. The temperature can be set from 450°F (232°C) to 550°F (288°C). 4.
3. “WARM” will appear in the display, once Start is pressed. NOTE: After selecting an Oven Mode and Temperature, you have the option to set a Cook Time and Start Time before pressing START. See “Cook Time” and “Start Time.” 4. Place food in the oven and close the door. 5. Press CANCEL when finished, and remove food from the oven. To Cancel Warm Feature: • Press CANCEL. Remove food from oven. Proof 1.
Advantages of Convection Cooking • Saves time and energy. • • • • Even baking, browning and crisping are achieved. • • • • • Baking on multiple racks at the same time with even results is possible. During roasting, juices and flavors are sealed in while the exterior is crisp. Yeast breads are lighter, more evenly textured, more golden and crustier. Air-leavened foods such as cream puffs, soufflés and meringues are higher and lighter. Prepare whole meals at once with no flavor transfer.
4. Press START, if you wish to broil at 450°F (232°C). OR Enter the desired temperature by pressing the number keypad, and then press START. The temperature can be set from 170°F(77°C) to 550°F(288°C). NOTE: After selecting an Oven Mode and Temperature, you have the option to set a Cook Time and Start Time before pressing START. See “Cook Time” and “Start Time.” 5. “Convect Broil” will be displayed, once Start is pressed. 6. Press CANCEL when finished, and remove food from the oven.
4. Press the number keypad to select among the 1.MEAT, 2.BAKED GOODS and 3.OTHER FOODS options. 5. Press START to confirm the selection. “Set temp and press START” will appear in the display. 6. Enter your normal roasting temperature by pressing the number keypad. 7. Enter your normal Cook Time. See “Cook Time,” and then press START. NOTE: Setting a Cook Time is required for Convection Conversion oven mode. See “Cook Time.” BAKED GOODS AND OTHER FOODS (ONLY) 1. Preheating will start.
BAKE CHART RACK POSITION TEMP.
• Multiple rack cooking for oven meals is done on rack positions 1, 2, 3 , 4 and 5. All six racks can be used for cookies, biscuits and appetizers. - 2 Rack baking: Use positions 1 and 3. - When baking four cake layers at the same time, stagger pans so that one pan is not directly above another. For best results, place cakes on front of upper rack and back of lower rack (See graphic at right). Allow 1" - 1 ½" (2.5 - 3 cm) air space around pans. • Converting your own recipe can be easy.
CONVECTION BAKE CHART Reduce standard recipe temperature by 25 ºF (15 °C) for Convection Bake. Temperatures have been reduced in this chart. RACK POSITION TEMP.
CONVECTION ROAST TIPS • • • Do not preheat for Convection Roast. • Use the 2-piece broil pan for roasting uncovered. Roast in a low-sided, uncovered pan. When roasting whole chickens or turkey, tuck wings behind back and loosely tie legs with kitchen string. WARNING Burn Hazard Use an oven mitt to remove temperature probe. Do not touch broil element. Failure to do so can result in burns.
CONVECTION ROAST CHART MEATS WEIGHT (lb) OVEN TEMP. °F (°C) RACK POSITION TIME (min. per lb) INTERNAL TEMP.
CONVECTION BROIL TIPS • • • • • Place rack in the required position needed before turning on the oven. Use Convection Broil mode with the oven door closed. Do not preheat oven. Use the 2-piece broil pan. Turn meats once halfway through the cooking time (see convection broil chart). CONVECTION BROIL CHART RACK POSITION BROIL SETTING °F (°C) INTERNAL TEMP.
DEHYDRATE TIPS The circulating heated air at a lower temperature slowly removes the moisture for food preservation. • • • • Oven temperature for dehydrating is between 120ºF (50ºC) to 160ºF (70ºC). • • • This mode is suitable for a variety of fruits, vegetables, herbs and meat strips. Multiple racks can be used simultaneously. Some foods require as much as 14-15 hours of time to fully dehydrate. Consult a food preservation book for specific times and the handling of various foods.
FOOD Mushrooms Tomatoes APPROXIMATE DRYING TIME* (hrs) PREPARATION TEST FOR DONENESS Wash and towel dry. Cut of stem end. Cut into 1/8" slices 7-12 Tough and leathery, dry Wash and towel dry. Cut this slices, 1/8" thick, dry well 16-23 Dry, brick red color Rinse and dry with paper towel Dry at 120°F (60°C) 3-5 hrs Crisp and brittle Use basil leaves 3 to 4 inches from top.
RACK POSITION BROIL SETTING °F (°C) INTERNAL TEMP. °F (°C) TIME SIDE 1 (MIN.)* TIME SIDE 2 (MIN.
OVEN CARE GENERAL CLEANING IMPORTANT: Before Cleaning, make sure all controls are off and the oven is cool. Always follow the instructions printed on the label of the cleaning products. USING THE CLEANING CHART 1. Locate the number of the part to be cleaned in the following illustration. 2. Find the part name in the chart. • • Use the cleaning method in the left column if the oven is black or white. Use the cleaning method in the right column if the oven is stainless steel. 3.
Cleaning Method Part Cleaning Method Stainless Steel Oven Part Stainless Steel Oven 1 Control Panel C-G 10 Interior Oven Door E 2 Door Cooling Vent E 11 Oven Front Frame E 3 Side Trim D 12 Oven Cavity E 4 Bottom Trim D 13 Door Gasket B 5 Door Frame E 14 Oven Cooling Vents D 6 Door Handle G 15 Oven Rack A 7 Interior Door Windows F 16 Broiler Pan Rack E 8 Door Front C&G 17 Broiler Pan E 9 End Caps D OVEN FINISHES / CLEANING METHODS The entire oven can be
E Porcelain Immediately wipe up acidic spills like fruit juice, milk and tomatoes with a dry towel. Do not use a moistened sponge/towel on hot porcelain. When cool, clean with hot sudsy water or apply BonAmi® or Soft Scrub® to a damp sponge. Rinse and dry. For stubborn stains, gently use Brillo® or S.O.S.® pads. It is normal for porcelain to craze (fine lines) with age due to exposure from heat and food soil. FR eflective Glass Clean with hot sudsy water and sponge or plastic scrubber.
• The oven is preset for a 2.5 hour clean cycle; however, the time can be changed. Suggested clean times are 2 hours for light soil and between 3.0 hours and 3.5 hours for average to heavy soil. • • Clean mode stops automatically at the end of the set cleaning time. • The oven light does not operate during Clean mode. When the oven heat drops to a safe temperature, the automatic door lock will release and the door can be opened. BEFORE SELF-CLEANING 1. Remove all utensils and bakeware. 2.
5. If you want to delay the start of the self-cleaning cycle, press DELAY START, and then set a time, by pressing the number keypad. 6. Press START. After the door is locked, “SELF CLEAN” will scroll in the selected text area until the clean cycle is finished. When the Self-clean Cycle Ends: “COMPLETE” appears in the display and the oven door unlocks. 7. Once the oven has completely cooled, remove ash with a damp cloth.
To Replace the Oven Door: 1. Holding the door firmly, insert the upper arms of both hinges into the slots. The recesses must hook on the lips. a b c d a Upper Arm b Recess c Slots d Lip 2. Open the oven door. NOTE: You should hear a “click” sound when the door is correctly in place. 3. Move the hinge latch on each side back into the locked position. 4. Open and close the door to test that it operates freely. If it does not, repeat the door removal and replacement process. 5.
1. Disconnect power at the main power supply (fuse or breaker box). 2. Using a Phillips-head screwdriver, remove the screw, and then remove the cover. a a Light Cover 3. Remove the burned out bulb from the socket. a b a Light Bulb b Light Cover NOTE: To avoid damage or decreasing the life of the new bulb, do not touch bulb with bare fingers. Wear cotton gloves or use a tissue when replacing the light bulb. 4. Replace the bulb, and then replace the bulb cover. 5.
TROUBLESHOOTING First try the solutions suggested here to possibly avoid the cost of a service call. BAKING AND ROASTING With either Bake or Convection Bake and Convection Roast poor results can occur for many reasons other than a malfunction of the oven. Check the chart below for causes of the most common problems. Since the size, shape and material of baking utensils directly affect the baking results, the best solution may be to replace old baking utensils that have darkened and warped with age and use.
BAKING PROBLEM CAUSE Cakes high in middle with crack on top • • • • • • • Piecrust edges too brown Oven temperature too high Baking time too long Pans touching each other or oven walls Incorrect rack position Pan size too small Oven temperature too high Edges of crust too thin OPERATION PROBLEM POSSIBLE CAUSE SOLUTION F03 or F04 Error appears in the display window. A problem with latch mechanism occurred.
PROBLEM POSSIBLE CAUSE SOLUTION Oven light is not working properly. Light bulb is loose or burned out. Replace or reinsert the light bulb if loose or defective. Touching the bulb with fingers may cause the bulb to burn out. Oven light stays on. Oven door does not close completely. Check for obstruction in oven door. Check to see if hinge is bent or door switch is broken. Cannot remove lens cover on light. Lens cover is dirty. There may be a soil build-up around the lens cover.
LIMITED WARRANTY IN-HOME SERVICE FULL TWO YEAR WARRANTY For 24 months from the date of original retail purchase, Cosmo will repair or replace any part free of charge including labor that fails due to a defect in materials or workmanship. Cosmo may replace or repair at their sole discretion any part, sub system including the entire product. Product must be accessible, without encumbrance and installed properly to receive warranty repair service.