ELECTRIC COOKTOP COS-244ECC COS-304ECC COS-365ECC Installation Manual IMPORTANT SAFETY INSTRUCTIONS: Carefully read the following important information regarding installation safety and maintenance. Keep these instructions for future reference.
THANK YOU FOR YOUR PURCHASE Thank you for your purchase! We know that you have many brands and products to choose from and we are honored to know that you have decided to take one of our products into your home and hope that you enjoy it. COSMO appliances are designed according to the strictest safety and performance standards for the North American market. We follow the most advanced manufacturing philosophy. Each appliance leaves the factory after thorough quality inspection and testing.
TABLE OF CONTENTS SAFETY & WARNINGS ................................................................4 INSTALLATION REQUIREMENTS ............................................5-11 Tools & Parts ....................................................................................5 Location Requirements .................................................................5 Product Specs: COS-244ECC ........................................................6 Product Specs: COS-304ECC ....................................
SAFETY & WARNINGS SAVE THESE INSTRUCTIONS FOR FUTURE REFERENCE AND FOR LOCAL ELECTRICAL INSPECTOR'S USE. This is the safety alert symbol. This symbol alerts you to potential hazards that can kill or hurt you and others. All safety messages follow the safety alert symbol and one of the following words: DANGER!: You can be killed or seriously injured if you do not immediately follow instructions. WARNING!: You can be killed or seriously injured if you don't follow instructions.
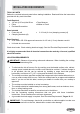
INSTALLATION REQUIREMENTS TOOLS & PARTS Gather the required tools and parts before starting installation. Read and follow the instructions provided with any tools listed here. Tools Required 1/4 inch (6.35 mm) Nut Driver Pliers Flat-head Screwdriver Tape Measure Marker or Pencil Parts Included Foam strip roll Clamping brackets (x2) 2 1/2 inch (6.4 cm) clamping screws (x2) Parts Required A UL-listed -OR- CSA-approved connector for 1/2 inch (1.
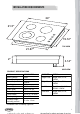
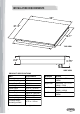
INSTALLATION REQUIREMENTS 24" 21.5" 19.12" TOP VIEW 21.87" 2" 3.14" SIDE VIEW PRODUCT SPECIFICATIONS SKU Rated Voltage Rated Frequency Rated Output Power Net Weight Glass Depth Glass Width Frame Depth Frame Width Cooktop Height Cooktop Height including conduit* COS-244ECC 240V 60Hz BURNER Right Front 5500W 20 lbs. Right Rear 19.12 in. / 48.6 cm Left Rear 21.5 in. / 54.6 cm 24 in. / 61 cm 21.87 in. / 55.6 cm 2 in. / 5.2 cm Left Front SPECS Single Zone, 5.9 in., 1200W Single Zone, 7.5 in.
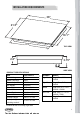
INSTALLATION REQUIREMENTS 30" 21.5" 19.1" 27.8" TOP VIEW 2.8" 3.75" SIDE VIEW PRODUCT SPECIFICATIONS SKU Rated Voltage Rated Frequency COS-304ECC 240V 60Hz Glass Depth Glass Width Frame Depth 21.5 in. / 54.6 cm 30 in. / 76.2 cm Rated Output Power Net Weight Frame Width Cooktop Height Cooktop Height including conduit* Right Front 6700W 23.59 lbs. Right Rear 19.12 in. / 48.6 cm Left Rear 27.81 in. / 70.6 cm 2.81 in. / 5.6 cm 3.75 in. / 9.
INSTALLATION REQUIREMENTS 36" 21.5" 19.1" 33.6" TOP VIEW 2.8" 3.75" PRODUCT SPECIFICATIONS SKU Rated Voltage Rated Frequency COS-365ECC 240V 60Hz Glass Depth Glass Width Frame Depth 28.22 lbs. 21.5 in. / 54.6 cm 36 in. / 91.4 cm 19.12 in. / 48.6 cm Rated Output Power Net Weight: Frame Width Cooktop Height Cooktop Height including conduit* 8500W 33.68 in. / 85.6 cm 2.81 in. / 5.6 cm 3.75 in. / 9.5 cm SIDE VIEW BURNER Right Front Right Rear Middle Left Front Left Rear SPECS Single Zone, 5.
INSTALLATION REQUIREMENTS CABINET DIMENSIONS A D B C L E G F IMPORTANT!: If installing a range hood or microwave hood combination above the cooktop, follow the range hood or microwave hood combination installation instructions for dimensional clearances above the cooktop surface. H I K J A.) 24" (61.0 cm) on 24" models; 30" (76.2 cm) on 30" models; 36" (91.4 cm) on 36" models H.) Junction box or outlet: 7" (17.8 cm) minimum from top of countertop C.) 30" (76.
INSTALLATION REQUIREMENTS ELECTRICAL REQUIREMENTS WARNING! ELECTRICAL SHOCK HAZARD Disconnect power before servicing. Use 8-Gauge copper wire. Electrically ground the cooktop. Failure to follow these instructions can result in death, fire, or electrical shock. If codes permit and a separate ground wire is used, it is recommended that a qualified electrical installer determine that the ground path and wire gauge are in accordance with local codes.
INSTALLATION REQUIREMENTS ELECTRICAL REQUIREMENTS (Continued) Before You Make the Electrical Connection To properly install your cooktop, you must determine the type of electrical connection you will be using and follow the instructions provided for it here. A 3-wire or 4-wire, single-phase, 120/240 volt, 60-Hz., AC-only electrical supply is required on a separate, 40-amp circuit fused on both sides of the line. The model/serial number rating plate is located on the metal cabinet underneath the cooktop.
INSTALLATION INSTRUCTIONS PREPARE COOKTOP FOR INSTALLATION WARNING! EXCESSIVE WEIGHT HAZARD: Use two or more people to move and install the cooktop. Failure to do so can result in back or other injury. A B Decide on the final location for the cooktop. Avoid drilling into or severing existing wiring during installation. C A.) Cooktop base B.) 1/16" x 3/16" (0.2 x 0.5 cm) Foam strip C.
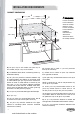
INSTALLATION INSTRUCTIONS Installing Brackets After Placing Cooktop in Cutout F 3cm A B C D E A B C 3.) 13 D E A) B) C) D) Cooktop Cooktop base Clamping screw Clamping bracket (extends far enough beyond cooktop base to allow installation of clamping screws) E) Countertop F) Foam seal F A 1 9/16 '' B 2.) C 5cm 1.) 1 1/8'' F 4cm 1. Using 2 or more people, place the cooktop right side up into the cutout. a.
INSTALLATION INSTRUCTIONS MAKE ELECTRICAL CONNECTION WARNING! ELECTRICAL SHOCK HAZARD Disconnect power before servicing. Use 8-Gauge copper wire. Electrically ground the cooktop. Failure to follow these instructions can result in death, fire, or electrical shock. This cooktop is manufactured with a frame-connected, green, or bare-ground wire. Connect the cooktop cable to the junction box through the UL-listed or CSA-approved conduit connector.
INSTALLATION INSTRUCTIONS 4-Wire Cable from Power Supply to 3-Wire Cable from Cooktop IMPORTANT!: Use the 4-wire cable from power supply where local codes do not permit connecting the frame-ground conductor to the neutral (white) junction box wire. A B C D A.) 4-wire cable from power supply B.) Red wires C.) Green or bare ground wire (from cooktop) D.) 3-wire cable from cooktop E.) Junction box E F G H I F.) White wire (from power supply) G.) UL listed wire connector H.) Black wires I.
INSTALLATION INSTRUCTIONS 3-Wire Cable from Power Supply to 3-Wire Cable from Cooktop IMPORTANT!: Use the 3-wire cable from the power supply where local codes permit connecting the frame-ground conductor to the neutral (white) junction box wire. A E B F G H C I D A.) 3-wire cable from power supply B.) Red wires C.) Green or bare ground wire (from cooktop) D.) 3-wire cable from cooktop E.) Junction box F.) White wire (from power supply) G.) UL-listed wire connector H.) Black wires I.
INSTALLATION INSTRUCTIONS COMPLETE INSTALLATION 1. Check that all parts are now installed. If there is an extra part leftover, go back through the installation steps to determine what may have been missed or skipped. 2. Check that you have all your tools. 3. Dispose of / recycle all packaging materials. 4. Use a mild solution of liquid household cleaner and warm water to clean cooktop 5. before use. Dry thoroughly with a soft cloth.
WARRANTY AND SERVICE For full warranty details on this product please visit: http://www.cosmoappliances.com/warranty TO RECEIVE WARRANTY SERVICE, YOUR PRODUCT MUST BE REGISTERED. TO REGISTER, VISIT: WWW.COSMOAPPLIANCES.
IMPORTANT Do Not Return This Product To The Store If you have a problem with this product, please contact Cosmo Customer Support at +1(888)784-3108 DATED PROOF OF PURCHASE, MODEL #, AND SERIAL # REQUIRED FOR WARRANTY SERVICE IMPORTANT Ne pas Réexpédier ce Produit au Magasin Pour tout problème concernant ce produit, veuillez contacter le service des consommateurs Cosmo Customer Support au +1(888) 784-3108 UNE PREUVE D’ACHAT DATEE EST REQUISE POUR BENEFICIER DE LA GARANTIE.
Cosmo is constantly making efforts to improve the quality and performance of our products, so we may make changes to our appliances without updating this manual. Electronic version of this manual is available at: www.cosmoappliances.