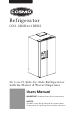
Refrigerator COS-SBSR263RHSS 26.3 cu. ft. Side-by-Side Refrigerator with Ice Maker & Water Dispenser Users Manual IMPORTANT: Read and save these instructions.
THANK YOU FOR YOUR PURCHASE Thank you for your purchase. We know that you have many brands and products to choose from and we are honored to know that you have decided to take one of our products into your home and hope that you enjoy it. COSMO Appliances are designed according to the strictest safety and performance standard for the North American market. We follow the most advanced manufacturing philosophy. Each appliance leaves the factory after thorough quality inspection and testing.
TABLE OF CONTENTS SAFETY & WARNINGS ..........................................................4-7 Electrical Warnings ..................................................................5 Operation Warnings ..................................................................6 Placement Warnings .............................................................6-7 Energy Warnings .......................................................................7 Disposal Warnings ................................................
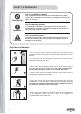
SAFETY & WARNINGS WARNING: Risk of fire / flammable materials This appliance is intended to be used in household and similar applications such as staff kitchen areas in shops, offices and other working environments; farm houses and by clients in hotels, motels and other residential type environments; bed and breakfast type environments; catering and similar non-retail applications.
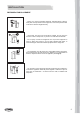
SAFETY & WARNINGS PROHIBITION This is a prohibition symbol. Any incompliance with instructions marked with this symbol may result in damage to the product or endanger the personal safety of the user. WARNING This is a warning symbol. It is required to operate in strict observance of instructions marked with this symbol, otherwise damage to the product or personal injury may be caused. CAUTION This is a caution symbol. Instructions marked with this symbol require special caution.
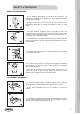
SAFETY & WARNINGS OPERATION WARNINGS ∙ Do not arbitrarily disassemble or reconstruct the refrigerator, nor damage the refrigerant circuit; maintenance of the appliance must be conducted by a specialist. ∙ Damaged power cord must be replaced by the manufacturer, its maintenance department or related professionals in order to avoid danger. ∙ The gaps between refrigerator doors and between doors and refrigerator body are small, be noted not to put your hand in these areas to prevent from squeezing the finger.
SAFETY & WARNINGS PLACEMENT WARNINGS (CONTINUED) ∙ Do not store beer, beverage or other fluid contained in bottles or enclosed containers in the freezing chamber of the refrigerator; the bottles or enclosed containers may crack due to freezing and cause damage to the appliance and/or a safety hazard. ENERGY WARNINGS 1.
INSTALLATION REFRIGERATOR PLACEMENT ∙ Before use, remove all packing materials, including bottom cushions, foam pads and tape inside of the refrigerator; remove the protective film on the doors and the refrigerator body. ∙ Keep away from heat and avoid direct sunlight. Do not place the freezer in moist or damp areas, to prevent rust and reduced insulation. ∙ Do not spray or wash the refrigerator.
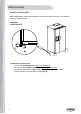
INSTALLATION ADJUST LEVELING FEET Before adjustment, ensure the refrigerator is disconnected from power. Use extreme caution to prevent injury. DIAGRAM: LEVELING FEET To adjust the leveling feet: a. Turn the feet clockwise to raise the refrigerator b. Turn the feet counter-clockwise to lower the refrigerator c. Adjust the feet either right or left to allow the refrigerator to stand level to the floor per instructions (See Page 8).
INSTALLATION ADJUST LEVELING DOOR Before adjustment, ensure the refrigerator is disconnected from power. Use extreme caution to prevent injury. DIAGRAM: LEVELING THE DOOR To adjust the top refrigerator door: 1.) Turn the locking nut clockwise and loose 2.) Turn the adjusting nut counter-clockwise to adjust 3.) Lock the locking nut after adjusting To adjust the bottom refrigerator door: 1.) Turn the adjusting nut clockwise to adjust 2.
INSTALLATION CHANGING THE LIGHT Replacement or maintenance of the LED lamps is intended to be made by the manufacturer, its service agent or similar qualified person. OPERATION ∙ Before first use, keep the refrigerator still for 30 minutes before connecting it to power supply. ∙ Before putting any fresh or frozen foods, plug in the the refrigerator and run for 2-3 hours; run 4 hours in the summer season, when the ambient temperature is high.
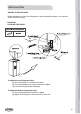
OPERATION STRUCTURE AND FUNCTIONS KEY COMPONENTS REFRIGERATING CHAMBER ∙ The Refrigerating Chamber is suitable for storage of a variety of fruits, vegetables, beverages and other food to consumed in the short term. ∙ Cooked foods should not be put in the refrigerating chamber until cooled to room temperature. ∙ Foods are recommended to be properly sealed or wrapped before putting into the refrigerator. ∙ The glass shelves can be adjusted up or down for to make room for larger items.
OPERATION FUNCTIONS DISPLAY Refrigerating/freezing temperature diagram Quick freezing Quick refrigerating Filter time reset Ice machine ON/OFF ENERGY SAVING mode Lock / Unlock BUTTON OPERATION A. Refrigerating temperature adjustment B. Freezing temperature adjustment C. Filter time reset button D. Ice machine ON/OFF E. ENERGY SAVING mode button 13 F. Lock / Unlock G. Whole / cubed ice dispenser H. Water dispenser I.
OPERATION 1.) Display Door display control A.) When the refrigerator is powered on for the first time, full display will last for 3 seconds, the start-up tone will sound and then enter into the normal operation display. When the power is on for the first time, the set temperature for the refrigerating chamber and freezing chamber is 39 Fahrenheit degrees and 0 Fahrenheit degrees respectively, ice maker opens by default, and the default temperature unit is Fahrenheit. B.
OPERATION 5.) Freezing chamber temperature setting Press the freezing temperature adjustment button to select the freezing temperature zone, and then press the freezing temperature adjustment button to adjust the freezing chamber temperature. Each time the freezing chamber button is pressed, the temperature shall drop 1°C / 1°F; after the temperature reaches -22°C / -7°F, press the freezing button again, the freezing chamber temperature setting will be -14°C / 7°F.
OPERATION Dispensing Water and Ice ∙ Various sounds are produced when the appliance performs the following actions: ∙ Making ice cubes ∙ Crushing ice with the grinding machine ∙ Water flowing into the ice vessel ∙ Ice cubes falling into the ice container ∙ Water valve will produce buzzing sounds ∙ Scratching noises may be heard when dispensing ice cubes, which may indicate ice in the ice container is stuck together.
CARE & MAINTENANCE CLEANING ∙ Dusts behind the refrigerator and on the ground shall be timely cleaned to improve the cooling effect and energy saving. ∙ Check the door gasket regularly to make sure there are no debris. Clean the door gasket with a soft cloth dampened with soapy water or diluted detergent. ∙ The interior of the refrigerator should be cleaned regularly to avoid odor. ∙ Please tum off the power before cleaning interior, remove all foods, drinks ,shelves, drawers, etc.
CARE & MAINTENANCE CLEANING THE DOOR TRAY ∙ Use both hands to squeeze the door tray inward from the left and right sides, and push it upward to remove (See below diagram). ∙ Place the door tray back into the door to your preferred position. CLEANING THE ICE CONTAINER Ice in the ice container may block the outlet because of clumped ice or other reasons. In this case, the ice container needs to be cleaned or the blockage eliminated. 1.
CARE & MAINTENANCE CLEANING THE GLASS SHELVES As the innermost part of the refrigerator liner where contacting the shelves has a backstop, raise the shelves upward, then remove. Adjust the position of the shelves according to your preferences. DEFROSTING The refrigerator is made based on the air-cooling principle and thus has automatic defrosting function.
TROUBLESHOOTING Please use the following chart to troubleshoot your appliance. For further assistance, please contact customer service (See Page 23).
WARRANTY AND SERVICE For full warranty details on this product please visit: http://www.cosmoappliances.com/warranty TO RECEIVE WARRANTY SERVICE, YOUR PRODUCT MUST BE REGISTERED. TO REGISTER, VISIT: WWW.COSMOAPPLIANCES.
IMPORTANT Do Not Return This Product To The Store If you have a problem with this product, please contact Cosmo Customer Support at +1(888)784-3108 DATED PROOF OF PURCHASE, MODEL #, AND SERIAL # REQUIRED FOR WARRANTY SERVICE IMPORTANT Ne pas Réexpédier ce Produit au Magasin Pour tout problème concernant ce produit, veuillez contacter le service des consommateurs Cosmo Customer Support au +1(888) 784-3108 UNE PREUVE D’ACHAT DATEE EST REQUISE POUR BENEFICIER DE LA GARANTIE.
NOTE:
Cosmo is constantly making efforts to improve the quality and performance of our products, so we may make changes to our appliances without updating this manual. Electronic version of this manual is available at: www.cosmoappliances.