
Operating instructions


DISTRIBUTED BY: TRACTOR SUPPLY COMPANY
•
200 POWELL PLACE
•
BRENTWOOD, TN 37027
•
WWW.TRACTORSUPPLY.COM
•
MADE IN U.S.A.
9
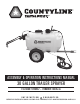
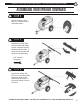
ASSEMBLY & OPERATION INSTRUCTIONS MANUAL - 30 GALLON TRAILER SPRAYER #1046832
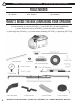
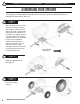
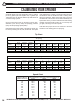
TESTING YOUR SPRAYER
OPERATING INFORMATION
Your sprayer is equipped with (2) ON/OFF switches.
One is on the wire assembly that you hook up to your
battery, the other is on the pump itself, on the opposite
endofthepressureswitch.The“-”isthe“ON”position
andthe“o”isthe“OFF”positionfortheswitches.Make
surebothswitchesaredepressedinthe“-”positionfor
operation.
InadditiontotheON/OFFswitch,thepumpisequipped
with an electronic pressure switch that is factory pre-set
for it to shut off at 60 p.s.i.. This switch assembly is the
‘square box’ on the head portion of the pump.
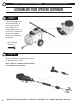
Alwaysllthetankwithadesiredamountofwaterrst,
and then add the chemical slowly, mixing as you pour
the chemical into the tank. You may use the handgun to
spray into the solution in order to mix the chemical and
water.
The pumping system draws solution from the tank,
through the strainer/lter, and to the pump.The pump
forcesthesolutionunderpressuretothehandgunand/
or boom nozzles.
• Openthehandgunbysqueezingthehandlelever.
• Rotatingtheadjustablenozzletiponthehandgun
will change the tip pattern from a straight stream to
aconepattern(nermist).
It is VERY important for you to test your sprayer with
plain water before actual spraying is attempted. This
will enable you to check the sprayer for leaks, with-
out the possibility of losing any expensive chemi-
cals.
Add water to the tank & drive to the starting place for
spraying. When you are ready to spray, turn the boom
valvetothe“on”position.Thiswillstartsolutionspraying
from the tips of the boom. The pressure will decrease
slightly when the boom is spraying. Adjust the pressure
byturningthe“ON/OFF”valveleveronthebypassline
valve.
Read the operating instructions. When everything tests
all right (no leaks, & good pressure), add the desired
chemicals to the mixture and water combination and
start your spraying operation. Adjust the pressure and
spray as you did in the testing procedure.
Conditions of weather and terrain must be considered
when setting the sprayer. Do not spray on windy days.
Protective clothing must be worn in some cases.
Be sure to read the chemical label(s) correctly!
WARNING: Some chemicals will damage the pump
valves if allowed to soak untreated for a length of
time! ALWAYS thoroughly ush the pump with water
after use. DO NOT allow chemicals to sit in the pump
for extended times of idleness. Follow the chemical
manufacturer’s instructions on disposal of all waste
water from the sprayer.