
Instructions / Assembly


- 3 -
PREPARATION TIPS
Before beginning installation of product, make sure all
parts are present. Compare parts with package contents
list. If any part is missing or damaged, do not attempt to
assemble or install the product.
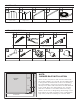
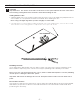
• Begin by measuring the overall width of the back wall
after it has been cleaned and prepared for installation.
• If the overall height of the back and/or side walls above
the bathtub or shower base is less than the height of the
panels, they can be easily cut to fit.
• Turn o the water supply.
• Remove all shower hardware and decorations, includ-
ing but not limited to: Faucet handles, escutcheons, filler
spouts, towel bars, and soap dishes.
• All plumbing and electrical work inside the walls must
be finished prior to installing the wall panels.
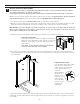
• Walls should be solid, plumb, and square within 1/8
inch of true. The Shower Wall System has been designed
to allow for trimming, to accommodate minor alignment
problems.
• The mounting surface should be cleaned and prepared,
according to the Installation Procedure.
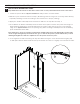
• If you plan to install a recessed accessory, cut the panel
accordingly after it has been fully installed, and had the
proper time to adhere to the wall. Remember to be
considerate of wall studs when positioning the
accessory.
CAULKING TIPS:
• Follow the instructions on the tube of your chosen
caulk.
• Once you have completed the project, inspect all areas
that have been caulked, filling in any gaps as needed.
• Remove any excess caulk using denatured alcohol and
a clean cloth. Use caution, and do not to disturb any of
the caulk joints.
INSTALLATION PROCEDURE:
The Shower Wall System can be installed over a variety
of products. Consult with a professional contractor if
you intend to apply the panels to any surface other than
those described here.
CEMENT/CONCRETE:
• Depending on the condition (flatness) of the existing
wall, additional silicone may be required to properly
secure the wall panels to the substrate.
• Surface must be completely clean. This includes but
not limited to: Soap scum, dust and any other contami-
nates that may aect adhesion. Ceramic tiles do not
need to be removed, if solidly adhered.
• Recommended: The complete area sealed with two
coats of water or oil-based sealer, to ensure proper
adhesion of the Shower Wall System.
• Complete the installation of the wall panels following
the instruction manual, after the sealer has completely
dried.
MASONITE:
• Surface must be completely clean. This includes but
not limited to: Soap scum, dust and any other contami-
nates that may aect adhesion.
• Optional: The complete area sealed with two coats of
water or oil-based sealer, to ensure proper adhesion of
the Shower Wall System.
• Complete the installation of the wall panels following
the instruction manual, after the sealer has completely
dried.
OLD TILE:
IMPORTANT: All plastic tiles must be removed. Old
ceramic tiles do not need to be removed, if solidly
adhered.
• Depending on the condition (flatness) of the existing
wall, additional silicone may be required to properly
secure the wall panels to the substrate.
• Properly remove and or reattach any loose ceramic
tiles.
• Remove all tile accessories attached to the wall.
Surface must be completely clean. This includes but not
limited to soap scum, dust and any other contaminates
that may aect adhesion.
• Complete the shower wall installation by following the
instruction manual.
PLASTER:
• Additional silicone may be required to properly secure
the substrate and the wall panel, depending on the
condition of the existing wall.
• Smooth all textured and/or swirled finishes by sanding.
• Surface must be completely clean. This includes but
not limited to soap scum, dust and any other contami-
nates that may aect adhesion.
• Recommended: The complete area sealed with two
coats of water or oil-based sealer, to ensure proper
adhesion of the Shower Wall System.
• Complete the installation of the wall panels following
the instruction manual, after the sealer has completely
dried.
SHEETROCK/GREENBOARD/CEMENT BOARD/ WOOD:
• Surface must be completely clean and free of soap
scum, dust, and any other contaminates that may aect
adhesion.
• Optional: The complete area sealed with two coats of
water or oil-based sealer, to ensure proper adhesion of
the Shower Wall System.
• Complete the installation of the wall panels following
the instruction manual, after the sealer has completely
dried.