
Instructions / Assembly
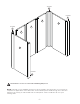


INSTALLATION PROCEDURE / STEP 2
2
- 5 -
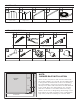
CUTTING
Important Note: The arrows on the label on the back of each panel indicate the TOP of the Panel.
The following cutting instructions should be used when making all cuts.
Cutting Panels to Size:
1. Carefully draw a line on the back of each panel where the cut is to be made. Any adjustments for
out of square or out of plumb should be considered when drawing this line.
Note: Using a straight edge when possible is highly recommended
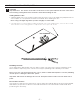
2. Circular saw is recommended for making required cuts. If using utility knife, score the line several
times and then use locking pliers to snap o the excess piece as shown.
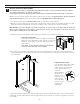
Plumbing Cut-Outs:
Use a drill and the appropriate size hole saw to create cut-outs for the shower head, filler spout,
faucet handles and/or any other cutouts necessary for plumbing that is already in the walls.
Note: To be sure your measurements are correct, make a cardboard template to test the plumbing
cutouts prior to cutting the JETCOAT® panels.
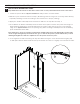
Important: Drill chuck can damage the Jetcoat® wall panel surface. Drill holes from back side of
panel.
Recessed Accessories:
If you plan to install a recessed accessory, cut the panel accordingly after it has been fully installed,
and had the proper time to adhere to the wall. Remember to be considerate of wall studs when
positioning the accessory.
RECOMMENDED
3