
Installation Guide


page 9
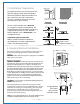
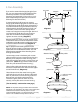
11. Testing Your Fan.
It is recommended that you test fan before finalizing
installation. Locate ON/OFF slider switch on wall
control and set to the ON position. Test fan speeds
with the different fan speed buttons. If the remote
control operates all of the functions of the fan,
battery has been installed correctly. If the wall
and/or remote controls do (does) not operate all of
the fan functions, refer to "Troubleshooting" section
to solve any issues before contacting Customer
Service.
Fan must be on LOW before setting the fan in
reverse. Reverse blade rotation (with button) to
recirculate air depending on the season.. A ceiling
fan will allow you to raise your thermostat setting in
summer and lower your thermostat setting in winter
without feeling a difference in your comfort.
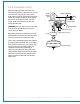
NOTE: If the wall/remote control interferes with
other appliances, change code switches on the
wall/remote control to another code. If you do
change the code, turn power off first. After setting
the new code on the wall/remote control, go back to
instructions regarding the SET button in Section 10
(page 9).
IMPORTANT: Remote and wall controls must be
synchronized with fan in order to properly function.
I
OFF ON
II
III
IV
V
VI
I
II
IV
VI
III
V
reverse
reverse
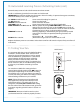
Wall Control
Remote Control
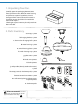
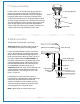
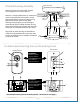
10. Automated Learning Process./Activating Code. (cont.)
Remove battery cover on back side of remote control transmitter.
Install 12-volt battery (provided) in transmitter and wall control.
IMPORTANT: Store the transmitter away from excess heat or humidity. To prevent damage to transmitter,
remove the battery if not used for long periods.
Fan SPEED control buttons 1: Use to control the ceiling fan speed 1-6
Fan OFF button 2: Use to turn the fan off
REVERSE function button 3: Use to control fan direction
LIGHTING button 4: Use to control down-light and up-light (if applicable)
CODE SWITCHES and SET button 5: With fan power off, arrange CODE SWITCHES to desired code
setting. Turn fan power on, press and hold SET button on back of
remote control and on wall control for 5 seconds within 60 seconds
of powering fan in order to synchronize with fan motor.
DIMMING function 6: Dimming capability is determined by the type of bulbs provided
with the fan. If no bulbs are provided, dimming functions will
not work.
OFF position = D On position = ON
ON/OFF slider switch 7: [Wall control only] Use to turn wall control on or off
Replace the battery cover on transmitter. Select decor cover for wall control and press firmly onto front of
wall control.