
Installation guide


10. Light Kit Assembly.
page 9
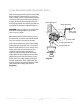
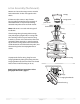
Remove 1 screw from motor plate on underside of
motor housing and partially loosen the other 2
screws. Align slotted holes in fitter plate with
loosened screws in motor plate, allowing male
plug from motor housing to come through hole in
middle of fitter plate. Twist fitter plate to lock.
Re-insert screw that was previously removed and
securely tighten all 3 screws with Phillips
screwdriver.
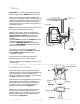
Remove 1 screw from post located on underside of
fitter plate and partially loosen the other 2 screws
on the other 2 posts. Connect male plug from
motor housing to female plug from the light kit
fitter. Make sure plugs connect tightly. Align
slotted holes in light kit fitter with loosened screws
in fitter plate. Twist light kit fitter to lock. Re-insert
screw that was previously removed and tighten all
3 screws securely.
Install the 75-watt halogen bulb, type JD E11,
included.
Tip: Do not touch glass portion of bulb with fingers or
hands. Oil from skin can cause bulb to overheat and
go out prematurely. Use cardboard box or foam
wrapping bulb was packed with to layer around glass
portion of bulb.
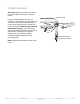
Locate slots on glass shade and align with nodules
on underside of light kit fitter. Gently push up on
glass shade and turn to the RIGHT (clockwise) until
it slides completely into place.
IMPORTANT: The glass shade must be removed in
order to replace the bulb. When replacing the bulb,
please allow bulb and glass shade to cool down
before touching. Use 75-watt max. halogen bulb,
type JD E11, to replace the bulb, keeping in mind
not to touch the bulb itself as described above (see
"Tip").
glass shade
nodules
motor housing
light kit fitter
slots
male plug
female plug
light kit fitter
bulb
motor housing
fitter plate
motor plate
fitter plate