Operator's Manual 5-1/2 in. 19.2 VOLT CORDLESS TRIM SAW Model No. 315.114260 Save this manual for future reference A WARNING: To reduce the dskof injury, the user must read and understand the operator's manual before using this product. Customer Help Line: 1-800-932-3188 Sears Roebuck and Co., 3333 Beverly Rd. Hoffman Estates, Visit the Craftsman web page: www.sears.
• Table of Contents and Warranty ....................................................................................................................................... 2 • Introductionand General Safety Rules ........................................................................................................................ 3-4 • SpecificSafety Rules and Symbols .............................................................................................................................
Your trim saw has many features for making your cutting operations more pleasant and enjoyable. Safety, performanceand dependability have been given top pnodty in the design of this trim saw making it easy to maintain and operate. j_. WARNING: Read and follow all Instructions. Failureto follow all instructionslistedbelow, may • Dress properly. Do not wear loose clothing or jewelry. Conteln long hair. Keep your heir, clothing, and gloves away from moving pads.
Shorting the battery terminals together may cause sparks, burns, or a fire. Maintain tools with care. Keep cutting tools sharp and clean. Properly maintained tools with sharp cutting edges are less likelyto bind and are easier to control. • • Check for misalignment or binding of moving pads, breakage of parts, and any other condition that may attest the toors operation, ff damaged, have the tool serviced before using. Many accidents am caused by poorlymaintained tools.
• Cheek the operetlon and condiUon of the lower guard spring. If the guard and the spring are not operating properly, they must be serviced before use. Lower guard may operate sluggishlydue to damaged parts, gummy deposits,or a buildupof debris. • Lower guard should be retracted manually only for special cuts such as "Pocket Cuts" and =Compound Cuts". Raise lower guard by Retracting Handle. As soon as blade enters the meterlal, lower guard muet be released.
• Neverusea battery that has been dropped or received a sharp blow. A damaged battery is subject to explosion, Properly dispose of a dropped battery immediately. Failure to heed this warning can result in sendus personal injury. • • Before using battery charger, read all Instructions and cautionary markings In this manual, on battery charger, and product using battery charger. Following this rule wJJlreduce the risk of electric shock,fire, or serious personal injury.
Important: Someof the following symbolsmay be used on yourtool. Please studythem and learn their meaning. Proper interpretationof these symbolswill aJlowyou to operate the tool better and safer.
TRIM SAW 315.114260 Blade Diameter CHARGER 5-1/2 in. Blade Arbor Input 3/8 in. Cutting Depth at 0° No load Speed Motor 19.2 Volt 1 Hours Charge Rate 1-1/8 in. 4,500 RPM 120 V, 60 Hz, AC only Charging Voltage 1-9/16 in, Cutting Depth at 45 ° ITEM NO._9 11041 (1425301) BATrERY PACK ITEM NO. _ 11375 (1323517 and 1323903) 19.2 Volt DC Yourtrim saw has been shipped completelyassembled exceptfor the blade. Inspect it carefullyto make sure no breakage or damage has occurredduring shipping.
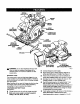
SPINDLE LOCK BUTrON LOCK-OFF BUTrON TRIGGER RIP GUIDESCREW (WING SCREW) UPPER BLADEGUARD GUARD HANDLE BEVELCUT ADZu_TMENT (BEVELADJU_FMENT KNOB) BLADEWRENCH'J_ BASE ASSEMBLY RiP GUIDE BLADEWRENGH mmHEXKEY) A WARNING: Do not allow familiaritywith your drilldriver to make you careless, Remember that a careless fraction of a second is sufficientto inflict severe injury.
minutes. Whenbattery pack reaches normal voltage range, red LED shouldcome on. If red LED does not come on after 30 minutes,this indicates a defective battery pack and shouldbe replaced. After normal usage, a minimum of 1 hour of charging time is required to fully recharge battery pack. The battery pack will become slightlywarm to the touch while charging.This is normal and does not indicate a problem. Do not place charger and battery pack in an area of extreme heat or cold.
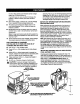
SPINDLE LOCKBg'TTON Always remove battery pack from your saw when you are assemblingparts, making adjustments,assembling or removingblades, cleaning, or when not in use. Removing battery pack will prevem accidental startingthat could cause serious personal injury. WARNING: LOWIERBLADE GUARDHANDLE Note: Your saw is assembled with the battery pack attached. TO REMOVE BATrERY F PACK See Figure 3. • Locate latches on side of be_ery pack and depress to release battery pack from your saw. See Ffgure 3.
TO REMOVE BLADE See Figure5. • Remove battery pack from saw. WARNING: Failure to remove battery pack from saw could result in accidental starting causing possible serious pemonal injury. • Remove bladewrenchfrom storagearea. See Figure 1. • Positionsaw as shown in figure 5, depress spindle lock button, and remove blade screw. Note; Turn blade screw clockwiseto remove. • Remove outerbladewasher. See Figure4. Note: Blade can be removed at this point. LATCHES BATTERYPACK Fig.
KICKBACK TO LESSEN THE CHANCE OF KICKBACK: See Figure 8. • Always keep the correctblade depth setting- the correct blade depth settingfor artouts shouldnot exceed 1/4 in. belowthe materialto be cut. Sea Figure 10. One blade toothbelow the materialto be cut w_)rksbest for most efficient cuttingaction. KICKBACI_mmmm i BLARE SET TOO DEEP Fig.B The best guard against kickback Is to avoid dangerous practices. Kickback occurswhen the blade stalls repidlyend the saw is driven back towards you.
STARTING • When making a cut use steady, even pressure, Never force cuts. • Do not cut warped or wet lumber. • Always hold your saw firmly with both hands and keep your body in a balanced position so as to resist the forces of Idckback should it occur. A CUT Know the dght way to use your saw, See Rgure 13. When using your saw, always stay alert and exercise control. Do not remove your sew from workplece while the blade Is moving. DEPTH OF CUT ADJUSTMENT Always keep correctblade depth setting.
TO HELP MAINTAIN CONTROL: Hold your saw firmly with both hands. See Figure 16. • Always supportyour workpiece near the cut, • Support your workpiece so the cut will be on your left. • Clamp your workpiece so it will not move during the cut. Place your workpiece with its good side down. Note: The good side is the side on which appearance is important, Before beginning a cut, draw a guidelinealong the desired line of cut.
TO CROSS CUT OR RIP CUT When making a cross cut or rip cut, align your line of cut with the outer blade guide notch on the saw base as shown in figure 17. TOP VIEW OF SAW GUIDELINE BLADE GUIDE NOTCH A width of cutscale has been provided on the base of your saw. When making straight cross cuts or ripcuts, the scale can be used to measure up to four inchesto the right side of the blade. It can be used to measure up to one inchto the left side of the blade.
ALTERNATIVE RIP METHOD Align your line of cut with the inner blade guide notch on the saw base when making 45° bevel cuts. See Figure20. Since blade thicknesses van/and different angles require different settings, always make a trial cut in scrap material along a guideline to determine how much you should offsel the guldallne on the board to be cut. Using C-damps, firmly clamp a straight edge to the workpiece and guide the saw along the straight edge to achieve a straight rip cut.
POSITIVE 0 ° BEVEL See Figure 23. STOP • Turn screw and adjust base untilsquare with saw blade. • ADJUSTMENT SCREW REVEL ADJUSTMENT KNOB "_ "nghtenhax nut and bevel adjustmentknobsecurely. WARNING: Attemptingto make cutswithout bevel adjustment knob securely tightened con result in sadous injury. TO POCKET CUT See Figure 24. WARNING: HEX NUT BLADE Always adjust bevel setting to zero before meldng a pocket cut.
Do not abuse power tools. Abusive practices can damage tool as well as workpieca. A_IL WARNING: When servicing, use only identical Craftsman replacement parts. Use of any other part may create a hazard or cause produstdamage. Onlythe parts shown on parts list, page 21, are intended to be repaired or replaced by the customer. All other parts shouldbe replaced at a Sears Service Center. Avoid using solvents when cleaning plastic parts.
CRAFTSMAN 19.2 VOLT CORDLESS TRIM SAW - MODEL NUMBER 315.
CRAFTSMAN 19.2 VOLT CORDLESS TRIM SAW - MODEL NUMBER 315.114260 1 , The model numberwillbe foundon a plate attachedto the motorhousing,Always mentionthe modelnumberin all correspondenceregardingyour CORDLESS TRIM SAW or when orderingrepairparts. J SEE BACK PAGE FOR PARTS ORDERING INSTRUCTIONS PARTS LIST Kay No. Part Number 1 975546-000 CarriageBolt(M6 x 102 ram)..................... 1 16 6619302 BumperScrew ............................................ 1 2 3025516 BaseAssembly............