
Operator`s manual
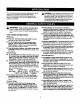
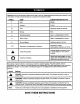
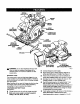

SPINDLE
LOCKBUTrON
LOCK-OFF
BUTrON
TRIGGER
RIP
GUIDESCREW
(WING SCREW)
UPPER
BLADEGUARD
GUARD HANDLE
BEVELCUT
ADZu_TMENT
(BEVELADJU_FMENT
KNOB) BASE
ASSEMBLY
RiP GUIDE
A WARNING: Do not allowfamiliaritywith yourdrill-
driverto make youcareless, Remember that a
carelessfraction of a second is sufficientto inflict
severe injury.
BA'rrERY PACK
The batterypackforyour toolhas been shipped in a low
chargecondition to preventpossibleproblems,Therefore,
youshouldcharge it untillighton frontof charger changas
from redto green.
Note: Batterieswillno: roach full chargethe firsttime they
are charged.Allowseveral cycles (drillingfollowedby
recharging)forthem to become fully charged.
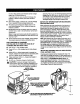
CHARGING BATTERY PACK
See Figure2.
• Charge batterypack onlywiththe charger provided.
• Make sure power supply Is normal household
voltage, 120 volts, 60 Hz, AC only,
9
BLADEWRENCH'J_
BLADEWRENGH
mmHEXKEY)
DEPTHOF
CUTADJUSTMENT
(DEPTHADJUSTMENTKNOB)
Fig.1
• Connectchargerto power supply.
• Placebatterypack inchargeraligning raisedribon
batterypackwithgroovein charger. See Figure 2.
• Pressdown1on battery pack to besure contacts on
batterypackengage properlywithcontacts in charger.
• Normally,the red LED on chargerwill come on. This
indicatescharger is infast chargingmode.
• Red LED shouldremainon for approximately1 hour
then thegreen LED will comeon. Green LED on
indicatesbatterypack is fullycharged and chargeris in
tricklecharge mode. Note: Green LEDwill remainon
untilbatterypack isremovedfrom charger or charger
is disconnectedfrom powersupply.
• Ifbothyellow andgreen LED come on, thisindicatesa
deeply dischargedor defectivebatterypack.
Allowbattery packto remain inchargerfor 15 to 30