
Operator`s manual


TO REMOVE BLADE AND INSTALL CUTTING
ATTACHMENT
jl_ WARNING: To avoid serious personal injury,
A" always wear gloves while handling, removing,
or installing the blade(s) or cutting attachment.
A WARNING: The gear housing gets hot after long
periods of use. To avoid serious personal injury,
do not touch the housing until it has cooled.
Use the following instructions and refer to the safety
warnings to properly remove the blade and install the
cutting attachment.
Place the unit upside down, on a workbench or the
ground, when removing and installing the cutting
attachment or blade.
Remove the Cutting Blade
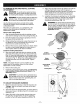
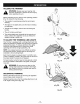
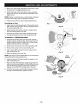
1. Align the shaft bushing hole with the locking rod slot
and insert the locking rod into the bushing hole (Fig. 5).
2. Hold the locking rod in place by grasping it next to
the boom of the unit (Fig. 10).
3. While holding the locking rod, loosen the lock nut on
the blade by turning it clockwise with a 5/8 inch
closed-end or socket wrench (Fig. 10).
4. Remove the lock nut, blade retainer and blade. Store
the lock nut and blade together for future use in a
secure place. Store out of reach of children.
Install the Cutting Attachment
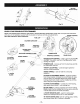
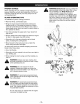
5. Align the output shaft hole with the locking rod slot
and insert the locking rod into the output shaft hole.
(Fig. 5). Place the blade retainer on the output shaft
with the flat surface against the output shaft bushing
as shown in Fig. 11. Screw the cutting attachment
counterclockwise onto the output shaft. Tighten
securely.
NOTE: The blade retainer must be installed on the
output shaft in the position shown for the cutting
attachment to work correctly.
6. Remove the locking rod.
7. Install the cutting attachment shield. See Removing
and Installing Cutting Attachment Shield in the
Assembly section.
CAUTION: To prevent serious personal injury
and damage to the unit, the cutting attachment
shield must be used when operating this unit
with the cutting attachment.
TO ADJUST SHOULDER HARNESS
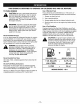
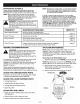
1. Place the shoulder harness on the left shoulder, the
"Danger" sign on the back, and hook on the right
thigh (Fig. 12).
2. The hook should be approximately 15 inches (38 cm)
above your knee, or six (6) inches (15 cm) below your
waist (Fig. 12).
3. Attach the hook to the shoulder harness clamp on
the unit (Fig. 14) and lift the unit to the operating
position to verify fit before operating unit (Fig. 12).
4.
.
Adjust the shoulder harness for balance so that the
cutting attachment is level with the ground. A
properly adjusted shoulder harness will support the
entire weight of the unit, freeing your arms and
hands to guide and control the cutting motion.
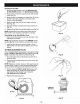
Lengthen the harness by pulling down on the strap
and moving the buckle up. Shorten the harness by
pulling the strap back through the buckle while
moving the buckle down (Fig. 13)
WARNING: To avoid serious personal injury,
do not connect the shoulder harness strap to
the unit until it is started and you are standing
in the operating position. Always follow the
Starting Instructions as described in the
Operation section.
Loosen
Fig. 10
Cutting
Attachment
Blade
Retainer
Output Shaft
Bushing
Locking Rod --
Fig. 11
Fig. 12
-11 -