
Operator`s manual

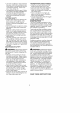

NOTE:Ifshieldisnotproperly
installed,damagetounit(includingmo-
torfailure)willresult.
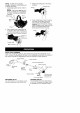
1. Insertedgeguideintotwoholesin
shield.
NOTE:Edgeguidemustbeposi-
tionedonshieldpriortoinstallation
onmotorhousing(seefollowingil-
lustration).
EdgeGuide Front
Locking
L.- Tab
Tabs
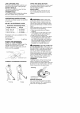
2. Place shield over cutting head at
an angle to the motor housing. In-
sert front locking tab on shield into
opening in front of motor housing.
Shield
Opening for
Front
Locking Tab
3. Keep front locking tab in the motor
housing.
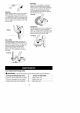
Cutting Head
Shield
4. Push shield toward motor housing
until rear locking tabs snap into
rear notches. An audible snap
must be heard. Ensure the cutting
head remains free to rotate and the
line is not caught between the
shield and the motor housing.
Shield
Cutting Head
Motor Housing
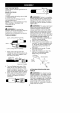
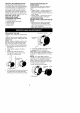
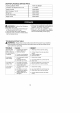
KNOW YOUR TRIMMER
READ THiS OPERATOR'S MANUAL AND SAFETY RULES BEFORE OPERATING YOUR
UNIT. Compare the illustrations with your unit to familiarize yourself with the location of
the various controls and adjustments. Save this manual for future reference.
Trigger Switch
_.._ /-_ Assist Handle
'..,--_-.-'_ -C.___ Jl_k_"'-'_._._. I_._d Twist and Edge Button
Cord _'_" / "I_'_1t_.. j Motor Housing
Retainer 4 _'-?-_._-. r /
Recessed / -._ / ,
Plug Locking _.,_f_"_.._._ Edge Guide
Sleeve Air __'"_'--_"h /i_
Assembly Vents _:/_,,.,.!"_._
Debris Shield _'-_/ Tri'mmer Head
_ Tri_ withOm'Or80ilneCh
Line Limiter Blade
RECESSED PLUG
The RECESSED PLUG is where you at-
tach your extension cord to the unit.
TRIGGER SWITCH
The TRIGGER SWITCH is used to turn
on the unit. Squeeze the trigger switch
to operate the unit. Release to stop.
6