
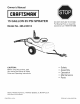
Owner`s manual
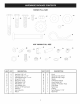

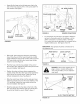

3ARTON CONTENTS
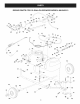
Boom Mount Bracket 4. Spray Gun Assembly 7. Hitch Brackets (2)
Lid 5. Boom Assembly 8. Axle
Tank with Frame Tubes 6. Hitch Arms (2) 9. Wheels (2)
_ 5
6 8
REMOVAL OF PARTS FROM CARTON
* Remove all parts and hardware packages from the
carton. Lay out all parts and hardware and identify
using the illustrations on pages 3 and 4.
TOOLS REQUIRED FOR ASSEMBLY
(2) 1/2" Wrenches
(1) Screwdriver
(1) Pliers
(1) Hammer
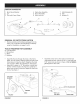
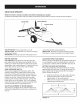
* Assemble the axle through the holes in the frame
tubes. You may need to slightly loosen the bolts in the
frame tubes to make the axle fit. Retighten the bolts
only enough to flatten the Iockwashers. See figure 1.
* Assemble a spacer, a 1/2" flat washer, a wheel and
another 1/2" flat washer onto the axle. Lightly tap a
palnut onto the end of the axle. Repeat on other end
of axle. See figure 1.
1/2"FLAT
WASHER i
PALNUT
SPACER
AXLE
FIGURE 1
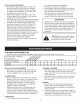
Assemble a hitch arm to the inside of a frame tube
underneath the tank. Use two 5/16" x 2" hex bolts and
5/16" nylock nuts as shown in figure 2. Do not tighten
yet. Repeat for other side.
J
NYLOCK NUT
5/16" ×
HEX BOLT HITCH ARM
FIGURE 2
4