
Operator`s manual


10
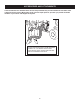
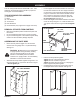
FIGURE 8
• Flipthecartoversothatitrestsonitswheels.
• Assemblethefronttongueontopofthereartongue
usingthree3/8"x3"hexboltsand3/8"nylocknuts.
Seegure8.
HINT: For easier assembly, support the rear tongue with
a block of wood.
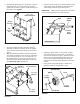
• Assemblethehitchbrackettothefronttongueusing
two3/8"x1-1/4"hexboltsand3/8"nylocknuts.
Tighten.Seegure9.
• Securethehitchpintothehitchbracketandtongue
withthehaircotterpin.Seegure9.
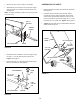
FIGURE 10
FIGURE 9
• Releasethelatchlockleverandtiltthecartbedback.
Seegure10.
• Assemblethefrontpaneltothecartbed,sliding
the bottom lip of the panel in between the cart bed
and the latch stand bracket. Fasten the panel to the
bottomandsidesofthecartbedusingsix1/4"x5/8"
hexboltsand1/4"nylocknuts.Tighten.Seegure10.
• Tighten the two bolts that you assembled to the latch
standbracketingure5.
TONGUE
(FRONT)
3/8" x 3"
HEX BOLT
BLOCK
3/8" NYLOCK NUT
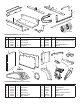
ASSEMBLING VAC PARTS
1/4" x 5/8"
HEX BOLT
FRONT
PANEL
1/4" NYLOCK NUT
1/4" x 5/8"
HEX BOLT
1/4" NYLOCK NUT
LATCH
STAND
BRACKET
HITCH BRACKET
3/8" x 1-1/4"
HEX BOLT
3/8" NYLOCK NUT
TONGUE
HITCH
PIN
HAIR
COTTER
PIN