
Operating instructions


TOOLS REQUIRED FOR ASSEMBLY
(1) 1/2" Wrench
(1) 5/16" Wrench
(1) Pliers
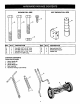
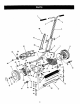
• Remove the reel mower, the loose parts and the
hardware package from the carton. Lay out the parts
and hardware as shown on page 3.
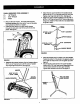
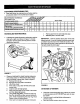
• Insert the short ends of the two handle braces
through the slots and over the two pins in the end
plates. See figure 1.
HANDLE BRACE
FIGURE 1
• Assemble the spacer between the two braces using a
5/16" x 2-1/2" hex bolt and a 5/16" Iocknut. Tighten
only finger tight at this time. See figure 2.
SPACER
BOLT 5/16-18
x 2-1/2" LONG
HANDLE BRACES
5/16-18
LOCKNUT
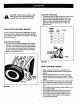
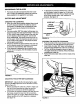
Attach the two upper handles to the handle braCas
with two 5/16" x 2-1/4' hex bolts and 5/16" hex nuts.
Tighten onlyfinger tightat thistime. See figure 3.
Fasten the upper handles together at the top with a
5/16" x 1-3/4" hex boltand a 5/16" Iocknut as shown
In figure 3. Tighten all four boltsand nuts assembled
In figures 2 and 3.
FIGURE 3
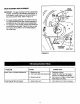
• Place the handle panel in positionover the handlas.
Fasten the bottomof the panel to the spacer using a
#10 x 5/8" hex head screw, Do not tighten yet, See
figure 4.
• Secure the top of the panel to the upper handles
using a #10 x 5/8" hex head screw assembled down
intothe notch between the two upper handles.
Tighten both screws at this time. See figure 4.
#10 x 5/8" HEX
HEAD SCREW
HANDLE
PANEL
FIGURE 2
FIGURE 4