
Operating Guide


7
ENGLISH
6. Do not freeze or immerse the charger in water or any
otherliquid.
Charger Cleaning Instructions
WARNING: Shock hazard. Disconnect
the charger from the AC outlet before cleaning. Dirt
and grease may be removed from the exterior of the
charger using a cloth or soft non-metallic brush. Do
not use water or any cleaningsolutions.
SAVE THESE INSTRUCTIONS FOR
FUTURE USE
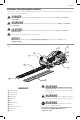
COMPONENTS (FIG. A)
Intended Use
This hedge trimmer is designed for residential use.
DO NOT use under wet conditions or in presence of
flammable liquids orgases.
DO NOT let children come into contact with the tool.
Supervision is required when inexperienced operators use
thistool.
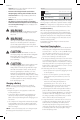
ASSEMBLY AND ADJUSTMENTS
WARNING: To reduce the risk of
serious personal injury, turn unit off and remove
the battery pack before making any adjustments
or removing/installing attachments or
accessories. An accidental start-up can causeinjury.
OPERATION
WARNING: To reduce the risk of
serious personal injury, turn unit off and remove
the battery pack before making any adjustments
or removing/installing attachments or
accessories. An accidental start-up can causeinjury.
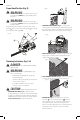
Installing and Removing the Battery Pack
(Fig. C)
NOTE: For best results, make sure your battery pack is
fullycharged.
To install the battery pack
8
into the tool handle, align the
battery pack with the rails inside the tool’s handle and slide
it into the handle until the battery pack is firmly seated in
the tool and ensure that it does notdisengage.
To remove the battery pack from the tool, press the release
button
9
and firmly pull the battery pack out of the tool
handle. Insert it into the charger as described in the charger
section of thismanual.
Fig.C
8
9
Fig.B
2
1
Switch (Fig. B)
WARNING: Never attempt to lock a
switch in the ON position.
CAUTION: Do not cut stems greater
than 3/4" (19mm). Use the trimmer only for cutting
normal shrubbery around houses and buildings.
NOTE:Powersaw can cut stems and branches up to
1.5" (38.1 mm).
To turn the unit on, push the lock-off switch
2
forward as
shown in FigureB, and squeeze the trigger switch
1
. Once
the unit is running, you may release the lock off switch.
In order to keep the unit running you must continue to
squeeze the trigger. To turn the unit off, fully release the
trigger and allow the lock-off switch
2
to engage.