
Instruction Manual


ENGLISH
6
Fig.D
14
Fig.E
5
Fig.F
9
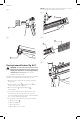
NOTE: Do not allow the pusher to snap forward against
the nail strip, allowing this to happen could damage the
nailcollation.
NOTE: This tool has a low nail lock out device which will not
allow the tool to drive fasteners when the fastener quantity
in the magazine is reduced to four.
Trigger
WARNING: Keep fingers AWAY from the trigger when
not driving fasteners to avoid accidental actuation.
Never carry a tool with finger on the trigger. In bump
action mode (contact actuation mode), the tool will
drive a fastener if the contact trip is bumped while the
trigger isdepressed.
The CMP21PL is equipped with a selectable trigger. This
trigger allows the operator to select either single sequential
action trigger mode or bump action trigger mode. In
accordance with the ANSI Standard SNT-101-2015, the
trigger is shipped as a single sequential action trigger mode.
The selectable trigger also has a trigger lock button to keep
the trigger locked at all times when the tool is not inuse.
Single Sequential Actuation Trigger
(Fig. G)
WARNING: Allow the tool to recoil off the work
surface after actuation. If the contact trip remains
depressed a nail will be driven each time the trigger is
released and pulled, which could result in accidental
actuation, possibly causinginjury.
The single sequential trigger’s intended use is for
intermittent fastening where very careful and accurate
placement isdesired.
Contact Actuation Trigger (Fig. G)
The contact actuation trigger is intended for rapid fastening
on flat, stationarysurfaces.
Using the contact actuation trigger, two methods are
available: place actuation and contactactuation.
Actuating Tool (Fig. G, H)
WARNING: To reduce the risk of injury, Always wear
proper eye [ANSI Z87.1 (CAN/CSA Z94.3)] and hearing
protection [ANSI S12.6 (S3.19)] when operating
thistool.
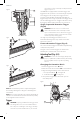
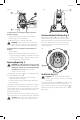
Changing the Actuation Mode
1. Push the trigger lock button
10
down.
2. Rotate the mode selector button
11
counterclockwise.
3. Align the triangular indicator to the desiredmode.
a. For Sequential Mode
as in FigureG.
b. For Contact Mode
as in FigureH.
4. Then push the trigger lock button back up to the
un-lockedposition.
Fig.G
11
10