
Instruction Manual


7
ENGLISH
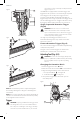
Fig.H
11
10
To Operate the Tool Using the Single Sequential
Actuation Trigger
1. Depress the contact trip against the worksurface.
2. Pull the trigger to drive thefastener.
3. Allow the tool to recoil off the worksurface.
WARNING: A fastener will be driven each time the
trigger is pulled as long as the contact trip remains
depressed which could result in accidentaldriving.
To Operate the Tool Using the Contact Actuation
Method
1. Pull thetrigger.
2. Depress the contact trip against the work surface. As
long as the trigger is pulled, the tool will drive a fastener
every time the contact trip is depressed. This allows the
user to rapidly drive multiple fasteners.
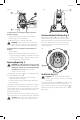
Adjusting Depth (Fig. I)
WARNING: To reduce the risk of serious personal
injury, turn unit off and remove air supply before
making any adjustments or removing/installing
attachments or accessories. An accidental
actuation can causeinjury.
The depth that the fastener is driven can be adjusted using
the depth adjustment wheel
7
.
1. To drive the fastener shallower, rotate the depth
adjustment wheel to theright.
2. To drive a fastener deeper, rotate the depth adjustment
wheel to theleft.
The adjustment knob has detents every full turn. Test drive
another fastener and check depth. Repeat as necessary to
achieve desired results. The amount of air pressure required
will vary depending on the size of the fastener and the
material being fastened.
Experiment with the air pressure setting to determine the
lowest setting that will consistently perform the job athand.
CAUTION: Air pressure in excess of that required can
cause premature wear and/or damage to thetool.
Fig.I
7
Directional Exhaust Deflector (Fig. J)
Adjust exhaust deflector
1
, so the exhaust air blast
will be directed away from the operator. The exhaust
deflector provides sixteen detented positions for directing
the exhaust blast away from the operator. Grasp the
deflector and rotate it to the desired position for the
currentapplication.
Fig.J
1
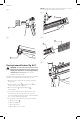
No-Mar Pad (Fig. K, L)
WARNING: Disconnect tool from air supply and
engage trigger lock, before removing or re-installing
no-marpad.
The contact trip with no-mar pad
6
is provided to reduce
marring of the work surface. The no-mar pad can be
removed, and stored inside the end cap, magazine
15
, to
provide increased grip and depth-of-drive for toe-nailing
applications.