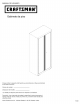
OPERATOR'S MAN UAL Floor Cabinet Please indicate the following from the service part drawing provided. Model Number: Model Description: *Product you purchased may vary from picture shown. Caution: Read and follow all Safety Rules and Operating Instructions before first use of this product. Retain this document for future reference. Sears, Roebuck and Co.
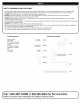
SAFETY • • • • • • • • • • WARNINGS AND CAUTIONS: Use appropriate safety equipment when using power and hand tools. Failure to do so may cause personal injury or product damage. | Use adequate manpower when assembling and moving this unit. Failure to do so may cause personal injury or product damage. | DO NOT stand on this product. You may fall which may cause personal injury. | DO NOT mount this product on a truck bed or any other moving object. This may cause personal injury or product damage.
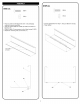
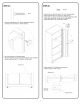
J B A(2) C(2).
f STEP (2): r STEP (1): BB(4) BB(3) EE(4) EE(3) • Place (1) side (A) with flange side down. Use packaging material to prevent scratches. • Insert (2) screws (BB) into middle (2) holes from bottom of flange on (A). • Place (1) back (C) over screws in side. Attach using (2) (EE). • Repeat for remaining side (A) and back (C). • Connect assemblies from step 1 using (3) (BB) and (3) (EE). • Finger tighten. --L A r--- EE \\ \ \ C \ \\ \ \ \ \\\\\\\\\\\\\\\\\\\ BB ......
f r STEP (3): STEP (4): AA(4) ;_i ,_J' " CC(2) BB(8) FF(1) DD(4) EE(12) • Insert top (B) into one end of assembly and attach using (4) (AA), (8) (BB), (4) (DD), and (12) (EE). • Finger tighten. • Place (1) shelf (D) with top down. Use packaging material to prevent scratches. • Install (FF) as shown, using (2) (CC). • Do not tighten. / D / / / \\ i' CC / AA DD /f .............................. .. _ In square holes Use with (AA) CC / / !(f ÷ D J. ../--/" BB \ EE FF ,J
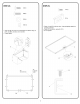
f r STEP (5): STEP (6): AA(6) AA(4) DD(6) BB(8) EE(6) DD(4) EE(12) Note: shelf (D) from step (4) must be installed in bottom middle location to allow door to latch and lock. Top and bottom shelves should have slots facing toward back of unit. Install top shelf first. • Insert shelf (D) from bottom of unit. • Place in desired mounting location in back of unit, and rotate into place as shown. • Attach using (2) (AA), (2) (DD), and (2) (EE) in square mounting holes as shown.
f r STEP (7): STEP (8): CC(16) FF(4) • Ensure lock on right side door (F) is in the unlock position. • Attach right side door (F) as shown, using (8) (CC). • Adjust door for optimum performance before tightening screws. (Door latch should line up with slot on middle shelf.) • Attach left side door (E) in the same manner. I • Install (4) leveling feet (GG). Some adjustments may be necessary after cabinet is in desired location. \\\\\\\\\\\\\ \ \ \ \ ,1 / / / / • Place the cabinet in its upright p
r STEP (9): f Shelf Adjustment BB(1) EE(1) Empty shelf. Remove fasteners. Rotate shelf upward and pull forward, as shown. Move shelf to desired location. Insert back of shelf in notches rotate shelf into place and reinstall fasteners. JJ(1) Cabinet MUST be attached to a stud in a wood frame wall. Failure to do so may cause personal injury or product damage. Hardware provided for wood frame wall use only. Concrete or other surfaces will require other hardware (not provided).
MANUAL DE USUARIO I(RFT M""°I Gabinete de piso Sirvase indicar ta siguiente informaci6n que encontrara en el dibujo suministrado de la pieza de servicio. Nemero de modelo: Descripci6n del modelo: *La unidad que adquiri6 puede variar con respecto a la ilustraci6n. Precauci6n: Lea y siga todas tas regtas de seguridad e instrucciones para el manejo antes de usar la unidad pot primera vez. Conserve este manual para referencia futura. Sears, Roebuck and Co.
fADVERTENCIAS Y PRECAUCIONES DE SEGURIDAD: _'_ • Utilice el equipo de seguridad adecuado cuando emplee herramientas electricas. De Io contrario, podria causarle lesiones personales u ocasionar da_os al producto. | • Utilice el personal adecuado para el montaje y el traslado de esta unidad. De Io contrario podria ocasionarse lesiones personales o da_ar el | producto. | • NO se ponga de pie sobre la unidad. Podria caerse y lesionarse.
J B A(2) C(2).
f PASO (2): r PASO (1): BB(4) BB(3) EE(4) EE(3) • Coloque (1) lado (A) con la brida hacia abajo. Utilice el material del embalaje para evitar que se daSe. • Inserte (2) tornillos (BB) en los agujeros del medio (2) desde la parte inferior de la brida en (A). • Coloque (1) parte posterior (C) sobre los tornillos en el lado. Fije utilizando (2) (EE). • Repita para el lado restante (A) y la parte posterior (C). j • Conecte los ensambles • Apriete a mano. del paso (1) utilizando (3) (BB) y (3) (EE).
f r PASO (3): PASO (4): AA(4) ;_ " CC(2) BB(8) FF(1) DD(4) EE(12) • Inserte la parte superior (B) en un extremo del ensamble y fije utilizando (4) (AA), (8) (BB), (4) (DD), y (12) (EE). • Apriete a mano. • Coloque (1) anaquel (D) con la parte superior hacia abajo. Utilice el material del embalaje para evitar que se dafie. • Instale (FF) como se ilustra, utilizando (2) (CC). • No apriete. // / / / D / \ / / \ / / \ CC / DD Utilice con (AA) AA En agujeros cuadrados f- --_ '; .........
f r PASO (5): PASO (6): AA(6) AA(4) DD(6) BB(8) EE(6) DD(4) EE(12) Nota: el anaquel (D) del paso (4) debera instalarse en la ubicaci6n media inferior para permitir que la puerta cierre y trabe. Los anaqueles superior e inferior deben tener ranuras orientadas hacia la parte posterior de la unidad. Instale el anaquel superior primero. • Inserte el anaquel (D) desde la parte superior de la unidad.
f r PASO (7): PASO (8): CC(16) • Compruebe que la cerradura en el lado derecho de la puerta (F) este en la posici6n destrabada. • Fije la puerta del lado derecho (F) como se ilustra, utilizando (8) (CC). • Ajuste la puerta para un rendimiento 6ptimo antes de apretar los tornillos. (El pestillo de la puerta debe estar alineado con la ranura del anaquel del medio). • Fije la puerta del lado izquierdo (E) de la misma manera. FF(4) I Instale (4) patas niveladores (GG).
r PASO (9): f Shelf Adjustment BB(1) EE(1) Ajuste de los anaqueles Vacie la balda. Quite los seguros. Gire la balda hacia arriba y tire hacia delante tal y como se muestra. Cambie la balda a la posici6n deseada. Inserte la parte posterior de la balda en las ranuras, gire la balda hasta colocarla en su lugar y vuelva a colocar los seguros. JJ(1) El Armario DEBE ser colocado sobre un saliente tachonado de una pared de marco de madera.