OPERATOR’S MANUAL | MANUAL DEL OPERADOR ORIGINAL INSTRUCTIONS | TRADUCCIÓN DE LAS INSTRUCCIONES ORIGINALES 2-CYCLE GAS CHAINSAW MOTOSIERRA DE GAS DE 2 TIEMPOS S165 | S185 CMXGSAMCN4216 | CMXGSAMCN4218 IF YOU HAVE QUESTIONS OR COMMENTS, CONTACT US. SI TIENE DUDAS O COMENTARIOS, CONTÁCTENOS. 1-888-331-4569 769-20672 / 00 WWW.CRAFTSMAN.
TABLE OF CONTENTS All information, illustrations, and specifications in this manual are based on the latest product information available at the time of printing. We reserve the right to make changes at any time without notice. The product may vary slightly from the illustrations contained in this manual. Safety . . . . . . . . . . . . . . . . . . . . . . . . . . . . . . . . . . . . . . . . . . . . . . .2 Know Your Unit . . . . . . . . . . . . . . . . . . . . . . . . . . . . . . . . . . . . . . . .
• IMPORTANT SAFETY INSTRUCTIONS • READ ALL INSTRUCTIONS BEFORE OPERATING WHILE OPERATING • WARNING: When using the unit, all safety instructions must be followed. Please read these instructions before operating the unit in order to ensure the safety of the operator and any bystanders. Please keep these instructions for later use. • • • • • • • • • • • Read the instructions carefully. Be familiar with the controls and proper use of the unit.
• • • • • • • • For safer, more effective performance, make sure the guide bar and chain are properly cleaned, lubricated, tightened and sharpened. Check the guide bar and chain at frequent intervals for proper adjustment. When cutting a limb that is under tension, use extreme caution. When the tension is released, the limb could spring back and strike the operator, causing severe injury or death.
• • • • • • • OTHER SAFETY WARNINGS Watch out for shifting objects (logs, branches, etc.) that might pinch or fall onto the saw chain during operation. Only use wedges made of wood or plastic. Do not use metal to hold a cut open. Follow the manufacturer’s sharpening and maintenance instructions for the saw chain. Only use replacement bars and chains specified by the manufacturer or the equivalent. These are available from authorized service dealers.
• SAFETY & INTERNATIONAL SYMBOLS • This operator's manual describes safety and international symbols and pictographs that may appear on this product. Read the operator's manual for complete safety, assembly, operating and maintenance and repair information. SYMBOL MEANING SYMBOL MEANING • SAFETY ALERT SYMBOL Indicates danger, warning or caution. May be used in conjunction with other symbols or pictographs.
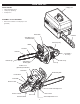
KNOW YOUR UNIT APPLICATIONS • • • Carrying Case Felling and limbing trees Cutting logs (bucking) Pruning trees ASSEMBLY TOOLS REQUIRED: • Flat-head screwdriver or multi-purpose tool (provided) Front Handle Scabbard Chain Brake Lever / Front Hand Guard Starter Rope Grip Muffler Saw Chain Guide Bar Rear Handle / Boot Loop Guide Bar Tip Chain Oil Cap Spiked Bumper / Bucking Spike Fuel Cap Air Filter Cover (Spark Plug and Air Filter) Choke Knob Bar-Retaining Nuts On/Off Switch Primer Bulb Throttle
ESSENTIAL TERMS AND DEFINITIONS • • • • • • • • • • • • • • • • • • • • • • • • • • • • • • • CHAIN SAW - A tool designed to cut wood with a saw chain. A chain saw is an integrated unit comprised of a power source, saw chain, guide bar, and handles that are designed to be held by two hands during operation. CHAIN SAW POWERHEAD - A chain saw without the saw chain and guide bar. DRIVE SPROCKET - A toothed wheel that drives the saw chain.
SPECIFICATIONS* Engine Type . . . . . . . . . . . . . . . . . . . . . . . . . . . . . . . . . . . . . . . . . . . . . . . . . . . . . . . . . . . . . . . . . . . . . . . . . . . . . . . . . . . . . . . Air-Cooled, 2-Cycle Displacement. . . . . . . . . . . . . . . . . . . . . . . . . . . . . . . . . . . . . . . . . . . . . . . . . . . . . . . . . . . . . . . . . . . . . . . . . . . . . . . . . . . . . . . 42 cc (2.56 cu. in.) Spark Plug Gap . . . . . . . . . . . . . . . . . . . . . . . . . . . . . . . . . .
ASSEMBLY ADDING BAR AND CHAIN OIL: INITIAL USE This unit comes from the factory with the chain oil reservoir empty. Fill the chain oil reservoir with bar and chain oil before starting or using the unit. Refer to Adding Bar and Chain Oil instructions in the Maintenance section. ADJUSTING THE CHAIN TENSION: INITIAL USE The saw chain must be properly tensioned before attempting to start or operate the unit. The saw chain may also require additional tensioning as the saw chain heats up during operation.
OIL AND FUEL FUELING THE UNIT OIL AND FUEL MIXING INSTRUCTIONS The use of old and/or improperly mixed fuel is the most common cause of performance problems. Use only fresh, clean unleaded gasoline. Follow the instructions carefully for the proper gasoline/oil mixture. WARNING: Gasoline is extremely flammable. Ignited vapors may explode. Always stop the engine and allow it to cool before filling the fuel tank. Do not smoke while filling the tank. Keep sparks and open flames at a distance from the area.
STARTING AND STOPPING WARNING: Operate this unit only in a well-ventilated On/Off Switch (I = On / O = Off) outdoor area. Carbon monoxide exhaust fumes can be lethal in a confined area. Throttle Control WARNING: Avoid accidentally starting the unit. To avoid serious injury, the operator and the unit must be in a stable position when pulling the starter rope (Fig. 5). Throttle Lockout WARNING: Never operate the unit without the guide bar and saw chain properly installed.
STOPPING INSTRUCTIONS NOTE: The engine is properly warmed up when it accelerates without hesitation. 1. Release the throttle control and allow the engine to idle. 2. Move the On/Off switch to the Off (O) position (Fig. 3). Wait for the engine and saw chain to come to a complete stop. IF... the engine hesitates, continue the warm-up. IF... the engine does not start, repeat the starting procedure. IF...
PREPARING THE WORK AREA • • • • Correct Grip Clear the area of children, bystanders and pets; keep them outside a 50-foot (15 m) radius, at a minimum. Even then, they are still at risk from thrown objects. Encourage bystanders to wear eye protection. If you are approached, stop the unit immediately. When felling, the safe distance is at least twice the height of the tallest tree in the work area. When bucking, keep workers at least 15 feet (4.6 m) apart. Keep the work area clean.
FELLING: SAFETY 135º From Planned Line of Fall Felling is the process of cutting down a tree. Follow these safety precautions to reduce the risk of serious injury, property damage and damage to electrical lines: • Do not fell trees with an extreme lean. Do not fell trees with rotten limbs, loose bark or hollow trunks. Have these trees pushed or dragged down with heavy equipment. • Do not cut trees near buildings or electrical lines. Leave these operations for professionals.
Step 3: Making the Felling Back Cut Felling Back Cut WARNING: Always recheck the area for bystanders, 2 inches (5 cm) animals and obstacles before making the felling back cut. Hinge 2 inches (5 cm) This cut fells the tree. 1. Make a horizontal cut into the opposite side of the tree from the notched undercut (Fig. 13). Make the cut approximately 2 inches (5 cm) above the bottom of the notched undercut (Fig. 13). 2.
BUCKING: SAFETY Log Supported on One End Bucking is the process of cutting a fallen tree into logs of desired lengths. Follow these safety precautions to reduce the risk of serious injury: • Clear the area of objects or obstructions that could contact the guide bar and result in kickback. • When bucking on a slope, always stand on the uphill side of the fallen tree. • If possible, the end of the tree to be cut should be raised off of the ground. A saw horse is ideal for this purpose.
Overbucking 1. Begin cutting from above, with the bottom of the saw chain against the top of the log (Fig. 19). 2. Exert light, downward pressure. The saw will tend to pull away from the operator. Be prepared and hold the saw firmly to maintain control. Wedge Underbucking 1. Begin cutting from below, with the top of the saw chain against the bottom of the log (Fig. 20). 2. Exert light, upward pressure. The saw will tend to push toward the operator. Be prepared and hold the saw firmly to maintain control.
MAINTENANCE CUSTOMER RESPONSIBILITY WARNING: To avoid serious personal injury, always stop the engine and allow it to cool before cleaning or maintaining the unit. Never perform cleaning or maintenance while the unit is running. Disconnect the spark plug wire to prevent the unit from starting accidentally. FREQUENCY Before each use MAINTENANCE REQUIRED • Check for loose screws, nuts or bolts (tighten as needed) • Check for damaged or worn parts* • Check the saw chain sharpness.
ADDING BAR AND CHAIN OIL Chain Oil Cap DANGER: Failure to fill the chain oil reservoir will cause irreparable damage to the unit. Make sure the chain oil reservoir is always filled. Always use bar and chain oil. Chain Oil Reservoir WARNING: Oil constantly flows from the chain oil reservoir to oil the saw chain. Check the chain oil level frequently so that it does not drop below half full. The guide bar and saw chain require lubrication to minimize friction.
ADJUSTING THE CHAIN TENSION CAUTION: The guide bar, saw chain, and saw bearings will wear more rapidly if the saw chain is not properly tensioned. Maintaining proper chain tension will improve cutting performance and prolong the life of the saw chain. WARNING: To prevent serious injury, never touch the saw chain or adjust the chain tension while the unit is running. Disconnect the spark plug wire to prevent the unit from starting accidentally. Flats Guide Bar Fig.
REMOVING AND INSTALLING THE GUIDE BAR AND SAW CHAIN Bar Cover WARNING: The saw chain is very sharp. Always wear heavy-duty protective gloves when handling or performing maintenance on the saw chain. The guide bar and saw chain need to be removed when certain maintenance procedures are performed, such as when rotating the guide bar. When replacing old guide bars and saw chains with new parts, always use the manufacturer’s specified replacement parts. Refer to Replacing the Guide Bar and Saw Chain.
SHARPENING THE SAW CHAIN Depth Gauge Clearance 1/32 inch (0.6 mm) WARNING: The saw chain is very sharp. Always wear heavy-duty protective gloves when handling or performing maintenance on the saw chain. Depth Gauge WARNING: An improperly sharpened saw chain Top Plate increases the chance of kickback. Failure to replace or properly maintain the saw chain can cause serious injury.
Restore original rounded shape Fig. 37 MAINTAINING THE GUIDE BAR Oil Passages 1. Rotate the guide bar frequently, at regular intervals (for example, after every 5 hours of operation), to ensure even wear on the top and bottom of the guide bar. Refer to Removing and Installing the Guide Bar and Saw Chain. 2. Clean the guide bar groove and oil passages whenever the saw chain is removed, when the unit has been used heavily or when the saw chain appears dirty.
REPLACING THE GUIDE BAR AND SAW CHAIN Guide Bar Sprocket Tip Lubrication Hole WARNING: Always use a low-kickback saw chain, which significantly reduces the danger of kickback. Lowkickback saw chain does not completely eliminate kickback. A low-kickback or “safety chain,” should never be regarded as total protection against injury. When replacing the guide bar and saw chain, only use the replacement parts specified by the manufacturer or their equivalents. Refer to Replacement Parts.
ADJUSTING THE IDLE SPEED Idle Speed Screw WARNING: The saw chain may spin during idle speed adjustments. Wear protective clothing and observe all safety instructions to prevent serious personal injury. If the engine will not idle properly: 1. Start the engine. Refer to Starting and Stopping. 2. Release the throttle control and let the engine idle. • If the engine stops, increase the idle speed.
CLEANING AND STORAGE CLEANING WARNING: To avoid serious personal injury, always stop the engine and allow it to cool before cleaning or maintaining the unit. 1. Loosen the saw chain if the chain tension was adjusted during operation. The saw chain will contract as the unit cools, which could damage the unit if the chain is too tight. 2. Clean the unit with a damp cloth. Do not douse the unit with water. Do not use strong detergents.
TROUBLESHOOTING PROBLEM SOLUTION THE ENGINE WILL NOT START The fuel tank is empty Fill the fuel tank with properly-mixed fuel The primer bulb was not pressed enough Press the primer bulb 10 times or until fuel is visible The engine is flooded Move the choke knob to Position 2, press the throttle lockout, squeeze the throttle control and pull the starter rope The fuel is old (over 30 days) and/or improperly mixed Drain the fuel tank and add fresh, properly-mixed fuel The spark plug is not working p
WARRANTY MTD LLC LIMITED WARRANTY FOR CRAFTSMAN® BRANDED HANDHELD PRODUCT Limited Warranty The limited warranty set forth herein is given by MTD LLC to the Initial Purchaser (as defined herein) with respect to new Craftsman branded hand held product (“Product”). This limited warranty does not cover Emission Control Systems and is not a Federal Emission Control Warranty Statement as defined by U.S. federal law.
This Warranty Does Not Cover And MTD LLC Disclaims Any Responsibility For: 1. 2. 3. 4. Loss of time or loss of use of the Product. Transportation costs and other expenses incurred in connection with the transport of the Product to and from the authorized service provider. Any loss or damage to other equipment or personal items. Damage resulting from the installation or use of any accessory or non-OEM (original equipment manufacturer) part for use with the Product. Limitations: 1.
TABLA DE CONTENIDO Toda la información, las ilustraciones y las especificaciones contenidas en este manual se basan en la información más reciente disponible en el momento de impresión del manual. Nos reservamos el derecho de hacer cambios en cualquier momento sin aviso previo. El producto puede variar ligeramente de las ilustraciones contenidas en este manual. Seguridad . . . . . . . . . . . . . . . . . . . . . . . . . . . . . . . . . . . . . . . . . . .31 Conozca su unidad . . . . . . . . . . . . . . .
• INSTRUCCIONES DE SEGURIDAD IMPORTANTES • LEA TODAS LAS INSTRUCCIONES ANTES DE USAR LA UNIDAD • Se deben respetar ADVERTENCIA: todas las instrucciones de seguridad al usar la unidad. Por • favor, lea estas instrucciones antes de utilizar la unidad para garantizar la seguridad del operador y los observadores. Por favor, guarde estas instrucciones para su uso posterior. • • • • • • • • • • • • Lea las instrucciones con atención.
• • • • • • • • • • • • • • • • • SEGURIDAD AL REBOTAR Apague el motor y desconecte la bujía para realizar tareas de mantenimiento o reparación. Transporte la unidad por la manija delantera con el silenciador alejado del cuerpo y la barra guía ubicada en la parte trasera. Cubra la barra guía y la cadena de la sierra con la funda cuando transporte la unidad. Si la unidad golpea o se enreda con un objeto extraño, detenga la unidad de inmediato. Controle si la unidad está dañada.
Precauciones de seguridad contra rebotes • Siga los siguientes pasos para reducir la posibilidad de un accidente o una lesión: • No confíe exclusivamente en los dispositivos de seguridad incorporados en la unidad. • No corte por arriba de la altura del hombro. • No se extienda demasiado. Siempre debe estar bien afirmado y mantener el equilibrio adecuado. Tenga cuidado al trabajar en pendientes o inclinaciones empinadas.
• SÍMBOLOS INTERNACIONALES Y DE SEGURIDAD • Este manual del operador describe símbolos y pictografías internacionales y de seguridad que posiblemente aparezcan en este producto. Lea el manual del operador para informarse bien sobre la seguridad, ensamblaje, operación, mantenimiento y reparación. SÍMBOLO SIGNIFICADO SÍMBOLO • SÍMBOLO DE ALERTA DE SEGURIDAD SIGNIFICADO • CONTROL DE ENCENDIDO/APAGADO DE PARADA Indica peligro, advertencia o precaución.
CONOZCA SU UNIDAD USOS • • • Caja de transporte Tala y desramado de árboles Corte de troncos (tronzado) Poda de árboles HERRAMIENTAS NECESARIAS PARA EL ENSAMBLAJE: • Destornillador de cabeza plana o herramienta multiuso (suministrado) Manija delantera Funda Palanca del freno de cadena / Protección delantera de la mano Agarre de la cuerda de arranque Silenciador Cadena de la sierra Barra de guía Manija trasera / Lazo de la bota Punta de la barra de guía Tapón de aceite de la cadena Tope dentado / Di
TÉRMINOS Y DEFINICIONES FUNDAMENTALES • • • • • • • • • • • • • • • • • • • • • • • • • • • • • SIERRA DE CADENA - Es una herramienta que está diseñada para cortar madera con una cadena de sierra. Una sierra de cadena es una unidad integrada compuesta por una fuente de energía, una sierra de cadena, una barra guía, y asas que están diseñadas para ser sostenidas con las dos manos durante el funcionamiento. CABEZAL MOTOR DE LA SIERRA DE CADENA - Es una sierra de cadena sin la cadena y la barra de guía.
• • DESRAMADO - El proceso de cortar las ramas de un árbol caído. PODA - El proceso de cortar las ramas de un árbol vivo. ESPECIFICACIONES* Tipo de motor . . . . . . . . . . . . . . . . . . . . . . . . . . . . . . . . . . . . . . . . . . . . . . . . . . . . . . . . . . . . . . . . . . . . . . . . . . . . . Enfriado por aire, de 2 tiempos Cilindrada. . . . . . . . . . . . . . . . . . . . . . . . . . . . . . . . . . . . . . . . . . . . . . . . . . . . . . . . . . . . . . . . . . . . . . . . . . . . . . . .
ENSAMBLAJE AGREGADO DE ACEITE DE LA CADENA Y BARRA: USO INICIAL Esta unidad viene de fábrica con el depósito de aceite de la cadena vacío. Llene el depósito de aceite de la cadena con aceite para barras y cadenas antes de arrancar o usar la unidad. Consulte las instrucciones de Agregado de aceite de la cadena y barra en la sección Mantenimiento. AJUSTE DE TENSIÓN DE LA CADENA: USO INICIAL La cadena de la sierra debe estar debidamente tensada antes de utilizar la unidad.
ACEITE Y COMBUSTIBLE INSTRUCCIONES PARA LA MEZCLA DEL ACEITE Y EL COMBUSTIBLE El uso de combustible viejo y/o mal mezclado es la causa más frecuente de los problemas de rendimiento. Sólo se debe utilizar gasolina nueva, limpia y sin plomo. Siga atentamente las instrucciones para que la mezcla de gasolina/aceite sea adecuada.
ARRANQUE Y PARADA ADVERTENCIA: Opere esta unidad solamente en un Interruptor encendido / apagado (I = Encendido / O = Apagado) área exterior bien ventilada. El monóxido de carbono de los gases de escape puede ser letal en un área confinada. Control del acelerador ADVERTENCIA: Evite arrancar la unidad por accidente. A fin de evitar lesiones graves, el operador y la unidad deben estar en una posición estable al tirar de la cuerda de arranque (Fig. 5).
9. Deje que el motor se caliente de 30 a 60 segundos. 10. Oprima y mantenga el bloqueo de acelerador. Apriete levemente y suelte el control del acelerador para que el motor funcione en ralentí. ADVERTENCIA: La cadena de la sierra no se debe mover cuando el motor funciona en ralentí. Si se mueve, consulte Ajuste de la velocidad de ralentí en la sección Mantenimiento. 11. Para reducir la posibilidad de lesiones, enganche el freno de la cadena hasta que usted esté listo para comenzar a operar.
OPERACIÓN ADVERTENCIA: Controle siempre la tensión de la cadena y ajuste si es necesario antes de comenzar la operación. Consulte Ajuste de tensión de la cadena en la sección Mantenimiento. ADVERTENCIA: Asegúrese de que el depósito de aceite de la cadena está lleno antes de la operación. Controle constantemente el nivel de aceite para que no caiga por debajo de la mitad. Asegúrese de que el tornillo de ajuste de aceite de la cadena está correctamente graduado.
SUJETAR LA UNIDAD Sujeción correcta ADVERTENCIA: Utilice siempre estos lugares para las manos que se especifican a continuación independientemente de que el operador sea diestro o zurdo. Esto ayudará a mantener al operador levemente hacia la izquierda de la unidad y fuera de la línea directa de la cadena de la sierra en caso de que se produzca un contragolpe (Fig. 8 y Fig. 9). Mantenga siempre todas las partes del cuerpo a la izquierda de la línea de la cadena.
• • • • • • • • No corte árboles cerca de edificios o cables de electricidad. Deje estas operaciones para que las realicen profesionales en la materia. Si el árbol talado toca un cable eléctrico notifíquelo de inmediato a la empresa de electricidad. Inspeccione el árbol para detectar ramas secas o dañadas que podrían caer y causar lesiones graves. Retire la tierra, piedras, cortezas sueltas, clavos, alambres y otras obstrucciones provenientes del árbol que se va a talar.
Paso 3: Ejecución del corte final de tala Corte final de tala ADVERTENCIA: Antes de hacer el corte final de tala siempre verifique que no haya personas, animales y obstáculos. 2 pulgadas (5 cm) Bisagra 2 pulgadas (5 cm) Este corte derriba el árbol. 1. Haga un corte horizontal en el lado opuesto del árbol a partir del corte inferior de la muesca (Fig. 13). Haga el corte aproximadamente 2 pulgadas (5 cm) por encima del corte inferior de la muesca (Fig. 13). 2.
TRONZADO: SEGURIDAD Tronco sostenido en un extremo El tronzado (bucking) es el proceso de cortar un árbol talado en leños de longitudes deseadas. Siga las siguientes medidas de seguridad para reducir el riesgo de lesiones graves: • Mantenga el área despejada de objetos u obstrucciones que podrían entrar en contacto con la barra guía y resultar en retroceso. • Cuando efectúe el tronzado sobre una pendiente, párese siempre en el lado cuesta arriba del árbol derribado.
Tronzado desde arriba (overbucking) 1. Comience a cortar el tronco desde arriba, con la parte inferior de la cadena de la sierra contra la parte superior del tronco (Fig. 19). 2. Ejerza una leve presión hacia abajo. La sierra tenderá a apartarse del operador. Esté preparado y sostenga la sierra firmemente para mantener el control. Cuña Tronzado desde abajo (underbucking) 1. Comience a cortar el tronco desde abajo, con la parte superior de la cadena de la sierra contra la parte inferior del tronco (Fig.
MANTENIMIENTO RESPONSABILIDAD DEL CLIENTE ADVERTENCIA: A fin de evitar lesiones personales graves, siempre pare el motor y deje que se enfríe antes de limpiar o mantener la unidad. No realice ninguna tarea de limpieza o mantenimiento mientras la unidad esté en funcionamiento. Desconecte el cable de la bujía para evitar que la unidad arranque accidentalmente. FRECUENCIA Antes de cada uso MANTENIMIENTO REQUERIDA • Verifique si hay tornillos, tuercas o pernos flojos (ajústelos según sea necesario).
AGREGADO DE ACEITE DE LA CADENA Y BARRA Tapón de aceite de la cadena PELIGRO: Si no se llena el depósito de aceite de la cadena se ocasionará daño irreparable a la unidad. Asegúrese de que el depósito de aceite de la cadena está siempre lleno. Use siempre aceite para barra y cadena. Depósito de aceite de la cadena ADVERTENCIA: El aceite fluye constantemente del depósito de la cadena para aceitar la cadena de la sierra.
AJUSTE DE LA TENSIÓN DE LA CADENA PRECAUCIÓN: Si la cadena de la sierra no está correctamente tensionada, la barra de guía, la cadena y los cojinetes se gastarán más rápidamente. Mantener la tensión adecuada de la cadena de la sierra mejora el rendimiento del corte y prolonga la vida útil de la cadena. ADVERTENCIA: Para evitar lesiones graves, nunca toque la cadena de la sierra ni ajuste su tensión mientras la unidad está funcionando.
RETIRO E INSTALACIÓN DE LA BARRA GUÍA Y LA CADENA DE LA SIERRA Cubierta de la barra ADVERTENCIA: La cadena de la sierra es muy filosa. Cuando manipule o efectúe el mantenimiento de la cadena de la sierra, use siempre guantes de protección reforzados. Es necesario retirar la barra guía y la cadena de la sierra cuando se efectúan los procedimientos de mantenimiento, por ejemplo, cuando se gira la barra guía.
• Las astillas de madera son pequeñas y pulverulentas. • La cadena de la sierra debe ser forzada a través de la madera. • La cadena corta hacia un lado. Si existe cualquiera de estas condiciones, afile o reemplace la cadena de la sierra. Consulte Afilado de la cadena de la sierra o Reemplazo de la barra guía y la cadena de la sierra.
3. Utilice un calibre de profundidad (no incluido) para medir el espacio libre del calibre de profundidad (Fig. 36) de cada cortador. El espacio libre del calibre de profundidad debe mantenerse a 1/32 pulgada (0,6 mm). El espacio libre del calibre de profundidad determina la profundidad a la cual el cortador ingresa en la madera durante la operación y el tamaño de las astillas de madera producidas. Demasiado espacio libre incrementa la probabilidad de retroceso.
3. Rote la cadena de la sierra manualmente. Utilice siempre guantes de protección reforzados. Compruebe que el freno de la cadena esté desenganchado. 4. Repita el proceso de lubricación hasta la lubricación total de la punta de la rueda dentada de la barra guía.
AJUSTE DE LA VELOCIDAD DE RALENTÍ Tornillo de marcha en vacío ADVERTENCIA: La cadena de la sierra puede girar durante los ajustes de la velocidad de ralentí. Use ropa de protección y observe todas las instrucciones de seguridad para evitar lesiones personales graves. Si el motor no funciona al ralentí correctamente: 1. Arranque el motor. Consulte Arranque y Parada. 2. Suelte el control del acelerador y deje que el motor funcione en ralentí. • Si el motor se para, aumente la velocidad de ralentí.
LIMPIEZA Y ALMACENAMIENTO LIMPIEZA ADVERTENCIA: Para evitar lesiones personales graves, apague siempre el motor y deje que se enfríe antes de limpiar o dar mantenimiento a la unidad. 1. Afloje la cadena de la sierra si se graduó la tensión de la cadena durante la operación. La cadena se contraerá a medida que se enfríe la unidad, lo cual puede dañar la unidad si la cadena está demasiado ajustada. 2. Limpie la unidad con un paño húmedo. No rocíe la unidad con agua. No utilice detergentes fuertes.
LOCALIZACIÓN Y SOLUCIÓN DE PROBLEMAS PROBLEMA SOLUCIÓN EL MOTOR NO ARRANCA El tanque de combustible está vacío Llene el tanque de combustible con la mezcla adecuada La pera del cebador no se oprimió lo suficiente Oprima la pera del cebador 10 veces o hasta que se vea el combustible El motor está rebosado Mueva la perilla del cebador a la Posición 2, apriete el bloqueo del acelerador, apriete el control del acelerador y tire de la cuerda de arranque El combustible está viejo (tiene más de 30 días) y/
GARANTÍA MTD LLC GARANTÍA LIMITADA PARA EL PRODUCTO DE MANO DE MARCA CRAFTSMAN® Garantía Limitada La garantía limitada establecida en este documento es otorgada por MTD LLC al Comprador Inicial (como se define aquí) con respecto al nuevo producto manual de marca Craftsman ("Producto"). La presente garantía limitada no cubre los Sistemas de control de emisiones y no constituye una Declaración de garantía del control de las emisiones federal según lo definido por las leyes federales de los Estados Unidos.
Lo que NO Cubre esta Garantía Limitada Esta Garantía Limitada No Cubre lo Siguiente (las “Exclusiones”): 1. 2. 3. 4. Los productos adquiridos fuera de los Estados Unidos. Los daños producidos por la falta de mantenimiento y/o un mantenimiento inadecuado, según se describe en el manual del operador. El desgaste normal resultante de usar el Producto.
NOTAS 61
NOTAS 62
NOTAS 63
TO ORDER REPLACEMENT PARTS OR SCHEDULE REPAIR SERVICE PARA ORDENAR PIEZAS O PEDIR SERVICIO DE REPARACIÓN 1-888-331-4569 CRAFTSMAN® IS A REGISTERED TRADEMARK OF STANLEY BLACK & DECKER, INC., USED UNDER LICENSE. ES UNA MARCA REGISTRADA DE STANLEY BLACK & DECKER, INC., UTILIZADA BAJO LICENCIA. © 2019 CRAFTSMAN PRODUCT MANUFACTURED BY: / PRODUCTO FABRICADO POR: MTD LLC P.O. Box 361131 Cleveland, OH 44136-0019 U.S. & CANADA ONLY • SÓLO EN EE.UU.