Operator's Manual ® 4-Cycle WEEDWACKER _ GAS TRIMMER Model No. 316.791910 l INCREDI.PULL_' _ UNBELIEVABLE with STARTING MAX FIREdlB EA S E N ITIO N ° • • • • • • SAFETY ASSEMBLY OPERATION MAINTENANCE PARTS LIST ESPANOL, P. 15 CAUTION: Before using this product, read this manual and follow all safety rules and operating instructions. Sears Brands Management Corporation, Visit our website: 769-05777 P01 Hoffman Estates, IL 60179 U.S.A. www.craftsman.
TABLE OF CONTENTS Rules for Safe Operation ....................................... Warranty Information .......................................... Know Your Unit .............................................. 2 4 4 Assembly Instructions ......................................... Oil and Fuel Information ........................................ 4 5 Starting and Stopping Instructions ................................ Operating Instructions .........................................
• Adjust the handle to your size in order to provide the best grip. • Be sure the cutting attachment starting the unit. is not in contact with anything before • Use the unit only in daylight or good artificial light. • Avoid accidental starting. Be in the starting position whenever pulling the starter rope. The operator and unit must be in a stable position while starting. Refer to Starting/Stopping Instructions. • Use the right tool. Only use this tool for its intended purpose. • Do not overreach.
C RAFTSMAN FU LL WAR RANTY If this Craftsman product fails due to a defect in material or workmanship within two years from the date of purchase, return it to any Sears store, Parts & Repair Service Center, or other Craftsman outlet in the United States for free repair (or replacement if repair proves impossible). This warranty applies for only 90 days from the purchase date if this product is ever used for commercial or rental purposes. This warranty covers ONLY defects in material and workmanship.
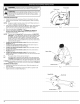
FUELING THE UNIT WARNING: OVERFILLING THE OIL CRANKCASE MAY CAUSE SERIOUS PERSONAL INJURY. Check and maintain the proper oil level in the crank case; it is important and cannot be overemphasized. Check the oil before each use and change it as needed. See Changing the Oil. RECOMMENDED any spilled fuel Avoid a source ignition for I i _1 II upWARNING: Addimmediately. fuel in a clean, wellcreating ventilated outdoorof area. Wipe I spilt fuel. Do not start the engine until fuel vapors dissipate.
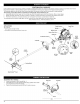
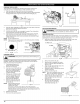
WARNING: Operate this unit only in a well-ventilated outdoor area. Primer Bulb Carbon monoxide exhaust fumes can be lethal in a confined area. Choke Lever WARNING: Avoid accidental starting. Make sure you are in the starting position when pulling the starter rope (Fig. 7). To avoid serious injury, the operator and unit must be in a stable position while starting. STARTING 1. 2. NOTE: 3. 4. 5. INSTRUCTIONS Check the oil level in the crankcase. Refer to Checking the Oil Level.
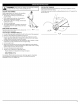
WARNING: I _hb Always wear eye, hearing, foot and body protection I to reduce the risk of injury when operating this unit. HOLDING I THE TRIMMER Before operating the unit, stand in the operating position (Fig. 9). Check for the following: • The operator is wearing eye protection and proper clothing Decorative trimming is accomplished by removing all vegetation around DECORATIVE TRIMMING trees, posts, fences and more.
LINE INSTALLATION FOR THE RAPID REWIND TMCUTTING HEAD I rope. These can break off and become dangerous projectiles. I WARNING: Never use metal-reinforced line, wire, chain or I_ Always use Craftsman XTRA QUIET TM0.095 inch (2.413 mm) original equipment manufacturer replacement line. Lines other than the specified may make the engine overheat or fail.
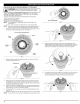
CLEANING THE RAPID REWIND HEAD TM NOTE: Also perform these steps when replacing inner reel with a new prewound reel. Cleaning the Rapid Rewind TM may be necessary if: 3. Pull the inner reel with existing line from the outer spool. 4. If rewinding with new line, remove any existing line from the inner reel before cleaning. Remove any debris or grass from the knob, spring, inner reel and foam seal. Wash the inner reel with warm soapy water (Fig. 19).
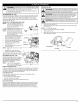
CHECKING THEOILLEVEL Theimportance ofchecking andmaintaining theproper oillevelinthe crankcase cannot beoveremphasized. Check oilbefore each use: 1. Stoptheengine andallow oiltodrain intothecrankcase. 2. Place theengine onanelevated, level surface withthecutting head shield hanging offthesurface togetanaccurate oillevel reading (Fig. 21). Fill Level Fig. 21 Fig. 25 3. Keep dirt, grass clippings and other debris out of the engine. Clean the area around the dipstick before removing it. 4.
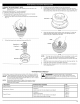
Tabs Back Plate Checking the fuel, cleaning the air filter, and adjusting the idle speed should solve most engine problems. If not and all of the following are true: • the engine will not idle • the engine hesitates or stalls on acceleration • there is a loss of engine power Have the carburetor serviced by a Sears or other qualified service dealer. ROCKER ARM CLEARANCE _ Fig, 29 Locking Tab Fig, 30 This requires disassembly of the engine.
SPARK ARRESTOR Adjusting Nut Remove the rear engine cover. See Rocker Arm Clearance. 2. With a flat blade screwdriver or Torx T-20 bit and a T-25 bit, remove the screws Rocker Arm .003-.006 in. (.076-.152 mm) t Feeler 3. Gauge 4. Valve Stem MAINTENANCE 1. attaching the spark arrestor diverter to the muffler (Fig. 38). Pull the spark arrestor diverter out of the muffler. Remove the spark arrestor diverter. Remove the spark arrestor screen from the spark arrestor diverter.
PROBLEM SOLUTION Empty fuel tank Fill fuel tank with fresh fuel Engine is flooded Pull the starter rope while holding the throttle control Fouled spark plug Replace the spark plug I=1#[_1#1=kVAVl Imlml#[Oil/IIm]m=l Air filter is plugged Improper carburetor Replace or clean the air filter adjustment Take to a Craftsman or other qualified service dealer for adjustment I=l#[e]l#l= kvAvl IIIIII _[oil f_,[o[o] ;:1111 ;:1 :f_,_l/ ;:1 Old fuel Drain fuel tank and add fresh fuel Dirty air filter Cle
I=1_ [_l_l=ril Engine Type .................................................................................................. Displacement .................................................................................................. Operating Air-Cooled, 4-Cycle 1.77 cu. in. (29 cc) RPM ................................................................................................. 6,800 - 9,300 rpm Idle Speed RPM ....................................................................................
Manual del Operador ® 4 Ciclos WEEDWACKER _ RECORTADOR A GASOLINA Model No. 316.791910 INCREDI.PULL_' _" UNBELIEVABLE con MAX STARTING E A S E TM FIRE_IBN ITION ° • • • • • SEGURIDAD MONTAJE OPERACION MANTENIMIENTO LISTA DE PARTES PRECAUCION: Lea el manual del operador y siga todas las advertencias e instrucciones de seguridad. Sears Brands Management Corporation, Hoffman Estates, IL 60179 U.S.A. Visite nuestro sitio web: www.craftsman.
INDICE DE CONTENIDOS Normas para una operaci6n segura ............................. Garantia ................................................... Conozca su unidad .......................................... Instrucciones de ensamble .................................... 16 18 18 18 Informaci6n del aceite y del combustible ......................... Instrucciones de arranque y apagado ............................ Instrucciones de operaci6n ....................................
• Esta unidad cuenta con un embrague. El accesorio de corte permanece estacionario cuando el motor est& en marcha lenta. Si no Io hace, haga ajustar la unidad por un tecnico de servicio autorizado. • Ajuste la manija a su tamafio de modo que le brinde el mejor agarre. • AsegOrese de que el accesorio de corte no est_ en contacto con ningOn objeto antes de arrancar la unidad. • Use la unidad Onicamente con la luz del alia o con buena luz artificial. • Evite arrancar la unidad accidentalmente.
GARANTIA TOTAL DE CRAFTSMAN Si este producto de Craftsman Professional falla debido a un defecto en el material o en la mano de obra dentro de un periodo de dos a_os a partir de la fecha de compra, devuelvalo a cualquier tienda o Centro de Servicio de Piezas y Reparaciones Sears u otro establecimiento de Craftsman en los Estados Unidos para que sea reparado sin costo alguno (o ser reemplazado si resulta imposible repararlo).
ADVERTENClA: EL LLENAR DEMASIADO EL CARTER PUEDE CAUSAR LESIONES PERSONALES GRAVES No podemos exagerar la importancia del control y mantenimiento del nivel correcto de aceite en el cigQeSal. Verifique el aceite antes de cada uso y cAmbielo cuando sea necesario segen se indica en la secci6n de Cambio del aceite.
I,_ I I ,_ El operador y la unidad deben estar en una posici6n estable al I ADVERTENClA: Evitelosarranques accidentales. Co'6quese arrancar la unidad para evitar graves lesiones personales. bien ventilada. Palanca del obturador Los gases de escape de mon6xido de carbono s61o en un _rea exterior I ADVERTENClA: esta cerrada. unidad pueden ser letales en Use un _rea Bombilla cebador del en posici6n de inicio cuando tire de la cuerda de arranque (Fig. 7). INSTRUCClONES DE ARRANQUE 1.
i_ IADVERTENClA: Use siempre protecci6n Y cuerpo para I operar reducir el riesgo Iaudici6n,estapiesunidad. COMO SOSTENER para sus ojos, de una lesi6n al I El recorte decorativo se realiza eliminando RECORTE DECORATIVO de los _rboles, postes, cercos, etc. toda la vegetaci6n Gire toda la unidad a modo de que el accesorio _ngulo de 30 ° con el suelo (Fig 10). EL RECORTADOR de alrededor de corte se ubique a un Antes de operar esta unidad, p&rese en posici6n de operaci6n (Fig. 9).
INSTALACION DE LA LINEA PARA EL RAPID REWIND TM I alambre, cadena ni soga, etc. Estos elementos pueden I_ I ADVERTENCIA: No useennunca linea reforzada desprenderse y convertirse un proyectil peligroso.con metal, Use siempre la linea de Craftsman XTF_6.QUIET TM de 2.413 mm (0.095 pulgadas). Una linea mayor puede causar un recalentamiento o falla en el motor. Existen dos metodos para cambiar la linea de corte Rapid Rewind • Bobinar el carrete interior con linea nueva / TM.
LIMPIEZA DEL RAPID REWIND TM NOTA: Realice tambien estos pasos al reemplazar el carrete interior por un nuevo carrete prebobinado. La limpieza de Rapid Rewind TM puede ser necesaria: * Para sacar linea enredada o en exceso 3, Saque toda la linea que haya en el carrete interior antes de limpiarlo. 4. Siva a rebobinar con una linea nueva, saque la linea existente del carrete interior antes de limpiarlo. Saque todos los residuos o pasto de la perilla, resorte, carrete interno y sello de espuma.
INSPECCION DEL NIVEL DE ACEITE No podemos exagerar la importancia de verificar y mantener el nivel correcto de aceite en el carter del cigQe_al. Inspeccione el nivel de aceite antes de cada uso: 1. 2. Nivel Apague el motor y permita que el aceite drene dentro del carter del cigQe_al. Coloque el motor sobre una superficie plana y nivelada, con el protector de la cabeza de corte colgando de un banco o mesa de trabajo para obtener una lectura adecuada del nivel de aceite (Fig. 21). de Ilenado Fig.
Ranuras NOTA" El accesorio funcionando de corte no debe girar cuando el motor est_ en minima. 3. Si el accesorio de corte gira cuando el motor est& funcionando en minima, gire el tomillo de velocidad minima en sentido antihorario de a 1/8 de vuelta por vez (segen sea necesario) para reducir la velocidad minima. La inspecci6n del combustible, la limpieza del filtro de aire y el ajuste del tomillo de velocidad minima debe resolver la mayoria de los problemas del motor.
Brazos oscilantes Tuercas de ajuste 5. ENTRADA Instale una bujia de encendido con la separaci6n correcta en la cabeza del cilindro. Ajuste girando la Ilave de casquillo 16 mm (5/8 de pulgada) en sentido horatio hasta que este ajustada sin huelgo. Si usa una Ilave de torsi6n, ajuste a: 110-120 pulg.*libras (12.3-13.5 N.m). No ajuste demasiado. ESCAPE MANTENIMIENTO 1. 2. Galga Fig. 35 Tuerca de ajuste de escape 3. Brazo oscilante de escape 0.076-0.152 mm (0.003-0.006 in.
CAUSA ACClON El tanque de combustible est& vacio El motor estA inundado La bujia de encendido :hi :o Llene el tanque con combustible Use el procedimiento est& arruinada nueva de arranque Cambie o limpie la bujia de encendido _i I=1q _vA [Oilu[o];I #[o]IILIJ#[o][o]#r:l _ #11_Vfl I#I hVA r_,l El filtro de aire est_ obstruido Cambie o limpie el filtro de aire El carburador Tomar a un Craftsman o otro comerciante de servicio cualificado para el ajuste no est_ ajustado en forma correcta El com
I_ [O]il I[O]_T_il Tipo de motor ............................................................................................ Desplazamiento Enfriado por aire, 4 ciclos ....................................................................................... 1.77 pulgadas cQbicas (29 cc) R.P.M. de operaci6n ............................................................................................ R.P.M. de velocidad minima ...............................................................................
REPLACEMENT PARTS - MODEL 316.791910 4-CYCLE GAS TRIMMER \\ \ \\ 29
REPLACEMENT PARTS - MODEL 316.791910 4-CYCLE GAS TRIMMER Item 23 Pad No.
REPLACEMENT Item 1 2 3 4 5 6 7 8 9 10 11 12 13 14 15 16 17 18 19 20 21 22 23 24 25 * Part No.
Your Home product manuals and home solutions advice: For troubleshooting, anag www.managemyhome.com For repair - in your home - of all major brand appliances, lawn and garden equipment, or heating and cooling systems, no matter who made it, no matter who sold it! For the replacement parts, accessories and owner's manuals that you need to do-it-yourself. For Sears professional installation of home appliances and items like garage door openers and water heaters.