
Operator`s manual
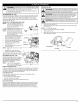

CLEANING THE RAPID REWIND TM HEAD
NOTE: Also perform these steps when replacing inner reel with a new
prewound reel.
Cleaning the Rapid Rewind TM may be necessary if:
• A jammed or excessive line must be removed
• The Rapid Rewind TM becomes difficult to wind or does not operate
correctly when bumping the head on the ground.
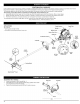
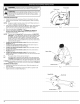
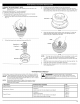
1. Hold the outer spool, and unscrew the bump knob counterclockwise
(Fig. 17).
3.
4.
5.
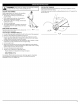
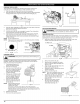
Pull the inner reel with existing line from the outer spool.
If rewinding with new line, remove any existing line from the inner reel
before cleaning. Remove any debris or grass from the knob, spring, inner
reel and foam seal. Wash the inner reel with warm soapy water (Fig. 19).
Inner
Fig. 19
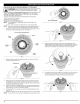
Clean the shaft and the inner surface of the outer spool. To clean the
shaft underneath the plunger, press down on the plunger (Fig. 20).
Remove any dirt or debris from the shaft.
2.
Fig. 17
Pull out the bump knob, spring and foam seal (Fig. 18).
Bump Knob _
Foam Seal _
• o -
Inner Reel__
Fig. 18
Shaft
Plunger _._
NOTE:
6.
7.
8.
9.
Fig. 20
The inner reel must be totally dry before reinstalling it into the outer
spool. Do not lubricate the inner reel or outer spool assembly.
Place the cleaned and empty or new prewound inner reel into the outer
spool.
Place the bump knob, spring and foam seal onto the inner reel (Fig. 18).
Press the bump knob down and tighten clockwise.
Install new line in the empty inner reel as described in Line Installation
for the Rapid Rewind TM.
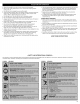
• MAINTENANCE SCHEDULE •
Perform these required maintenance procedures at the frequency stated in
the table. These procedures should also be a part of any seasonal tune-up.
NOTE: Some maintenance procedures may require special tools or skills.
If you are unsure about these procedures take your unit to a Sears
or other authorized service dealer.
NOTE: Maintenance, replacement, or repair of the emission control
devices and system may be performed by a Sears or other
authorized service dealer.
WARNING: To prevent serious injury, never perform
maintenance or repairs with unit running. Always service and
repair a cool unit. Disconnect the spark plug wire to ensure that
the unit cannot start.
FREQUENCY MAINTENANCE REQUIRED SEE
Every 10 hours Clean and oil air filter Page 10
Change oil Page 10
After the 1st 10 hours Check rocker arm to valve clearance and adjust Page 11
Change oil Page 10
Clean spark arrestor Page 12
Every 40 hours Check rocker arm to valve clearance and adjust Page 11
Check spark plug condition and gap Page 12
9