Operator's Manual M 2-Cycle WEEDWACKER® GAS TRIMMER Model No. 316.794400 UNBELIEVABLE STARTING E A S E _= ,, SAFETY * ASSEMBLY * OPERATION CAUTION: Before using this product, read this manual and follow all its Safety Rules and Operating instructions. Sears Brands Management * PARTS LIST * ESPANOL, R 19 Corporation, Visit our website: 769-07332 P00 * MAINTENANCE Hoffman Estates, IL 60179 U.S.A. www.craftsrnan.
TABLEOFCONTENTS Safety............................................... 2 Warranty............................................. 5 KnowYourUnit........................................ 6 Specifications ......................................... 6 Assembly ............................................. 7 OilandFuel........................................... 9 Starting andStopping .................................. 10 Operation ............................................ 11 Maintenance ............................
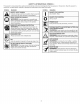
• iMPORTANT SAFETY iNSTRUCTiONS READ ALL iNSTRUCTiONS BEFORE OPERATING The trimmer attachment shield must always be in place while operating the unit. Do not operate unit without both trimming lines extended, and the proper line installed. Do not extend the trimming line beyond the length of the shield. This unit has a clutch. The cutting head remains stationary when the engine is idling. If it does not, take the unit to a Sears or other qualified service dealer for an adjustment.
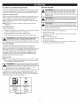
,,SAFETY & iNTERNATiONAL SYMBOLS ,, This operator's manual describes safety and international symbols and pictographs that may appear on this product. Read the operator's manual for complete safety, assembly, operating and maintenance and repair information. SYMBOL MEANING SYMBOL _ ,_ I Indicates ALERT danger, SYMBOL warning or caution. May be used in =oSAFETY conjunction with other symbols or pictographs.
CRAFTSMAN 2 YEAR FULL WARRANTY FOR 2 YEARS from the date of purchase, this product is warranted against any defects in material or workmanship. receive free repair or replacement if repair is unavailable. For warranty coverage details to obtain free repair or replacement, visit the web site: www.craftsman.com This warranty covers ONLY defects in material and workmanship.
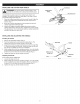
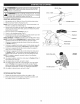
APPLiCATiONS Fuel As a trimmer: Cap Starter • Cutting grass and light weeds. Edging Rope Grip Decorative trimming around trees, fences, etc. Other optional accessories may be used with this unit. Shaft Grip ASSEMBLY TOOLS REQUIRED: On/Off Switch #2 Phillips screwdriver Handle Throttle Control Choke Lever Air Filter Cover Shaft Housing Primer Bulb Convertible Coupler TM Muffler Cutting Head Shield Spark Plug Cutting Line Cutting Blade Engine Type .........................................
iNSTALLiNG THE CUTTING HEAD SHIELD _ _ operate the unitTowithout cuttingpersonal head shield place. WARNING: preventthe serious injury,innever ] Cutting Head Shield Use the following instructions if the cutting head shield is not installed. Use only the instructions that apply to the type of shaft and shield equipped with this unit. 1. Place the cutting head shield onto the mount bracket. Align the holes in the cutting head shield with the holes in the mount bracket. (Fig. 1) 2.
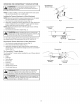
OPERATING THE CONVERTIBLE TM COUPLER SYSTEM I __J ] damage to the unit, shut the unit off before removing or WARNING: To avoid serious personal injury and installing attachment. NOTE: To make installing or removing the attachment the unit on the ground or on a work bench. installing the Trimmer Attachment 90° Edging Hole (Trimmer Only) I easier, place or Other Attachment NOTE: Remove the protective cap and gray spacer from the upper and lower shafts prior to assembling the attachment. 1.
FUELING THE UNiT OiL AND FUEL MiXiNG iNSTRUCTiONS The use of old and/or improperly mixed fuel is the most common cause of performance problems. Use only fresh, clean unleaded gasoline. Follow the instructions carefully for the proper gasoline/oil mixture. Definition of Blended WARNING: Gasoline is extremely flammable, ignited vapors may explode. Always stop the engine and allow it to cool before filling the fuel tank. Do not smoke while filling the tank.
Off (O) / Stop ! outdoor area. Carbon monoxide exhaust fumes can be I WARNING: lethal in a confined Operate area.this unit only in a well-ventilated I_ On (i)/Start [__J serious injury, the operator and the unit must be in a stable ARNING: starting position when Avoid pulling accidentally the starter rope (Fig.the 8). unit. To avoid STARTING J INSTRUCTIONS Throttle Control 1. Mix gasoline with oil. Refer to Oil and Fuel Mixing Instructions. 2. Fill the fuel tank. Refer to Fueling the Unit.
HOLDINGTHE TRIMMER body protection to reduce the risk of injury when operating| WARNING: Always wear eye, hearing, hand, foot and I this unit. J • Stand in the operating position (Fig. 9). Hold the shaft grip with the right hand. Keep the right arm slightly bent. Hold the handle with the left hand. Keep the left arm straight. Hold the unit at waist level. 1 ,_ Keep the cutting head parallel to the ground so that it easily contacts the grass without the need for bending over.
WARNING: To prevent serious injury, never perform maintenance or repairs while the unit is running. Always allow the unit to cool before servicing or repairing the unit. Disconnect the spark plug wire to prevent the unit from starting accidentally. MAINTENANCE Outer Spool Bolt Bump Knob SCHEDULE / Perform these required maintenance procedures at the frequency stated in the table. These procedures should also be a part of any seasonal tune-up.
Part 2 - Winding New Trimming Line onto the inner Reel = • A B If using single line, refer to Winding Single Line. If using split line, refer to Winding Split Line. If using a prewound inner reel, proceed to Part 3 - Installing the Inner Reel. Winding Single Line 1. Cut two 8-foot (2.4 m) lengths of new single trimming line. 2. Insert the end of one line into the top hole in the inner reel (Fig. 15A).
MAiNTAiNiNG THE AiR FILTER Choke Lever the engine and allow it to cool before cleaning or maintaining To avoid serious personal injury, always stop _ WARNING: the unit. 1 Screws Screws Failure to maintain the air filter can result in poor performance or can cause permanent damage to the engine. Engine failure due to improper air filter maintenance is not covered by the product warranty. Removing the Air Filter Cover 1. 2. Move the choke lever to Position 2 (Fig. 19).
ADJUSTING THE iDLE SPEED [die Speed Screw adjustments. Wear protective clothing and observe all The cutting head may spin during idle speed[ safety nstruct ons to prevent serous persona njury, j WARNING: NOTE: Careless adjustments can seriously damage the unit. A Sears or other qualified service dealer should make carburetor adjustments. if, after checking the fuel and cleaning the air filter, the engine still will not idle, adjust the idle speed screw as follows: 1. Start the engine.
CLEANING STORAGE • _ the engine and allow it to cool before cleaning or maintaining To avoid serious personal injury, always stop WARNING" the unit. J Use a small brush to clean the outside of the unit. Do not use strong detergents. Household cleaners that contain aromatic oils such as pine and lemon, and solvents such as kerosene, can damage plastic. Wipe off any moisture with a soft cloth. Never store a fueled unit where fumes may reach an open flame or spark.
PROBLEM SOLUTION The primer bulb was not pressed enough Press the primer bulb 10 times or until fuel is visible The fuel is old (over 30 days) and/or improperly mixed Drain the fuel tank and add fresh, properly mixed fuel The outside temperature Pull the starter rope up to 10-15 times is below 40 ° F The fuel is old (over 30 days) and/or improperly mixed Drain the fuel tank and add fresh, properly mixed fuel The fuel is old (over 30 days) and/or improperly mixed Drain the fuel tank and add fresh
Congratulations on making a smart purchase. Your new Craftsman@ product is designed and manufactured for years of dependable operation. But like all products, it may require repair from time to time. That's when having a Repair Protection Agreement can save you money and aggravation.
Manual del Operador M Motor de 2 tiernpos RECORTADORA WEEDWACKER® DE GASOLINA Modelo No. 316.794400 UNBELIEVABLE STARTING E A S E _= * SEGURIDAD * ENSAMBLAJE * OPERACION PRECAUCION: Antes de utilizar, este producto lea este manual y siga todas las reglas de seguridad e instrucciones de operaci6n. Sears Brands Management Corporation, Visite nuestro 769-07332 P00 * MANTENIMIENTO * LISTA DE PIEZAS Hoffman Estates, IL 60179 U.S.A. sitio web: www.craftsman.
TABLA DE CONTENIDO Seguridad ............................................ Garantia .............................................. Conozca su unidad ..................................... 2 5 6 Especificaciones ....................................... Ensamblaje ........................................... Aceite y combustible .................................... Arranque y parada ..................................... Operaci6n ........................................... Mantenimiento ........................
• INSTRUCCIONES LEA TODAS LAS INSTRUCCIONES LA UNIDAD _ • DE SEGURIDAD ANTES DE OPERAR Lleve puestas gafas o lentes de seguridad que cumplan las normas ANSI Z87.1 y esten marcados como tales. Use siempre protecci6n para los oidos al operar esta unidad. Si la operaci6n levanta polvo, Ileve puesta una mascara facial o contra el polvo. Use pantalones largos y gruesos, botas, guantes y camisa de mangas largas. No use ropa holgada, alhajas, pantalones cortos, sandalias ni ande descalzo.
• Espere aqueelmotorseenfrieparaguardar otransportar la unidad. Cerci6rese deasegurar bienlaunidad altransportarla. Guarde launidad enunlugarseco,bajoIlaveo enalto,afinde evitarsuusonoautorizado odafio.Mantengala fueradel alcance delosnifios. Nomojenirocielaunidad conaguaniconningQn otroliquido. Mantenga losmangos secos,limpios y sinsuciedades. Limpiela unidad despues decadauso,consulte lasinstrucciones de Limpieza y almacenamiento. Guarde estas instrucciones.
GARANTiA TOTAL Este producto defectuoso se Para conocer Esta garant{a POR 2 ANOS DE CRAFTSMAN se garantiza contra defectos de materiales o mano de obra POR 2 AN©S a partir de la fecha de compra. Un producto reparara sin costo alguno o se remplazar& si no es posible repararlo. los detalles de la cobertura de garant{a para la reparaci6n o reemplazo gratuitos, visite el sitio web: www.craftsman.com cubre SOLAMENTE defectos de materiales o mano de obra.
usos Tapa deJ tanque de combustible Como recortadora: Agarre de la cuerda de • arranque EmpuSadura deJ eje Cortar cesped y malas hierbas escasas. Orillar (bordear) Hacer recortes decorativos alrededor de arboles, cercas, etc. Con esta unidad se pueden utilizar otros accesorios opcionales.
INSTALACI()N DEL PROTECTOR DEL CABEZAL DE CORTE \ TornilJos (2) Protector del cabezal de corte I_ graves, no opere nunca la unidad sin el protector del _ADVERTENClA: Para evitar lesiones personales cabezal de corte colocado. ] Soporte de montaje Si el protector del cabezal de corte no esta instalado, siga las instrucciones a continuaci6n. Siga solamente las instrucciones que correspondan al tipo de eje y protector con que esta equipada esta unidad. 1.
OPERAR EL SISTEMA DE ACOPLADOR CONVERTIBLE TM Orificio y da_os a la unidad, apague la unidad antes de quitar o DVERTENClA: Para evitar lesiones personales gravesj instalar cualquier accesorio. __J de 90 ° para bordeadora (solo recortadora) NOTA: Para facilitar la instalaci6n o remoci6n de un accesorio, coloque la unidad sobre el suelo o sobre un banco de trabajo.
INSTRUCCIONES COMBUSTIBLE Mezclar el combustible PARA MEZCLAR EL ACEITE Y EL NOTA: Esta unidad trae un frasco de 3.2 onzas de aceite para motor de 2 tiempos. Para que la mezcla de combustible descrita anteriormente sea la correcta, echele la botella completa a un gal6n de gasolina sin plomo. El uso de un combustible viejo y/o mal mezclado es la causa mas comQn de problemas de funcionamiento. Utilice solamente gasolina fresca, limpia y sin plomo.
Apagado _ (O} / Parada a.rea exterior bien ventilada. El mon6xido de carbono de ADVERTENClA: unidad solamente en un los gases de escape Opere puede esta ser letal en un Area confinada. Encendido ( I ) / Arranque _ accidente. A fin de evitar lesiones graves, el operador y la unidad deben estar en una posici6n estable al tirar de la DVERTENOIA: Evite arrancar la unidad por cuerda de arranque (Fig. 8). INSTRUCClONES DE ARRANQUE 1. Mezcle la gasolina con el aceite.
SOSTENER LA RECORTADORA puesta protecci6n para los ojos, oidos, pies y cuerpo a fin ADVERTENCIA: AI lesiones. operar esta unidad, Ileve siempre de reducir el riesgo de • ] Parese en la posici6n de operaci6n (Fig. 9). Sostenga la empufiadura del eje con la mano derecha. Mantenga el brazo derecho ligeramente flexionado. Sujete el mango con la mano izquierda. Mantenga el brazo izquierdo recto. Sujete la unidad a la altura de la cintura.
ADVERTENClA: Para evitar lesiones graves, no haga nunca ningQn mantenimiento ni reparaci6n con la unidad funcionando. Siempre deje que la unidad se enfrie antes de darle mantenimiento o repararla. Desconecte el cable de la bujia para evitar que la unidad arranque por accidente. Bobina exterior _. Perno Perilla percusiva PLAN DE MANTENIMIENTO Lleve a cabo los procedimientos necesarios de mantenimiento con la frecuencia indicada en la tabla.
Parte2 = • Enrollar la nueva I{nea de corte en el carrete interior A Si usa una sola linea, consulte Enrollar una Ifnea sola. Si usa una linea dividida, consulte Enrollar una Ifnea dividida. Siesta usando un carrete interior prebobinado, pase a la Parte 3 - Instalar el carrete interior. B Pared separadora Enrollar una linea sola 1. Corte aproximadamente linea de corte sola. 2. 8 pies (2.41 m) de largo de una nueva Inserte el extremo de la linea en el agujero superior del carrete interior (Fig. 15A).
MANTENIMIENTO DELFILTRO _ DE AIRE PaJancadeJ obturador Posicibn 2 apague siempre el motor y deje que se enfrie antes de ADVERTENCIA: Para evitar limpiar o dar mantenimiento a la lesiones unidad. personales graves, i TornilJos TornilJos No dar mantenimiento al filtro de aire correctamente puede hacer que el motor funcione mal o da5arlo para siempre. La falla del motor debida al mantenimiento inadecuado del filtro no esta cubierta pot la garantia del producto. Quitar la tapa del filtro de aire 1. 2. 2.
AJUSTAR LA VELOCIDAD DE MARCHA EN VACiO Tornillo ADVERTENClA: El cabezal de corte puede girar durante los ajustes de marcha en vacio. Use ropa de protecci6n y observe todas las instrucciones de seguridad para evitar lesiones personales graves. NOTA: Los ajustes negligentes pueden dafiar seriamente la unidad. Los ajustes del carburador debe hacerlos un distribuidor de Sears u otto distribuidor de servicio calificado.
LIMPIEZA ALMACENAMIENTO • _ graves, apague siempre el motor y deje que se enfrie antes Para evitar alesiones personales j deDVERTENClA: limpiar o dar mantenimiento la unidad. Use un cepillo pequedo para limpiar la unidad pot fuera. No utilice detergentes fuertes. Los limpiadores caseros que contienen aceites esenciales, por ejemplo, de pino y lim6n, y los solventes como el queroseno, pueden dadar el plastico. Sequela humedad con un pado suave.
PROBLEMA SOLUCION La pera del cebador no se oprimi6 Io suficiente Oprima la pera del cebador 10 veces o hasta que se vea el combustible El combustible estb, viejo (tiene mas de 30 dias) y/o mal mezclado Vacie el tanque de combustible y eche combustible nuevo bien mezclado La temperatura exterior es inferior a 40 ° F Tire de la cuerda de arranque de 10 a 15 veces El combustible esta viejo (tiene mas de 30 dias) y/o mal mezclado Vacie el tanque de combustible y eche combustible nuevo bien mezclado
Felicitaciones por haber hecho una compra inteligente. Su nuevo producto Craftsman@ fue dise_ado y fabricado con vistas a una operaci6n confiable por a_os. Pero como todos los productos, es posible que sea necesario repararlo alguna vez. Ahi es cuando tener un Convenio de Protecci6n de Reparacidn puede ahorrarle dinero y problemas.
REPLACEMENT PARTS - MODEL 316.794400 2-CYCLE GAS TRIMMER item Part No. Description 1 2 753-04511 791-180350B Air Cleaner Cover Assembly (includes 2 & 25) Air Cleaner Filter 3 4 5 6 791-180351 791-180226 753-04418 753-04419 Carburetor Mounting Screw Assembly Wavey Washer Choke Lever Assembly Choke Plate Assembly (includes 5) 7 8 753-05133 791-610675 item Part No.
REPLACEMENT Item Part No. Description 1 2 3 4 5 753-06790 753-06791 791-182690 791-182405 753-06682 Throttle Housing Assembly (includes 2-4) Throttle Trigger Throttle Trigger Spring Switch 6 7 8 9 10 11 753-05461 791-181587 753-06793 791-182057 791-181617 791-181981 12 13 14 15 16 17 753-04386 753-06789 753-05267 753-05698 753-06571 753-06125 18 19 2O 21 22 23 753-06123 753-06126 753-04284 791-610660 791-610317B 753-1155 24 791-153066B 753-1156 791-682075B PARTS - MODEL 316.
Your Home product manuals and expert advice: For troubleshooting, managemylife www.managernylife.com For repair - in your home - of all major brand appliances, lawn and garden equipment, or heating and cooling systems, no matter who made it, no matter who sold it! For the replacement parts, accessories and owner's manuals that you need to do-it-yourself. For Sears professional installation of home appliances and items like garage door openers and water heaters.