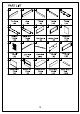
PART LIST Upper Left Upper Right Right Back Top Panel Shelf Panel Panel Panel 1PC 1PC 1PC 1PC 1PC Left Back Middle Back Lower Left Panel Panel Seat Panel Bottom Panel Panel 1PC 1PC 1PC 1PC 1PC Lower Right .
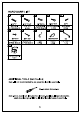
HARDWARE LIST #3] [#4] #5 | /41" ®1/4™1 3/8" ©8™30mm ol Short Bolt Long Bolt Wood Dowel Round Head Bolt Short Screw 16 PCS (Extra 2) PCS 24 PCS (Extra 2) 6 PCS 8 PCS 23*16mm a4*1 1/2" L85xW30xH27 M4 Screw Long Screw Hook Handle Allen Wrench 54 PCS (Extra 2)| 12 PCS (Extra 2) PCS PCS 1PC Safety Strap Kit 1ST ADDITIONAL TOOLS (Not Provided) Note: It is not recommended to use power tools during assembly. % Phillips Head Screwdriver Note: Wood dowels are intended for alignment.
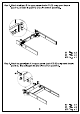
Step 1. Attach drawer bottom rails (part T), drawer left panel (part Q) and drawer right panel (part P) to drawer front panel (part O) using wood dowels (part #3), short screws (part #5) and fillips head screwdriver. Step 2. Insert drawer bottom pane!l (part R) to assembled unit (parts Attach drawer back panel (part S) to assembled unit (parts using wood dowels (part #3), short screws (part #5) and fillips head screwdriver.
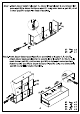
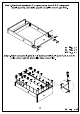
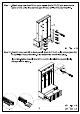
Step 3. Attach shelf (part B) to upper panels (parts C & D) using wood dowels (part # 3), short bolts (part #1) and Allen wrench (part #10). Step 4. Attach top panel (part A) to upper panels (parts C & D) using wood dowels (part # 3), long bolts (part #2) and Allen wrench (part #10).
Step 5. Attach seat panel (part H) to upper panels (parts C & D) using wood dowels (part #3), short bolts (part #1) and Allen wrench (part #10). #1 #3 #10 Step 6. Attach back panels (parts assembled unit (parts A, B, C, using screws (part #6) and fillips head screwdriver.
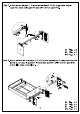
Step 7. Attach lower rail (part L) to lower panels (parts J & K) using wood dowels (part # 3), short bolts (part #1) and Allen wrench (part #10). #1005y x1 Step 8. Attach assembled unit (parts seat panel (part H) using wood dowels (part # 3), short bolts (part #1), long screws (part #7), Allen wrench (part #10) and fillips head screwdriver.
Step 9. Attach bottom panel (part ) to lower panels (parts J & K) using wood dowels (part #3), short bolts (part #1) and Allen wrench (part #10). Step 10. Carefully turn unit upright. Attach lower back panel (part N) to seat panel (part H) and bottom panel (part 1) using screws (part #6) and fillips head screwdriver.
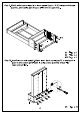
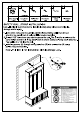
Step 11. Attach upper rails (part M) to upper panels (parts C & D) and lower panels (parts J & K) using long screws (part #7) and fillips head screwdriver. # ™~ x10 v OUGHT Step 12. Attach hooks (part #8) to back panels (parts using screws (part # 6) and fillips head screwdriver. Slide assembled drawer into place. Important: Safety strap kit (part #11) must be installed to prevent tipping, damage and/or injury.
#11] mm%m Safety Wall Safety Strap Kit Long Screw Wall Anchor Short Screw Strap Flat Washer 1ST 1PC 1PC 1PC 1PC 1PC SAFETY WALL STRAP INSTALLATION Note: It is highly recommended to install this safety strap kit to prevent tipping, damage and/or injury. 1. Insert short screw (C) through flat washer (E) and safety wall strap (D) and attach to top panel (part A) using fillips head screwdriver. 2. Drill a 11/32" hole where you want to secure the unit.