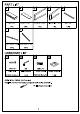
PART LIST ADDITIONAL TOOLS (Not Provided) Note: It is not recommended to use power tools during assembly.
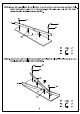
Step 1. Lay bottom panel (part B) upside down on a soft surface, such as carpet, as shown below. Attach front bottom rail (part F) to bottom panel (part B) using Allen bolts (part #1), wood dowels (part #3) and Allen wrench (part #2). #3 amm x2 Step 2. Attach back bottom rail (part G) to bottom panel (part B) using Allen bolts (part #1), wood dowels (part #3) and Allen wrench (part #2).
Step 3. Attach assembled unit (parts and back rail (part E) to left side frame (part C) and right side frame (part D) using Allen bolts {part #1), wood dowels (part #3) and Allen wrench (part #2). Step 4. Lay top panel (part A) upside down on a soft surface, such as carpet, as shown below. Attach assembled unit (parts top panel (part A) using Allen bolts (part #1), wood dowels (part #3) and Allen wrench (part #2).
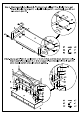
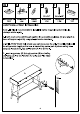
3/4" D8 x Safety Strap Kit| Wall Anchor Washer Short Screw Long Screw | Safety Wall Strap| 1PC 1PC PCS 1PC 1PC 1PC SAFETY WALL STRAP INSTALLATION Note: It is highly recommended to install this safety strap kit to prevent tipping, damage and/or injury. 1. Insert short screw (C) through washer (B) and safety wall strap (E) and attach to back of top panel (part A) using fillips head screwdriver. 2. Drill a hole where you want to secure the unit.