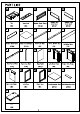
PART LIST B < & Top 1PC Drop Leaf 1pPC Drawer Front Panel PCS Drawer Left Side Panel PCS Drawer Right Side Panel PCS ~ Drawer Back Panel |Drawer Bottom Panel Front Top Rail Front Middle Rail PCS PCs 1PC 1PC 1PC Back Bottom Rail Partition Rail Back Panel Left Side Frame Right Side Frame 1PC 1PC PCS 1PC 1PC Partition Panel Left Door Right Door Big Adjustable Shellfish Adjustable Shelf 1PC 1PC 1PC PCS PCS
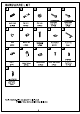
HARDWARE LIST Tools needed: Allen key (part#11) (included) Phillips Head Screw Driver (Not included) Long Round Short Round Wood Dowel Cam Bolt Cam Lock Head Bolt Head Bolt PCS 18 PCS 18 PCS 4 PCS 6 PCS Knob Barrel Nut H::asdosgzt Flat Washer Allen Key PCS 6 PCS 6 PCS 6 PCS 1PC Pin Hi Short Flat Magnet (Sage 11:25:5) Shelf Holder Round Head Screw Head Sc rem 2PC 4 PCS 24 PCS 4 PCS 16 PCS Long Flat Head Screw 1PC
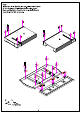
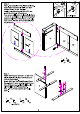
Step 1 Insert Cam Bolts (Part #2) into per-drilled holes of parts using a Phillips head screw driver.Attach Drop Leaf(Part B) to Top (Part A} using Short Round Head Bolts(Part #5) as shown.
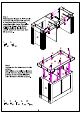
Step 2 Note Two people are required for this step. Attach Back Top Exterior Rial (J) & Back Bottom Rail (K} to the Partition Rail (L) with Wood Dowels (Part #1), and insert Back Panels (M) as shown. One person will need to hold assembled Parts J,K,L & M up straight, while the other person attaches Side Frame N fo Parts J & K using Cam Locks (Part #3) & Wood Dowels (Part #1) as N ™~ Step 3 Attach the Magnets (Part #11) to the Front Middle Rail (I) using Round Head Screws (Part #14) as shown.
Step 4 Attach assembled parts Side Frame (N) with Wood Dowses (Part #1) & Cam Locks (Part #3) as shown. Attach Right Side Frame (O) to Back Top Exterior Rail (J) ,Back Bottom Rail(K) & Rail (H & 1) using Wood Dowels (Part #1) & Cam Locks (Part #3) as shown. Step 5 Carefully turn the cabinet over on a flat surface. Attach Base (U) to cabinet using Wood Dowels (Part #1), Barrel Nuts (Part #7), and Hex Socket Head Bolt(Part #8) with Flat Washer (Part #9) as shown.
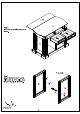
Carefully turn the cabinet over with the base on a flat surface. Place the assembled Top (Parts A&B) onto the cabinet and attach using Cam Locks (Part #3) as shown.
15 ‘X4 15 T Step 7 Attach Knob (Part #6) to the Drawer Front Panel (C) using Long Round Head Bolt (Part #4). Using Short Flat Head Screws (Part #15) ,attach the Left & Right Side Panels (D&E) to the Drawer Front Panel (C). Insert Drawer Bottom Panel (G) into the groove as shown. Using Short Flat Head Screws (Part #15), attach Drawer Back Panel (F) to Drawer Side Panels (D&E) . NOTE Be sure that roller wheels on drawer glides are at the back side of the assembled drawer.
Step 8 Ins: ert the ass n. Round Head Bolts (Part #4).
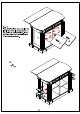
gxu insert Shelf Holders (Part #13) into the 13 interior and exterior storage areas of he cabinet at desired heights. Insert he Big Shelves (S) & Small Shelves T) into place as shown.
Step 11 Attach doors (Q&RY) to the cabinet by placing bottom Pin Hinge into per-drilled holes at the bottom & depressing the top spring loaded Pin Hinge to fit the doors into place. Note:Be sure Pin Hinges (top & bottom) have fully extended into the per-drilled holes to secure the doors into place. Congratulations! You are finished.